
Flooring Installation Mistakes in India: The Costly Errors That Make Floors Tent, Drum and Lift
The ten most expensive flooring-installation mistakes Indian homeowners pay for twice — skipped expansion joints, hollow tiles, lippage, laying on green concrete and more — with the fix for each.
A flooring job looks finished the day the mason packs up. The mistakes show up three weeks, three months or three monsoons later — a row of tiles that suddenly arches and pops with a gunshot crack, a floor that goes "tock-tock-tock" hollow underfoot, a bathroom that pools water in the wrong corner, a wooden floor that cups into tiny waves. Almost none of this is bad luck. It is bad installation, and nearly all of it is preventable for a few rupees per square foot at the right moment. This guide walks through the ten costliest flooring-installation mistakes we see in Indian homes — mistake, consequence, fix — so you can catch them before the labour leaves site.
Why installation matters more than the material
Indian buyers obsess over the tile, the marble grade, the brand of laminate — and then hand the laying to whoever the builder or showroom sent, unsupervised. That is backwards. A ₹120/sq ft vitrified tile laid badly will fail; an ₹60 tile laid correctly will last decades. The material is bought once. The installation is what you actually live on.
The brutal economics: redoing a failed floor is rarely a patch job. Lifting tiles damages adjoining ones, the screed comes up with them, furniture must be moved out, and you pay full labour and material a second time — often ₹100-250/sq ft to demolish and relay, plus weeks of disruption. Getting it right the first time costs almost nothing extra. Most fixes below add ₹5-40/sq ft at most, and several are free — they are just a matter of insisting the work be done in the right order.
The ten costliest mistakes — and the fix for each
| # | Mistake | What goes wrong (consequence) | The fix |
|---|---|---|---|
| 1 | No expansion / movement joints | Tiles have nowhere to expand in summer heat; the floor arches, "tents" and pops with a loud crack — usually large vitrified tiles | Leave an 8-10 mm perimeter gap hidden under skirting; add intermediate movement joints every ~20-25 sq m or 8-10 m, at all doorways and over structural joints; fill with flexible sealant |
| 2 | Hollow / drummy tiles (low adhesive coverage) | Less than 80% of the tile back is bonded; tiles sound hollow, crack under point loads, and lift; voids trap water | Use the right notched trowel; back-butter large-format and PGVT tiles so both surfaces are coated; press and beat in; aim for 80%+ coverage (95% in wet areas) |
| 3 | Lippage (uneven tile edges) | Adjacent tiles sit at different heights; sharp lips you stub toes on, collect dirt, look amateur — worst with large rectified tiles | Use a tile-leveling system (clips + wedges) plus 2-3 mm spacers; flatten the bed first; do not rely on eye alone for big tiles |
| 4 | Laying on green / damp concrete | Tiles fixed to a slab that is still curing or wet; the slab shrinks and moves under them, breaking the bond → hollowness, cracks, efflorescence | Let new RCC/screed cure ~21-28 days; check moisture is low and stable before fixing; never tile a slab poured last week |
| 5 | No slope or waterproofing in wet areas | Bathroom, balcony or utility floor holds standing water, seeps into the slab, leaks to the floor below, breeds mould and slip hazards | Lay a waterproofing membrane (per IS 2645 practice), then a fall of ~1:80 to 1:100 toward the drain; ponding-test before tiling |
| 6 | Grouting too soon | Grout filled before the adhesive has set traps moisture and disturbs alignment → weak, cracking, discoloured joints and shifted tiles | Wait ~24 hours after tiling before grouting; keep foot traffic off for 24-48 h and heavy loads off for ~7 days |
| 7 | No DPM under wood on concrete | Slab moisture rises into laminate/engineered/solid wood; planks swell, cup into waves and lift at the edges | Lay a 200-micron PE damp-proof membrane (plus foam/IXPE underlay) over concrete; acclimatise planks 48 h on site; leave an 8-12 mm expansion gap at walls |
| 8 | Wrong adhesive grade | Standard C1 used for large-format, exterior, or tile-over-old-tile work where it cannot flex/hold → debonding and hollow tiles | Match the grade to the job: C1 for standard interior small tiles; C2 (flexible, high-polymer) for large format, exteriors, wet areas and over old surfaces |
| 9 | No dry layout (sliver tiles) | Tiling started from a wall without planning; the run ends in ugly 2 cm "sliver" cuts and an off-centre, lopsided pattern | Do a dry layout first: find the centre lines, balance cuts to both ends, keep cut tiles half-width or larger, and hide them under furniture/low-traffic edges |
| 10 | No spare box / dye-lot mismatch | One tile cracks years later; the exact shade is discontinued or from a different batch → a glaring patch or a re-do of the whole area | Buy 5-10% extra from the same shade/dye-lot and store it labelled; the spare box is your cheapest insurance against a future eyesore |
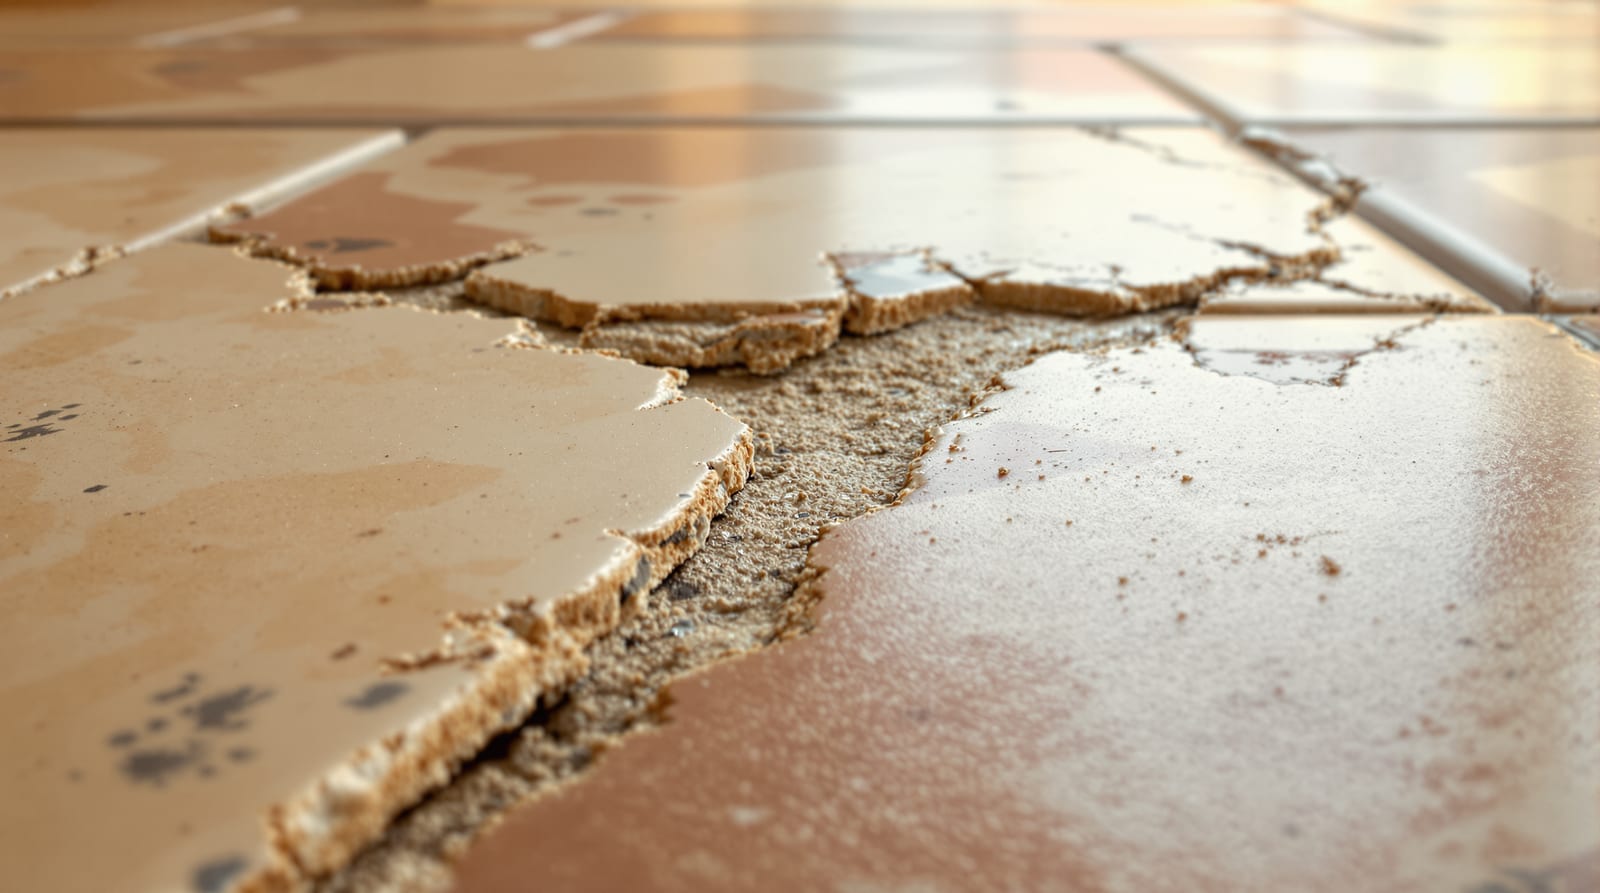
The hollow-tile mistake, illustrated
The single most common failure we see in Indian flat-buyer homes is the hollow tile — the floor that drums when you tap it. It happens when the mason spreads a thin, ridged layer of adhesive (or, in the old "dot-and-dab" method, just five blobs of mortar) so that the tile rests on ridges or dots with big air gaps underneath. Those voids are weak points: a heavy footstep, a dropped vessel or a dragged sofa cracks the tile, and water that gets into a joint sits in the void and rots the bond. The fix is full-bed coverage — comb the adhesive with the correct notched trowel, back-butter the underside of large and polished tiles, then press and tap the tile down so the ridges collapse into a near-solid bed. The diagram below shows the difference.
A quick site test: after a few days, tap a coin across the floor. A solid, bright "tick" means good bedding; a deep, hollow "tock" means voids. Walk the floor before the labour leaves and flag any tiles that drum — at that stage they can be lifted and re-set cheaply.
How much these fixes actually cost
None of these are expensive insurance. The table below shows the indicative add-on for doing it right, against the cost of redoing it later (indicative, varies by city and vendor; add 18% GST on materials).
| Right-first-time fix | Typical add-on | Cost of failing instead |
|---|---|---|
| Tile-leveling clips + spacers (anti-lippage) | ₹8-20 / sq ft | Relay area: ₹100-250 / sq ft + disruption |
| Flexible C2 adhesive vs standard C1 | ₹5-15 / sq ft | Debonded floor relaid: ₹100-250 / sq ft |
| 200-micron DPM + foam underlay under wood | ₹10-30 / sq ft | New planks, cupped floor scrapped: full re-do |
| Waterproofing membrane + correct slope | ₹40-90 / sq ft | Leak to flat below + repairs: ₹ tens of thousands |
| Extra 5-10% spare tiles (same dye-lot) | One extra box | Mismatched patch or whole-room re-do |
A homeowner's site checklist
You do not need to be a mason to supervise. Insist on these, in order, and most failures vanish:
- Slab fully cured (~21-28 days) and dry before tiling begins; no laying on last week's pour.
- A dry layout chalked out, centre lines marked, sliver cuts balanced — approved by you before fixing.
- Correct adhesive grade on site (C2 for large format, wet and exterior areas), not just whatever was cheapest.
- Large and polished tiles back-buttered; coverage checked; no drummy tiles when you coin-tap.
- Leveling clips used on big tiles; run a straightedge to check for lippage.
- Perimeter gap left under skirting and movement joints planned, not skipped.
- In wet areas: waterproofing down, slope to drain, ponding test passed before tiles go on.
- Under wood: DPM laid, planks acclimatised 48 h, expansion gap at walls.
- Grouting only after ~24 h; floor protected from traffic and loads while it sets.
- A labelled spare box of every tile handed to you at handover.
For the underlying methods behind these fixes, read our step-by-step on how to lay floor tiles, the deep dives on floor expansion joints and tile leveling and spacers, and subfloor preparation. If you are inspecting a builder's flat rather than commissioning new work, our guide on how to evaluate a builder floor before buying shows you how to spot these same defects during a site visit. To budget the job, the Studio Matrx flooring installation cost calculator helps you plan labour and materials in one place.
Frequently asked questions
Why do my floor tiles sound hollow when I tap them?
Because less than about 80% of the tile back is actually bonded to the adhesive — there are air voids underneath, usually from a thin combed bed or the old five-blob dot-and-dab method. Hollow tiles are weak and crack or lift over time. The fix is full-bed coverage with back-buttering of large and polished tiles. Catch drummy tiles by coin-tapping the floor before the labour leaves.
Why did a row of my tiles suddenly crack and lift up on their own?
That is "tenting" — the floor expanded in summer heat with nowhere to go because no expansion or movement joints were left. The tiles push against each other until they arch and pop, often with a loud crack. It is most common with large vitrified floors. There is no cheap patch; the area must usually be relaid with a perimeter gap and intermediate movement joints designed in.
Can I tile straight onto a freshly laid concrete slab?
No. Green concrete is still curing, shrinking and releasing moisture; tiling onto it breaks the bond and traps water, causing hollowness, cracks and efflorescence. Let the slab cure for roughly 21-28 days and confirm it is dry and stable before fixing tiles or wood.
How many spare tiles should I keep?
Buy 5-10% extra from the same shade and dye-lot and store the box labelled. Tile shades vary between production batches, so if one tile cracks years later you cannot rely on buying a match — the exact lot is usually discontinued. The spare box is the cheapest insurance against an obvious patch or a full re-do.
Why is my wooden floor cupping into little waves?
Moisture is rising from the concrete slab into the planks because no damp-proof membrane was laid, or the planks were not acclimatised and no expansion gap was left. Wood swells, lifts at the edges and cups. Prevention is a 200-micron PE DPM over concrete, 48 hours of on-site acclimatisation, and an 8-12 mm gap at the walls.
Export this guide
Related Guides — Deep-dive reading
How to Lay Floor Tiles in India: Complete Step-by-Step Guide
A practical, mason-grade walkthrough for tiling an Indian home floor — base check, dry layout, adhesive vs mortar bed, leveling, lippage and grouting.
Flooring & SurfacesTile Leveling System and Spacers in India: Dead-Flat Floors, Even Joints, No Lippage
How tile spacers set even 2-3 mm joints and a tile leveling system (clips plus wedges or caps) kills lippage on large-format and vitrified floors.
Flooring & SurfacesWooden Floor Installation in India: Nail-Down, Glue-Down & Floating Methods
How solid and engineered wood floors are actually laid in Indian homes — acclimatising planks, moisture barriers, the three fixing methods, expansion gaps and labour rates that decide whether your floor stays flat or cups.
Flooring & SurfacesRelated Tools — Try Free
Flooring Cost Calculator
Estimate the all-in cost of a floor — material, laying, wastage, skirting and GST — by area and material.
Flooring CalculatorMonsoon-Readiness Checklist
Pre-rain home audit across 9 categories — terrace, drains, waterproofing, electrical, HVAC, pest, vehicles, documents.
Seasonal AuditTile Adhesive Calculator
Estimate tile adhesive bags and cost by area and bed thickness, for floor or wall tiling jobs.
Flooring Calculator