
Sliding Door Track Installation: Top-Hung vs Bottom-Roll (India 2026)
How to install a sliding door track in India — top-hung versus bottom-rolling systems, levelling and fixing to lintel/wall, setting rollers, anti-jump and floor guides, and soft-close.
A sliding door is only as good as the track it runs on, and a clean, silent slide is won or lost in the first hour of fitting. Sliding door track installation is a precision job: the track must be dead level, fixed to something that will not sag, the rollers set to hang the leaf square, and an anti-jump catch and floor guide added so the door cannot lift off or swing out at the bottom. Get the level wrong by a few millimetres over two metres and the door creeps open or shut on its own; skip the floor guide and the leaf rattles. This guide is the carpenter's and site engineer's reference for installing a sliding track in India — internal pocket door, wardrobe slider, or heavy patio leaf — covering top-hung versus bottom-rolling systems, fixing to the lintel or wall, setting rollers, anti-jump and floor guides, soft-close, and the final alignment. This is the install playbook; if an existing slider has gone noisy or stiff, the fix lives in sliding door roller repair and sliding door track cleaning instead.
Top-hung versus bottom-rolling: choosing the system
The first decision in any sliding door track installation is which system carries the weight. In a top-hung system the entire weight of the leaf hangs from a top track via roller carriages; the floor only has a small guide that stops the bottom swinging. In a bottom-rolling system the leaf stands on wheels that run in a bottom track, and a top channel or guide simply keeps it upright. Each suits different situations.
| Feature | Top-hung | Bottom-rolling |
|---|---|---|
| Load path | Leaf hangs from top track | Leaf stands on bottom track |
| Best for | Internal doors, barn doors, heavy patio leaves | Wardrobes, light cupboard shutters |
| Floor | Clean, no raised track (just a guide pin/channel) | Bottom track collects dust/grit |
| Header needed | Strong fixing to lintel/timber header essential | Less critical at top |
| Smoothness | Stays smooth (no floor dirt on wheels) | Stiffens as bottom track fouls |
| Soft-close | Easy to add to top track | Available on better systems |
| Accessibility | Flush floor, no threshold trip | Bottom track is a small trip lip |
As a rule of thumb, prefer top-hung wherever the door is heavy, used a lot, or where a flush, trip-free floor matters (internal sliders, patio doors). Choose bottom-rolling for wardrobes and light shutters where the cabinet itself carries the top guide. For accessibility, top-hung wins: a bottom track is a raised lip, and the RPwD Act 2016 Harmonised Guidelines favour a flush, ≤12-13mm threshold across any doorway people pass through.
What the track fixes to: lintel, header and wall
A sliding track is only as steady as its backing. For a top-hung door the track must be fixed to something that will not deflect under the hanging weight — a concrete lintel, an RCC band, a structural timber header, or a steel section bolted across the opening. For internal openings this is often a planted timber header (a stout batten, ~50-75mm thick) fixed to the lintel/wall above the opening, which also brings the track forward of the wall so the leaf clears the architrave.
- Onto an RCC lintel or concrete wall: drill and fix with metal anchor bolts or sleeve anchors at ~300-450mm centres; never rely on plastic rawl plugs alone for a heavy leaf.
- Onto a timber header: screw the track with full-thread woodscrews into solid timber, not plaster or hollow lining.
- Onto drywall/partition: never fix a sliding track to plasterboard alone — fix to noggins/studs or a planted timber header bridging studs; see the cautions in door frame drywall fixing.
- Track height: set the track so the hung leaf clears the finished floor by the chosen undercut plus the floor-guide gap — see door undercut clearance.
A bowed or under-fixed header is the most common cause of a slider that binds mid-travel, because the track sags between fixings under load. Pack behind the fixings if the wall face is uneven so the track stays straight.
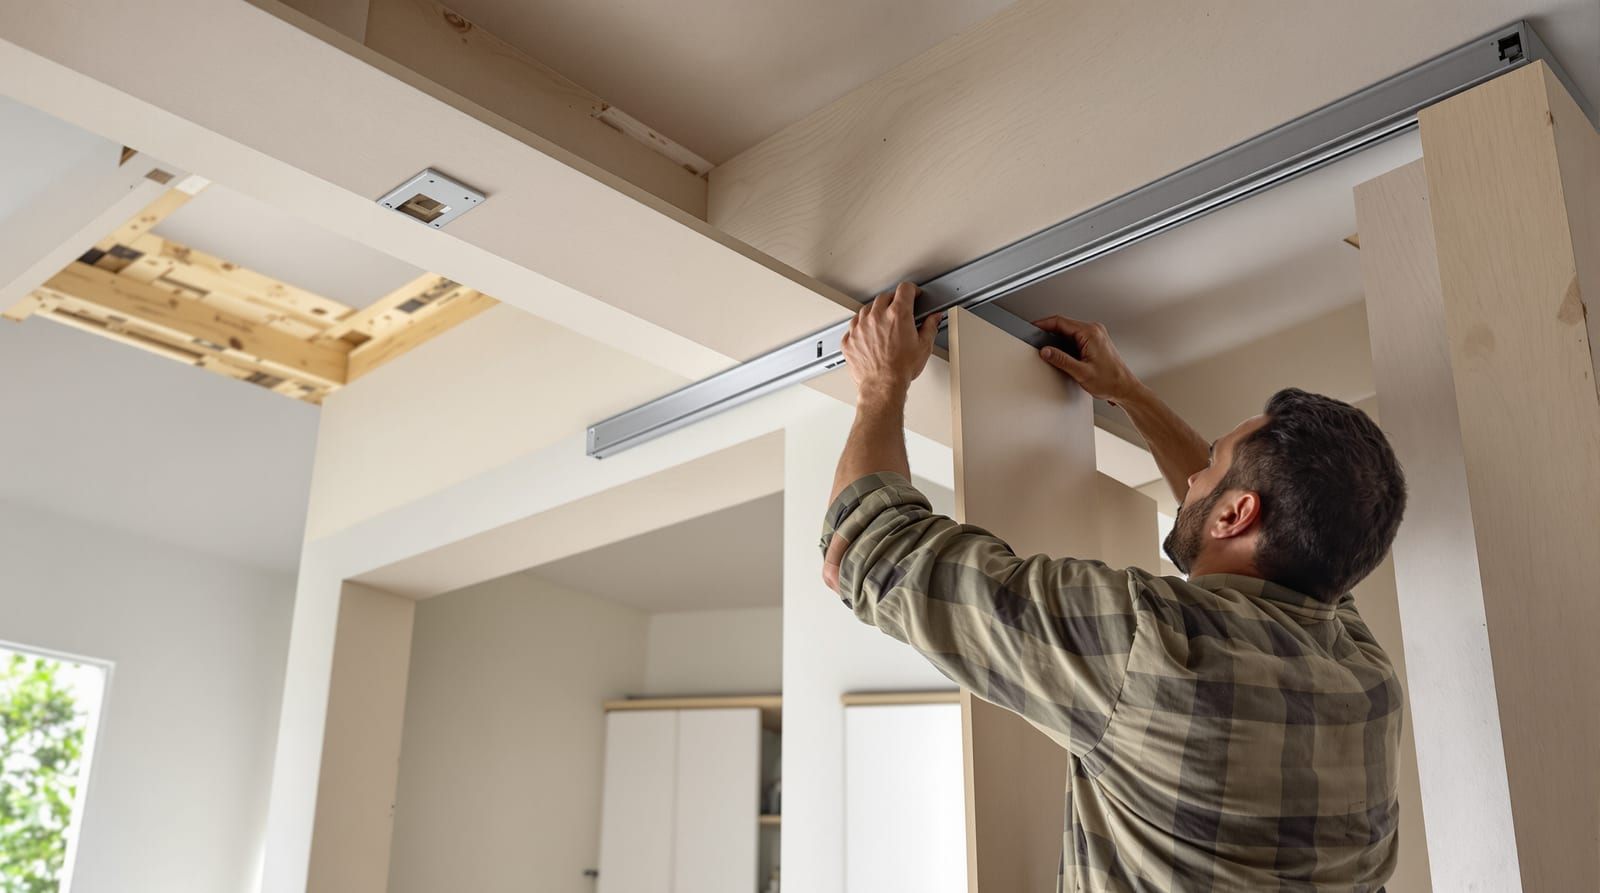
Levelling the track — the make-or-break step
The single most important act in a sliding door track installation is getting the top track dead level. A sliding leaf has no latch holding it in place, so gravity rules: if one end of the track is even slightly lower, the door will roll towards that end on its own. Use a long spirit level (or a laser line) along the full length of the track, not a short level that can read true on a localised hump.
- Mark a level datum line across the wall first, then fix the track to that line, packing behind it where the masonry is out of true.
- Check the track is level end to end and front to back — a track tilted forward lets the leaf swing out at the bottom.
- Confirm the track is straight (not bowed) by sighting along it before final tightening.
- For two-track (bypass) wardrobe systems, both tracks must be parallel and level so the leaves don't foul.
Setting rollers, anti-jump and the floor guide
With the track fixed and level, the leaf gets its running gear. Most top-hung kits use two roller carriages (hangers) fixed near the top corners of the leaf; each carriage has an adjustment bolt or screw that raises or lowers that corner. This adjustment is how you make the leaf hang square in the opening.
1. Fit the carriages to the leaf top — into the top rail of a timber door, or the dedicated channel of an aluminium/uPVC leaf.
2. Hang the leaf onto the track (most carriages clip or thread in from the open end of the track).
3. Adjust the height at each carriage until the leaf gaps are even all round and the leading edge is plumb against the jamb.
4. Fit the anti-jump device — a small catch or block in the track that stops the carriage lifting out if the door is slammed or yanked upward. This is mandatory on patio and barn doors; never leave it off.
5. Fit the floor guide at the bottom — a small pin or U-channel screwed into the floor (or a channel routed into the leaf bottom) that stops the leaf swinging in and out while letting it slide freely. Set it with a hair of clearance so it guides without dragging.
6. Fit end stops in the track so the leaf cannot overrun and crash off the end.
A bottom-rolling system reverses this: the wheels live at the bottom of the leaf and run in the floor track, the wheels carry the adjustment, and the top channel is the guide. Either way, the adjuster screws are what get the gaps even.
Clearances, soft-close and alignment
A sliding door needs the same even reveal as a hung door, achieved through carriage adjustment rather than planing. The targets below are rules of thumb; tighten or loosen to suit the kit and the leaf weight.
| Item | Rule of thumb | Why |
|---|---|---|
| Track level | within ~1-2mm over the run | door won't self-open/close |
| Side reveal at jambs | ~3-5mm even both sides | leaf clears the frame, looks square |
| Bottom gap (top-hung) | ~6-12mm to finished floor | clears floor, room for guide |
| Floor guide clearance | hair gap, guides not drags | silent, no rattle |
| Anti-jump engagement | set so carriage cannot lift out | safety on heavy leaves |
| Soft-close trigger | per kit (catch on track) | gentle close, no slam |
| Overlap onto wall (pocket/wall-slide) | ~50mm each side | leaf covers the opening fully |
Soft-close mechanisms — a sprung damper that catches the carriage near the end of travel and pulls the leaf gently closed — are now common on better Indian sliding kits. They fit into the top track and need the matching trigger/activator screwed to the leaf or carriage at the right position; follow the kit's setting-out dimension exactly or the door either slams past the catch or stops short of closing. For final alignment, slide the door slowly through its full travel and watch the reveal: if the gap opens up at one end, lower that carriage slightly; if the leaf swings at the bottom, check the floor guide and that the track is not tilted forward.
Internal, wardrobe and patio sliders — what differs
The principles are the same but the details change with use. Internal/pocket sliders are usually top-hung on a planted timber header with a flush floor guide — clean, accessible, no threshold. Wardrobe sliders are commonly bypass (two leaves on parallel tracks), often bottom-rolling within the cabinet; here the carcase must be square and rigid or the leaves bind. Patio sliders are heavy aluminium or uPVC framed glass leaves that demand a robust structural fixing, a weather-sealed bottom track with drainage weep holes sloped outward, and good anti-jump and locking — see door weather bar. Always confirm the opening is true first: measure and prep it per measuring for a door and door opening prep, and use the door rough opening calculator and door clearance checker before cutting anything.
Related guides and tools
This page sits in the frames-and-installation cluster. For the broader fit, see how to fit a door and door installation mistakes; for the gap below the leaf, door undercut clearance; and for fixing into a partition, door frame drywall fixing. If a slider is already installed and has gone stiff or noisy, that is maintenance — see sliding door roller repair and sliding door track cleaning. See the phase pillar door frames and cluster pillar complete door guide, and check the opening with the door rough opening calculator and door clearance checker.
Frequently asked questions
Should I choose a top-hung or bottom-rolling sliding door?
Choose top-hung for heavy, frequently used or accessibility-sensitive doors — the leaf hangs from the top track and the floor stays flush with no trip lip and no grit to foul the wheels. Choose bottom-rolling for wardrobes and light cupboard shutters where the cabinet carries the top guide. Top-hung needs a strong, well-fixed header to take the hanging weight.
Why does my new sliding door roll open or shut on its own?
Because the track is not level. A sliding leaf has no latch holding it, so even a 2-3mm tilt over the run lets gravity pull it towards the low end. Re-check the top track with a long spirit level end to end and front to back, pack behind the fixings to correct it, and re-set the carriage heights so the leaf hangs plumb.
What is an anti-jump device and do I really need one?
An anti-jump catch is a small block or clip in the track that stops the roller carriage lifting out if the door is slammed, yanked up, or knocked. On heavy patio and barn-style doors it is a genuine safety item — without it a leaf can de-rail and fall. Always fit the one supplied with the kit; never leave it off to save time.
Do I need a bottom track or floor guide on a top-hung door?
You do not need a full bottom track, but you do need a floor guide — a small pin or U-channel that stops the bottom of the leaf swinging in and out while letting it slide freely. Set it with a hair of clearance so it guides without dragging. Skipping it leaves the leaf rattling against the frame as it moves.
How do I fix a sliding track to a drywall partition?
Never screw a sliding track straight into plasterboard — it will pull out under the hanging weight. Fix to the studs or noggins behind, or plant a stout timber header across the opening (bridging the studs) and screw the track to that. See the cautions in the drywall-fixing guide; for heavy leaves, an RCC lintel or steel header is safer.
Can I add soft-close to an existing sliding door track?
Often yes, if the track profile accepts a retrofit soft-close cassette and the matching activator. The damper fits into the top track and catches the carriage near the end of travel; the trigger must be screwed to the leaf or carriage at the exact setting-out dimension in the kit instructions, or the door slams past it or stops short. Confirm compatibility with your track brand first.
Export this guide
Related Guides — Deep-dive reading
Door Frame Plumb, Level & Square: Setting It True (India 2026)
How to set a door frame plumb, level, square and out-of-wind on Indian sites — spirit level, plumb bob, diagonals, shimming and the 1-2mm tolerance that decides whether the leaf latches.
Home Doors & EntrancesDoor Frame Installation: Set a Chowkhat True (India 2026)
Step by step on setting a door frame into the opening — propping, bracing, plumb, level and square, fixing and grouting — so the leaf hangs perfectly.
Home Doors & EntrancesMeasuring for a Door: Opening Sizes & Checks (India 2026)
How to measure a door opening in India — three width and height points, diagonals, plumb and level — so the carpenter cuts it right the first time.
Home Doors & EntrancesRelated Tools — Try Free
Window Cost Calculator
Estimate window price plus installation by type, frame material, size, glass and quantity.
Window CalculatorAluminium Door Cost Calculator
Estimate an aluminium door cost by opening size, profile grade, finish, glazing and type, with fitting and GST.
Door CalculatorDoor Clearance Checker
Check your door's measured gaps and undercut against the recommended margins for normal, fire, bathroom and external doors.
Clearance Checker