
Over-Deck vs Under-Deck Roof Insulation
The head-to-head that decides where your roof insulation goes: ABOVE the slab (over-deck, under the waterproofing) or BELOW it (under-deck, as a false ceiling). Thermal performance and mass, protecting the slab from cracking, waterproofing interaction, ceiling height, retrofit ease, cost, condensation, and a clear choose-this-if verdict. India-grounded.
There is only one roof insulation decision that trips up almost every Indian homeowner, and it is not which insulation to buy — it is where to put it. You can lay the insulation on top of the roof slab, under the waterproofing and the tiles (over-deck, or external), or you can fix it under the slab, as a false ceiling or a board stuck to the soffit inside the room (under-deck, or internal). Same material, same R-value on paper — but the two positions behave very differently once the summer sun is on the roof, and they suit different homes.
This is the placement deep-dive of the Roofing Knowledge Hub, a companion to The Ultimate Guide to Roofing Systems and the direct sequel to the Roof Insulation Guide, which covers what insulation is and how much you need. Here we settle the where: how each position performs thermally, what it does to the concrete slab, how it interacts with your waterproofing, what it costs, and which one to pick for a new build versus a retrofit, and for a hot climate versus a cold one. By the end you should be able to say, for your own roof, "over-deck because…" or "under-deck because…" and mean it.
Scope & safety. This guide helps you understand, plan, choose and judge where to place roof insulation. Designing the roof build-up, sizing the insulation, calculating loads, and applying the waterproofing and insulation on a roof — along with all work at height — are qualified work for a structural engineer and a licensed roofing or waterproofing contractor. Getting the layer order wrong can trap moisture or damage waterproofing, so treat any build-up here as a starting point for a professional to confirm, not a specification.
The two positions, in one picture
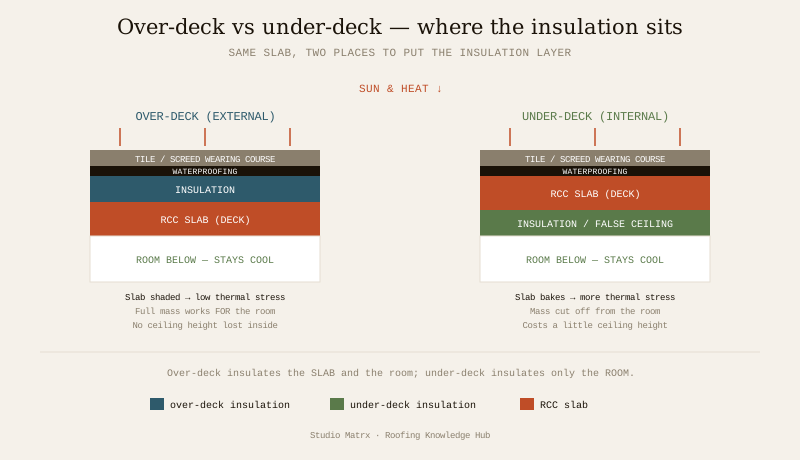
Strip the roof down to its layers and the choice is simple to see. Reading a flat RCC roof from the sky down, you have the finish (tile or screed), the waterproofing, the slab, and then the room. The insulation layer can go in one of two gaps:
- Over-deck (external). The insulation sits above the structural slab — usually on the deck, with the waterproofing and a protective screed or tile over it (a "warm roof"), or in an inverted build-up with the waterproofing on the slab and the insulation, then ballast, above it. Either way the concrete slab is below the insulation, in the cool.
- Under-deck (internal). The insulation sits below the slab, inside the room — a suspended false ceiling with insulation above it, or boards/spray fixed directly to the slab soffit. The concrete slab is now above the insulation, out in the heat.
That single difference — is the slab inside the insulated envelope, or outside it? — drives everything that follows.
Thermal performance and thermal mass
Both positions cut the heat reaching your rooms; that is the headline job and both do it. The difference is how the roof behaves through the day, and that comes down to thermal mass — the heavy concrete slab's ability to soak up heat slowly and release it slowly.
With over-deck insulation, the slab is protected from the sun and stays close to indoor temperature. Its mass now works for you: it steadies the room, damping the swing between the hot afternoon and the cooler night, and it delays the peak heat by hours. A well-insulated over-deck roof feels calm and even — the classic advantage of a heavy, externally-insulated roof in a hot climate.
With under-deck insulation, the slab sits outside the insulated layer and bakes in the sun all day. The insulation still stops most of that heat from reaching the room, but the mass of the slab is now on the wrong side — it is a hot reservoir separated from you by a thin board, contributing nothing to steadying the room. The upside is the mirror image: because the room is decoupled from all that mass, an under-deck room cools down fast when you switch on a fan or AC, which suits a room used in short bursts.
| Behaviour | Over-deck (external) | Under-deck (internal) |
|---|---|---|
| Slab temperature | Cool — inside the envelope | Hot — outside the envelope |
| Thermal mass | Works for you (steadies the room) | Cut off from the room |
| Daily temperature swing | Small — damped, delayed peak | Larger — room follows the AC |
| Cools down when AC switched on | Slower (mass to cool first) | Faster (little mass in the loop) |
| Best suited to | Rooms used all day; steady comfort | Rooms used in bursts; quick cooling |
Neither is simply "better." A living room or bedroom used through the day rewards over-deck's steadiness; a guest room or a hall cooled only for an evening event rewards under-deck's quick response.
Protecting the slab from thermal stress
This is over-deck's quiet, structural trump card, and it rarely gets mentioned in a sales pitch. An exposed RCC slab in an Indian summer can reach 60–65°C on its top surface while its underside stays far cooler. That temperature difference makes the concrete expand on top and not below, and the daily heating-and-cooling cycle works the slab back and forth. Over years this thermal cycling contributes to surface crazing, cracks and stress at the edges — and every crack is a future path for water to reach the reinforcement steel and start it rusting.
Over-deck insulation keeps the whole slab cool and at an even temperature, so it barely expands and contracts. The concrete is shielded from the sun, the thermal swing is small, and the slab lives an easier, longer life. Under-deck insulation does nothing for the slab — the concrete is left fully exposed to the sun above and now also insulated from the cooler room below, so it can actually run hotter than a bare slab. For a homeowner who wants the roof structure itself to last, this is a genuine point in over-deck's favour, and one reason engineers often prefer it on a new build in a hot region.
How each interacts with waterproofing
Where the insulation sits changes its relationship with the waterproofing membrane, and this is where care is needed.
- Over-deck, warm-roof (insulation under the waterproofing). The insulation is buried in the build-up. It must be a closed-cell, load-bearing, moisture-resistant board (like extruded polystyrene or a suitable PUR/PIR), because it carries the screed and foot traffic above it and must not soak up water. A vapour barrier is usually needed below it to stop indoor moisture condensing inside the layer. This is a proper layered assembly — get the order and the vapour control wrong and you can trap moisture.
- Over-deck, inverted / "upside-down" (insulation over the waterproofing). The waterproofing goes straight on the slab and the insulation sits on top of it, under ballast or pavers. This is elegant because the membrane is now shielded from the sun, foot traffic and the daily thermal swing that ages it — so the waterproofing tends to last longer. It demands genuinely water-resistant insulation (again, typically XPS) and heavier ballast to hold it down.
- Under-deck. The insulation is inside the room, well below the waterproofing, so the two barely interact — a real practical simplicity. But precisely because it is on the warm, humid indoor side, an under-deck layer needs thought about condensation (below), and it does nothing to protect the membrane above.
The key takeaway: over-deck insulation is part of the roof sandwich and must be detailed with the waterproofing and a vapour barrier as one system; under-deck insulation is a separate internal element that leaves the waterproofing alone but sits on the roof's humid side.
Ceiling height, retrofit ease and cost
The practical, wallet-and-tape-measure differences often decide the matter, especially on an existing home.
Ceiling height. Over-deck adds its thickness above the slab, so it costs you nothing inside the room — head-room is untouched. Under-deck, whether a false ceiling or boards on the soffit, eats 75–150 mm or more of internal height. In a room with a generous slab-to-floor height that is fine; in a already-low top-floor room it can feel cramped.
Retrofit ease. This is under-deck's biggest win. To add over-deck insulation to a finished roof you must strip back the existing tiles, screed and often the waterproofing, lay the insulation, re-waterproof and re-finish — a major, expensive job that only makes sense when the roof is due for renovation or re-waterproofing anyway. Under-deck insulation is fitted from inside the room with the roof untouched and the house occupied: a false ceiling goes up in a day or two per room, causes no work at height on the roof, and can be done one room at a time. For an existing home that is not being re-roofed, under-deck is usually the only sensible retrofit.
Cost. Over-deck's insulation board is more specialised (closed-cell, load-bearing) and it is entangled with the waterproofing and screed, so as part of a new roof it adds a moderate, well-justified cost. As a retrofit it is expensive because of all the stripping and re-doing. Under-deck materials (mineral wool or EPS over a false ceiling) are cheaper and the labour is ordinary interior work, so it is the lower-cost route, particularly as a retrofit — with the caveat that a false ceiling is also a finish you may have wanted anyway.
| Practical factor | Over-deck (external) | Under-deck (internal) |
|---|---|---|
| Ceiling height lost | None — sits above the slab | 75–150 mm+ inside the room |
| Fits an occupied house? | No — roof stripped & re-done | Yes — from inside, room by room |
| Best moment to do it | New build, or a full re-roof | Any time; ideal retrofit |
| Insulation material | Closed-cell, load-bearing (e.g. XPS, PIR) | Cheaper (mineral wool, EPS, boards) |
| Typical cost driver | Waterproofing + screed rework | Ordinary interior labour |
| Retrofit cost | High (strip & re-waterproof) | Low — the affordable route |
Condensation risk — the detail not to ignore
Condensation is where the theory bites. Warm, humid indoor air always wants to move towards a cold surface; where it meets one below its dew point, water forms — often hidden inside the build-up, where you cannot see it until it does damage.
Over-deck keeps the slab warm (on the room side of the insulation), so the internal surfaces stay above the dew point and surface condensation on the ceiling is unlikely. The risk moves inside the layered roof, which is exactly why a warm-roof over-deck build-up includes a vapour barrier on the warm side — to stop indoor moisture reaching the cold zone within the sandwich. Detailed correctly, over-deck is a low-condensation system.
Under-deck puts the insulation on the room side of a slab that may be cold (in winter, or under a running AC in a humid coastal city). Warm room air can pass through or around a poorly-sealed false ceiling, reach the cold slab soffit above it, and condense there — dripping back through, staining the ceiling, and, over time, breeding mould. This is a real, if manageable, risk in humid and air-conditioned settings and it is why an under-deck layer benefits from a vapour-check on the warm side and from being reasonably well sealed. In dry-hot inland climates the risk is low; in humid coastal or heavily air-conditioned rooms it deserves attention. See the healthy-homes angle on damp and mould if this is a concern.
The scorecard, side by side
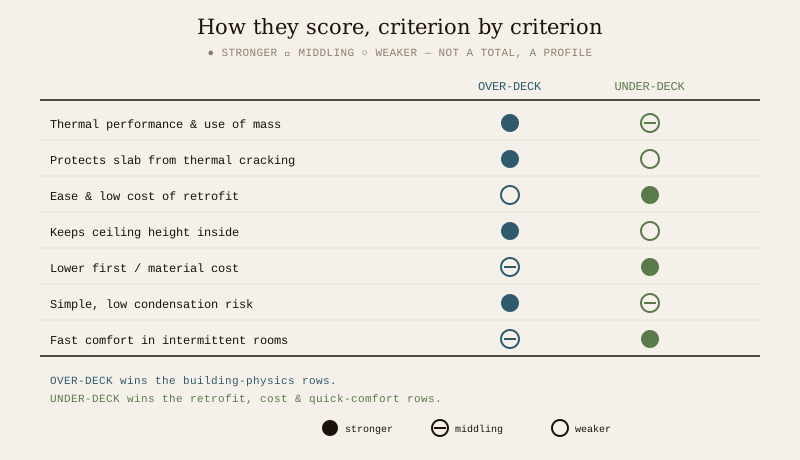
Pulling the threads together, the two positions each own a clear half of the scorecard. Over-deck wins the building-physics rows — steadier thermal performance, use of the slab's mass, protection of the slab from thermal cracking, no ceiling height lost, and a naturally low-condensation profile when detailed as a proper warm roof. Under-deck wins the practical rows — easy and cheap to retrofit into an occupied home, lower first cost, and fast, room-by-room comfort for spaces used in short bursts.
| Criterion | Winner | Why |
|---|---|---|
| Thermal performance & use of mass | Over-deck | Cool slab steadies the room, delays the peak |
| Protects slab from thermal cracking | Over-deck | Slab shaded and at an even temperature |
| Ceiling height retained | Over-deck | Sits above the slab, none lost inside |
| Low condensation (well detailed) | Over-deck | Warm slab + vapour barrier keeps surfaces dry |
| Ease of retrofit into an occupied home | Under-deck | Fitted from inside, roof untouched |
| Lower first / material cost | Under-deck | Cheaper board + ordinary interior labour |
| Quick comfort in intermittent rooms | Under-deck | Room decoupled from slab mass, cools fast |
The honest reading is not "one is better" but "over-deck is the better roof; under-deck is the better retrofit." Which matters more depends entirely on your situation — which is what the verdict below sorts out.
The verdict — choose over-deck if… / under-deck if…
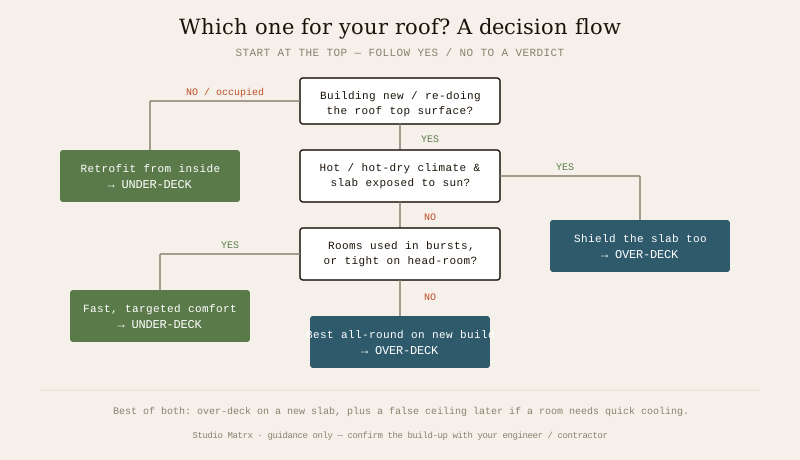
Choose over-deck (external) if:
- You are building new or re-doing the roof top anyway — the moment when over-deck is cheap to include and its downside (roof rework) disappears.
- You are in a hot or hot-dry climate and the slab is exposed to full sun — over-deck shields the concrete and uses its mass to steady the rooms.
- You want the roof structure to last — protecting the slab from thermal cracking is worth real money over decades.
- Head-room is tight and you cannot afford to lose ceiling height inside.
- The rooms below are lived in through the day and you want even, steady comfort rather than fast on-off cooling.
Choose under-deck (internal) if:
- The roof is finished and staying, the house is occupied, and you are not re-roofing — under-deck is the practical, affordable retrofit fitted from inside.
- Budget is tight and you want the biggest comfort gain for the least spend.
- Only one or two rooms need help — you can do them one at a time.
- The rooms are used in short bursts with AC (a guest room, a hall, a home office) and you value quick cool-down over steadiness.
- You were going to install a false ceiling anyway — insulating it is a small add-on.
Best of both. These are not mutually exclusive. On a new build in a hot climate, over-deck on the slab is the strong default; if a particular room later needs faster cooling, add a false ceiling in that room too. And whichever you choose, the roof's surface still matters — a reflective cool-roof finish or a green roof cuts the heat load before the insulation ever has to deal with it, and good roof ventilation lets trapped heat escape. Insulation placement is one move in a bigger heat strategy, not the whole game. Aim for an envelope that meets the roof U-value targets in the residential energy code as your yardstick (see References).
The one-line answer
Over-deck insulation goes above the slab (under the waterproofing, or over it in an inverted roof) and keeps the concrete cool and inside the insulated envelope — giving steadier comfort, using the slab's thermal mass, protecting the structure from thermal cracking, and losing no ceiling height, but only practical to fit on a new build or a full re-roof. Under-deck insulation goes below the slab as a false ceiling — cheaper, fitted from inside an occupied home, and quick to cool a room used in bursts, but it leaves the slab baking, cuts a little head-room, and needs care against condensation in humid or air-conditioned rooms. So: over-deck is the better roof and the right choice for a new home in a hot climate; under-deck is the better retrofit and the affordable, room-by-room fix for a house already built. Detail the layers and vapour control with a professional either way.
Where to go next
- The parent guide — what insulation is and how much you need: Roof Insulation Guide.
- Cut the heat before it arrives: Cool Roof Guide · Green Roof Guide.
- Let trapped heat escape: Roof Ventilation Guide.
- The layer over-deck lives with: Roof Waterproofing Guide.
- The whole subject in one map: The Ultimate Guide to Roofing Systems · Roofing Knowledge Hub.
References
- Eco Niwas Samhita (ENS) — Energy Conservation Building Code for Residential Buildings, Bureau of Energy Efficiency — envelope and roof U-value / thermal-transmittance provisions; verify the current version at the BEE.
- Energy Conservation Building Code (ECBC), Bureau of Energy Efficiency — roof assembly U-value requirements for commercial buildings; verify the current edition.
- IS 3792: Guide for Heat Insulation of Non-Industrial Buildings — Bureau of Indian Standards.
- IS 15351 (laminated HDPE / insulation applications) and IS 14435 (thermal-insulation materials) — verify current status via the BIS catalogue: https://www.services.bis.gov.in/
- National Building Code of India (SP 7), Bureau of Indian Standards — Part 11 (Approach to Sustainability) and Part 8 (Building Services) for envelope and thermal-comfort guidance; verify the current edition.
This is an educational overview. Choosing and sizing insulation, designing the roof build-up and its vapour control, and applying insulation and waterproofing at height are qualified professional work — engage a structural engineer and a licensed roofing or waterproofing contractor for your project, and verify any standard's current status via the BIS catalogue or the BEE before relying on it.
Export this guide
Related Guides — Deep-dive reading
Designing a Naturally Energy-Efficient Indian Home
Comfort first, gadgets last — passive design, orientation, insulation, ventilation and the climate wisdom that cuts Indian energy bills
SustainabilityThe Roof Insulation Guide
How to keep heat out through the roof — the biggest heat collector on an Indian house — and, in the hills, keep it in. What insulation actually does, U-value and R-value made simple, where to insulate, the materials compared (EPS, XPS, PU/PIR, mineral and glass wool, reflective barriers and cool-roof surfaces), how thick to go against Eco Niwas Samhita targets, and how to retrofit. Plain language, India-grounded.
RoofingEnergy-Efficient Facades in India: How the Building Skin Cuts Your Cooling, Heating & Lighting Bills
How a building facade drives cooling, heating and lighting energy in India, the three levers of solar-heat-gain control, insulation and daylighting, U-value, SHGC, VLT and WWR in plain terms, ECBC and Eco-Niwas expectations, and real Indian green buildings.
Building FacadesRelated Tools — Try Free
Renovation vs New Build Calculator
Compare renovating vs building new interiors city-wise across 13 work scopes with GST and per-sqft rates.
Cost ComparisonMaterial Decision Framework (M-Score)
Score 30+ Indian construction materials across cost, durability, climate fit, maintenance, and sustainability.
MaterialsCross-Ventilation Analyzer
Estimate airflow and air changes per hour (ACH) from room size, window areas, layout, and local wind — with NBC 2016 Part 8 compliance check.
Ventilation Calculator