
Fitting Strike Plates & Keeps on the Frame: India 2026
The new-fit craft of marking, mortising and seating strike plates and box keeps so the latch and bolt engage cleanly the first time.
The last few millimetres of any well-hung door are decided at the frame. Fitting strike plates and box keeps is the new-fit craft of cutting the receiving hardware into the jamb so the latch springs home and the deadbolt throws fully, with no rattle, no slam-and-bounce, and no fighting the leaf to close it. Get the strike position wrong by even a millimetre and a perfectly hung door will refuse to latch, self-swing, or need a shoulder to shut. This guide is for carpenters and site engineers fitting hardware on a new leaf and frame — if you are realigning a strike that has drifted on an existing door, read door strike plate alignment instead; this piece is about cutting it cleanly the first time.
It pairs with fitting mortise locks, which covers cutting the lock body into the leaf edge — the strike is the matching half on the frame. Use both together: the lock sets the latch and bolt positions, and the strike must mirror them exactly.
Strike plate, box keep, lip strike and dust socket — know the parts
The terminology trips up mixed-skill site teams, so fix it before you cut.
| Component | What it is | Where it goes | Typical use |
|---|---|---|---|
| Flat strike plate | A flat plate with a latch hole, screwed flush to the jamb face | Frame, opposite the latch | Light internal flush doors with a tubular latch |
| Lip (radius) strike | Strike with a curved return lip that guides the latch in | Frame face wrapping the rebate edge | Most rim and lighter mortise latches |
| Box keep | Strike plate backed by a steel box that captures the latch and deadbolt fully | Mortised into the frame with a deep box pocket | Mortise locks (IS 1003/IS 2202 type), security and fire doors |
| Dust box / dust socket | A small cup that receives a tower or flush bolt | Frame head, sill or floor | Flush and tower bolts on the inactive leaf |
For a quality mortise-lock installation you almost always want a box keep, not a bare flat plate: the box hides the rough chopped pocket, stops the bolt fouling the timber, and gives the latch and deadbolt a clean steel seat. On fire-rated door-sets the keep is part of the tested set — never substitute a generic plate. See mortise locks for the lock-side product detail and fitting door hardware for the wider new-fit workflow.
Transferring the latch position — marking before you cut
The single rule of strike fitting: let the latch tell you where the strike goes. Never measure the strike from the floor independently and hope it lines up — small handing, hinge and clearance errors accumulate, and the latch will miss.
The reliable sequence on a hung leaf:
1. Hang the leaf and fit the lock first. The lock body, latch and bolt must already be mortised into the leaf edge (see fitting mortise locks). The keep cannot be positioned until the latch exists.
2. Colour the latch tip. Rub the protruding latch and the dead-bolt face with a marker, a smear of paint, or carpenter's chalk/lipstick.
3. Close the leaf gently until the coloured latch kisses the jamb and leaves a witness mark. That mark is the exact vertical centre of your strike hole. Repeat with the bolt thrown a few millimetres to mark the bolt position.
4. Square the marks across to the jamb face with a combination square, and set the strike plate over them so the latch hole aligns with the witness mark. Scribe round the plate with a marking knife — a knife line, not a pencil line, gives a crisp mortise edge.
5. Set the strike back off the rebate so the latch enters cleanly: the face of the strike should sit where the leaf face will close to, allowing the latch to seat without the leaf standing proud or sucking in.
For the broader marking-out discipline — datum lines, handing and set-out heights — see marking out door hardware and the setting out doors Act pillar.
Typical keep heights and set-out
| Element | Indicative height / position | Note |
|---|---|---|
| Mortise lock keep centre | ~900 mm from FFL | Mirrors the lock case centre on the leaf |
| Lever / handle centre | ~900-1050 mm (≈1000 mm common) | RPwD / Harmonised Guidelines: lever, not knob |
| Backset (latch to leaf face) | 60 mm (some 57 mm) | Strike hole offset must match the lock backset |
| Top tower-bolt dust box | At frame head, inactive leaf | Mark from the shot bolt, same witness method |
| Bottom flush-bolt dust socket | In the sill / floor | Use a floor socket; protect from grit |
| Margin / leaf-to-frame gap | 2-4 mm even reveal | Affects how far the strike sits back |
FFL = finished floor level. Heights follow NBC 2016 and accessibility guidance; for accessible openings keep operation one-handed and at a reachable lever height. See accessible doors where relevant.
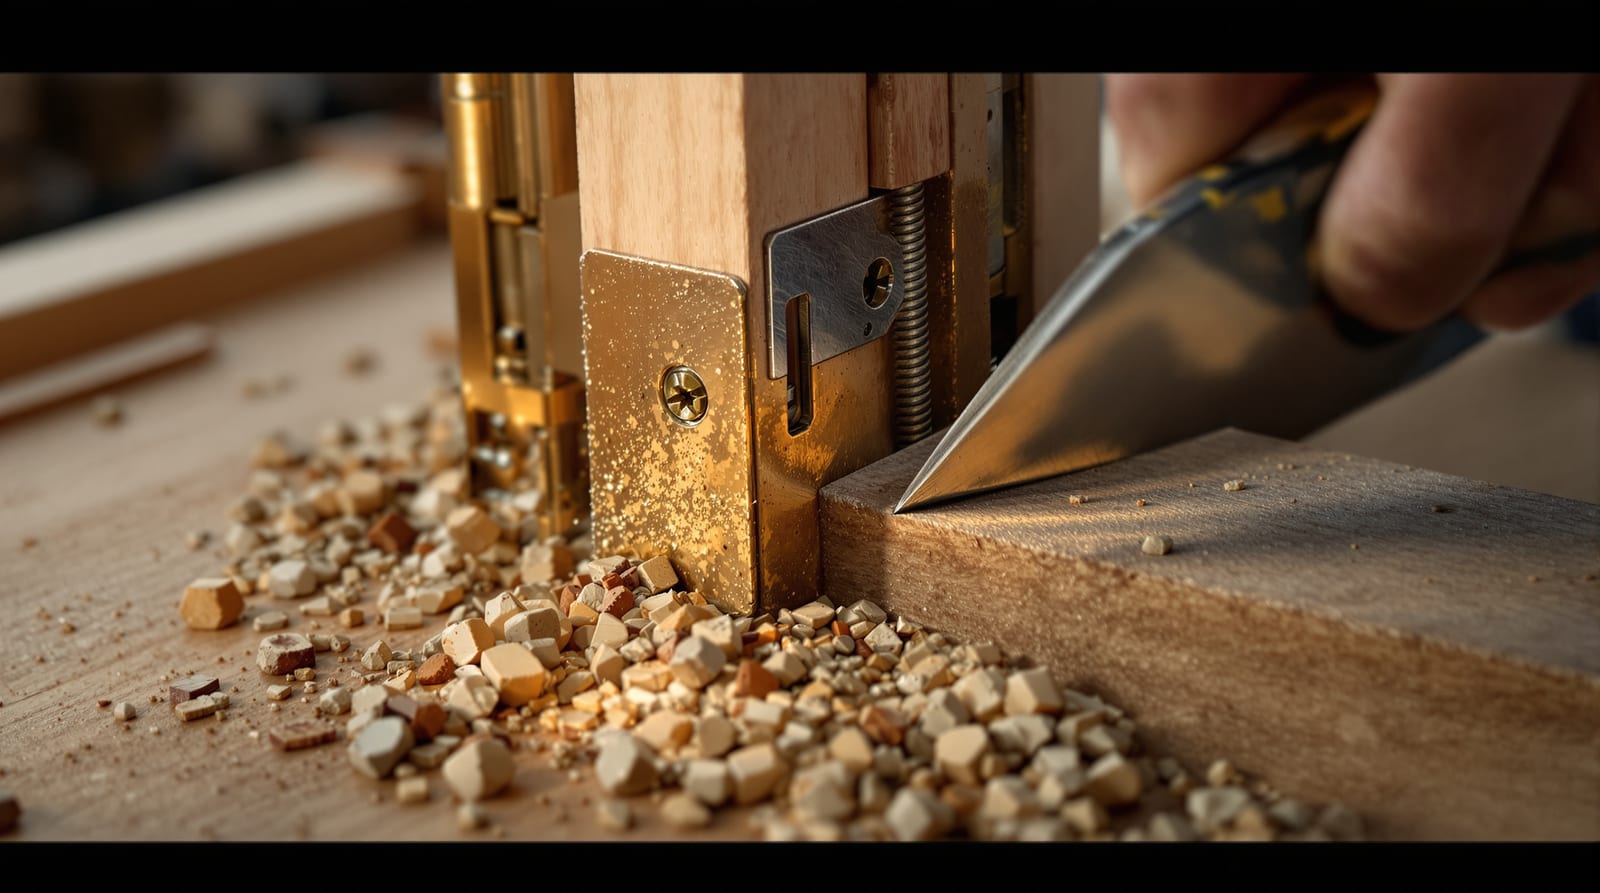
Mortising the jamb for the strike plate and box keep
Mortising the frame is where the craft shows. A box keep needs two cuts: a shallow flat recess for the plate flange (so it sits flush with the jamb face) and a deeper box pocket behind it for the latch-and-bolt steel box.
Step sequence
| Step | Action | Tool | Watch-out |
|---|---|---|---|
| 1 | Knife-scribe the plate outline and the bolt/latch hole | Marking knife, square | Cut to the knife line, not over it |
| 2 | Drill out the box pocket | Forstner / auger 22-25 mm, then chisel | Don't overbore — a sloppy box rattles |
| 3 | Pare the pocket walls square and to depth | Mortise & bevel chisel | Test the box dry, no forcing |
| 4 | Chop the shallow flange recess to plate thickness | Bevel-edge chisel, router for volume | Recess just deep enough to sit flush |
| 5 | Bed the keep, pilot the screws, drive | Cordless driver, correct bit | Pilot every screw — frames split |
| 6 | Test, mark fouling, fettle | Marker witness again | Tune before final fixing |
Mortise the flange recess only as deep as the plate is thick — a strike standing proud catches the leaf; a strike sunk too deep stops the latch lip working. Pilot-drill every screw: frames are often teak, hardwood or WPC and will split, and an over-driven screw in WPC strips the thread. On steel frames the strike hole is usually pre-pressed at the factory; if not, a step drill and a thread-cutting screw or rivnut is needed rather than a wood screw.
For a fire door, the keep mortise must not breach the frame to the point of compromising integrity — use the tested keep, keep cut-outs to the certified size, and remember the leaf-to-frame gap must stay ≤3 mm (4 mm max) with continuous intumescent and smoke seals in the rebate. The strike pocket is part of that tested assembly; read fire door installation compliance and fire door maintenance & inspection.
Getting a clean latch engagement — tight, loose and fettling
A strike that is positioned right but seats poorly still feels wrong. Tune it after the first test close.
- Won't latch / latch hits the plate face. The witness mark was off, or the strike sits too far back. Re-mark with the coloured-latch method; if it is only a hair out, file the latch hole edge with a fine file rather than re-chopping the whole pocket.
- Latches but rattles (loose). The keep sits too far into the rebate so the leaf doesn't pull tight. Pack the plate forward with a thin steel shim, or move the strike out a millimetre. On a lip strike, gently dress the lip to draw the leaf in.
- Too tight / leaf must be forced. The strike is proud or set too far out; the latch is fully engaging before the leaf is home. Deepen the flange recess slightly or ease the latch hole.
- Self-swings open. Often a frame-plumb issue, not a strike one — check door frame plumb & level; but a strike that the latch can't fully clear will also let the leaf creep.
- Deadbolt won't throw fully. The box pocket is too shallow or misaligned — re-mark the bolt witness and deepen the box.
Verify the result against the project's door operation testing routine and the door snagging Act pillar before sign-off. A strike that needs two attempts to latch is a snag, not an acceptable door.
Strike on the jamb — set-out diagram
Dust boxes for flush and tower bolts
The inactive leaf of a double door, and any leaf with a top tower bolt, needs dust sockets to receive the shot bolts. Fit them with the same witness method: throw the bolt, mark where the tip strikes the head, sill or floor, then drill and seat a dust box so the bolt drops cleanly into a steel cup rather than a raw hole that fills with grit.
For the floor socket, set it flush with the finished floor and slightly proud of grout so it sheds water and dust — India's site dust and monsoon wet quickly clog an open hole. On flush bolts, the head socket and floor socket must be on the same vertical line as the bolt, or the inactive leaf won't shoot home and the active-leaf strike beyond it won't hold. See fitting flush & tower bolts for the bolt-side craft.
This whole task sits inside the larger new-fit sequence — pull the cluster together at the complete door guide and budget the labour with the door fitting time estimator and door hardware height calculator.
Frequently asked questions
How do I find the exact strike position without measuring?
Colour the latch tip with marker or chalk, close the leaf gently, and the latch leaves a witness mark on the jamb. That mark is the centre of your strike hole. Repeat with the deadbolt thrown to mark the bolt position. This transfer method beats measuring because it absorbs all the small hinge and handing errors.
Strike plate or box keep — which should I use?
Use a flat or lip strike for a light internal door with a tubular latch. Use a box keep for any mortise lock, security or fire door: the box captures the latch and deadbolt fully, hides the rough pocket, and on fire-rated sets it is part of the tested assembly. Never substitute a generic plate on a certified fire door-set.
My door latches but rattles — how do I tighten it?
The keep is set too far into the rebate, so the leaf doesn't pull tight. Pack the strike forward with a thin steel shim, or move it out a millimetre. On a lip strike, gently dress the lip to draw the leaf in. Re-test with the coloured-latch witness after each adjustment.
How deep should the box pocket be?
Deep enough for the deadbolt to throw fully without bottoming out, plus a small clearance — never so deep it weakens the frame or, on a fire door, breaches the tested cut-out size. Drill with a 22-25 mm Forstner or auger, then pare the walls square. Test the box dry before fixing.
Is this the same as realigning a strike that has drifted?
No. This guide covers cutting a new strike into a new frame. If an existing door has stopped latching because the strike or frame has moved, that is a repair job — see door strike plate alignment.
What does the fire-door strike have to comply with?
Use the keep supplied with the tested door-set, keep cut-outs to the certified size, hold the leaf-to-frame gap at ≤3 mm (4 mm max), and keep the continuous intumescent and smoke seals intact in the rebate. The strike is part of the certified assembly under IS 3614 and NBC 2016 fire and life-safety provisions; an oversize pocket can void the rating.
Export this guide
Related Guides — Deep-dive reading
Door Strike Plate Alignment: Fix the Latch (India 2026)
A clean, step-by-step DIY guide to realigning a door strike plate so the latch catches every time, plus a security-strike upgrade.
Home Doors & EntrancesFitting Tower Bolts & Flush Bolts: Site Guide (India 2026)
How to mark, mortise and align surface tower bolts and morticed flush bolts on the inactive leaf of a double door so each bolt shoots clean.
Home Doors & EntrancesFitting Mortise Locks: New-Fit Craft Guide India 2026
The on-site craft of fitting a mortise lock to a new door — marking, mortising the pocket, boring cylinder and handle holes, and testing the throw.
Home Doors & EntrancesRelated Tools — Try Free
Door Material Comparison Tool
Compare 2–4 door materials on cost, durability, maintenance, security and moisture resistance.
Comparison ToolDoor Security Rating Calculator
Score your main door out of 100 across leaf, frame, lock and hardware — and see the top upgrades.
Security ToolDoor Size Calculator
Get the standard door and frame size by room, with swing clearance and the accessible clear-width check.
Door Tool