
Rainwater Harvesting Through Landscape Design — Slow It, Spread It, Sink It
The soft, landscape-led side of harvesting rain — contouring, swales, permeable surfaces and recharge structures that catch water where it falls
The cheapest, most resilient rainwater tank you own is the ground beneath your garden — and a well-shaped landscape harvests the monsoon where it falls, slowing, spreading and sinking it into the soil before a single drop runs off down the road.
Most rainwater advice in India starts with a tank. This guide deliberately does not. Our companion piece, Rainwater Harvesting at Home, already covers the "hard" plumbing side beautifully — rooftop catchment, downpipes, first-flush diverters, filters, sumps, storage tank sizing, recharge regulations and cost/ROI. Think of that guide as the pipes-and-tanks half of the story. This one is the other half: the soft, landscape-led approach. Instead of routing every drop into a tank, you shape the land itself so rain soaks into your soil and recharges the water under your feet. The two work as a pair — and the best home water plan uses both. (For the wider strategy, see Sustainable Water Management in the Landscape and Water-Secure Homes.)
The core idea: slow it, spread it, sink it
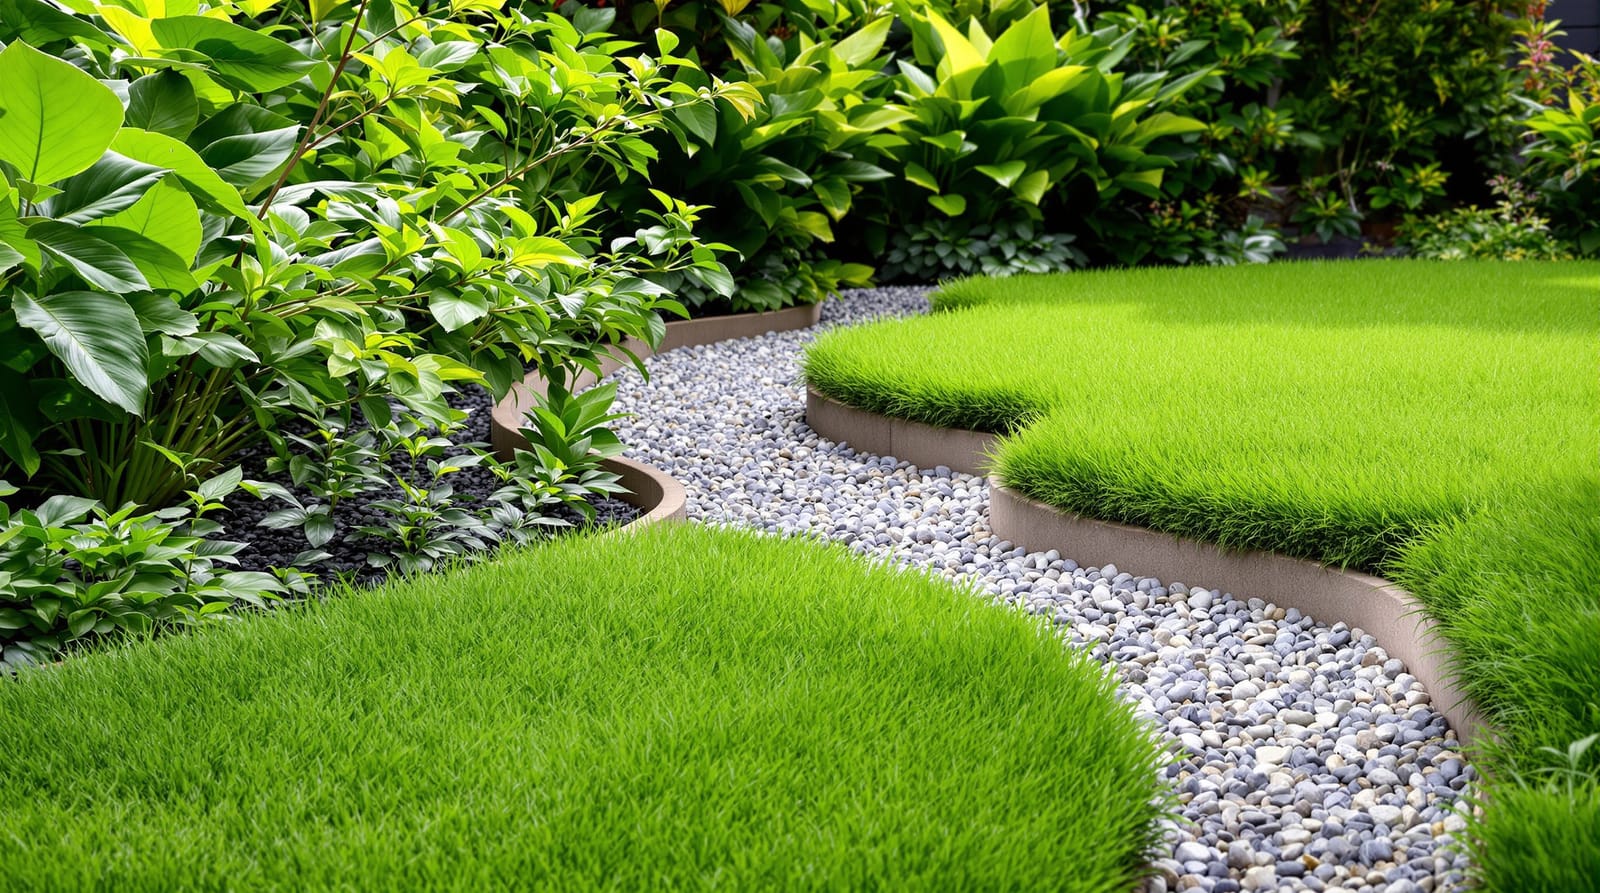
A conventional roof-to-tank system says "collect and store". Landscape harvesting says something quieter and older: slow it, spread it, sink it. Rain that lands on a bare, sloped, compacted Indian plot during a July cloudburst behaves like water on glass — it sheets off in minutes, scours your topsoil, floods the gate and is gone into the stormwater drain before it can do you any good. Every metre that water travels fast, it does damage and gives nothing back.
The landscape designer's job is to make water hesitate. Slow its velocity with roughness and gentle gradients; spread it across the widest possible area instead of channelling it into one torrent; and give it time to sink into the soil, where it recharges your borewell, feeds your plants for weeks afterwards, and quietly cools the ground. A garden that does this turns a flood risk into a free, slow-release irrigation and recharge system.
This matters enormously in India. The Central Ground Water Board (CGWB) classifies a large share of urban districts as "over-exploited" or "critical" — Bengaluru, Chennai, parts of NCR, Pune and Hyderabad among them. Borewells that ran at 150 feet a generation ago now chase water past 800 feet. A single 30 ft × 40 ft (1200 sq ft) plot in Bengaluru receiving ~970 mm of annual rain sheds well over a lakh litres a year. Sink even half of that and you are visibly raising the local water table — and on most plots that is cheaper than the equivalent storage.
Read the land before you move any soil
Before swales or pits, you read the plot. Stand outside during the first real downpour of the monsoon and watch — genuinely the most useful site survey you can do for free.
- Where does water enter and leave? Note the high corner and the low corner. Water always exits at the lowest point; that is where it is currently being wasted.
- What is the slope? A simple drop of 1 in 50 (about 2%) is enough to move water briskly. You can measure it with a string, a line level and a tape, or a builder's water-tube level.
- Where does it pool or scour? Puddles show low spots and impermeable clay; rills and bare patches show fast, erosive flow.
- What is your soil? Dig a 30 cm pit, fill with water, let it drain, refill and time how fast it drops. Sandy red soil may take in 50–100 mm/hour; black cotton (clayey) soil of the Deccan may manage barely 5–10 mm/hour and will need larger, shallower spreading rather than deep pits.
The aim is a mental "water map": catchment areas (roof, paving, lawn that shed water) and the paths that water naturally wants to take. You then design WITH those paths, intercepting flow on its way down rather than fighting it.
Contouring and grading: aiming the water
Grading is simply deciding the levels of the land so water goes where you want. Two rules govern almost everything:
1. Always grade away from the house. The ground for at least the first 1.5–2 m around the plinth must fall away from the foundation at roughly 1 in 50 (about 5 cm drop per metre). Water pooling against the wall is the commonest cause of damp, efflorescence and cracked plinth protection. Keeping water out of the house is non-negotiable and comes before any harvesting ambition.
2. Direct the surplus to where it can soak. Once water is safely clear of the building, lead it gently — via shallow grassed channels or planted depressions — towards the parts of the garden built to absorb it.
On a flat plot you create gentle "saucers" and broad shallow valleys. On a sloped plot you work across the slope (on contour) to intercept water as it descends. A "contour" is simply a line of equal height; water sitting on a contour line does not flow sideways, so anything you build along it holds water evenly and lets it sink.
Swales: the workhorse of landscape harvesting
A swale is a shallow, level-bottomed channel dug along the contour, usually with the excavated soil piled on the downhill side as a low bund (berm), planted up. Because the bottom is dead level, rain running downhill hits the swale, spreads along its full length and pools harmlessly until it infiltrates — typically within a day. It is the single most effective, lowest-tech landscape harvesting structure.
For a home garden a swale 30–45 cm deep and 60–90 cm wide, planted with grasses, ferns and shrubs on the berm, disappears into the design as a planted band. On a 2–4% slope, space swales every 5–8 m down the gradient. Always include a stone-lined spillway at one end set slightly lower than the bund, so that in an extreme cloudburst the overflow leaves safely instead of breaching the berm.
Swales pair naturally with rain gardens — a planted depression that takes concentrated runoff (say from a downpipe or driveway) and lets it soak through a free-draining soil-and-gravel bed. Because rain gardens deserve their own detailed treatment, we cover species, sizing and the bioretention soil mix in full in Rain Gardens Explained; on a swale-and-rain-garden plot, the swale is the conveyor and the rain garden is the sink.
Permeable vs hard surfaces
Every square metre of impermeable surface — RCC driveway, full mortar-bedded paving, that ambitious concrete forecourt — is a metre that sheds 90% of its rain straight to the drain. The single biggest free win in most Indian homes is to stop sealing the ground.
| Surface | Approx. runoff | Notes |
|---|---|---|
| Solid concrete / dense paving | 85–95% | Worst case; sheds almost everything |
| Brick/stone on mortar bed | 70–85% | Joints help only slightly |
| Sand-set pavers with open joints | 40–60% | Cheap, easily retrofitted |
| Grass pavers / turf blocks | 20–40% | Ideal for driveways and parking |
| Gravel / kankar / compacted murram | 25–45% | Excellent low-cost path surface |
| Lawn / planted bed | 10–25% | The benchmark to aim towards |
Practical moves: lay driveways in grass-paver blocks or two concrete wheel-strips with gravel between; set garden paths in gravel or sand-bedded flags with open joints; and keep the proportion of sealed ground deliberately low. Even retrofitting open joints into existing paving and removing mortar lets a surprising volume soak in.
Recharge structures — the landscape way
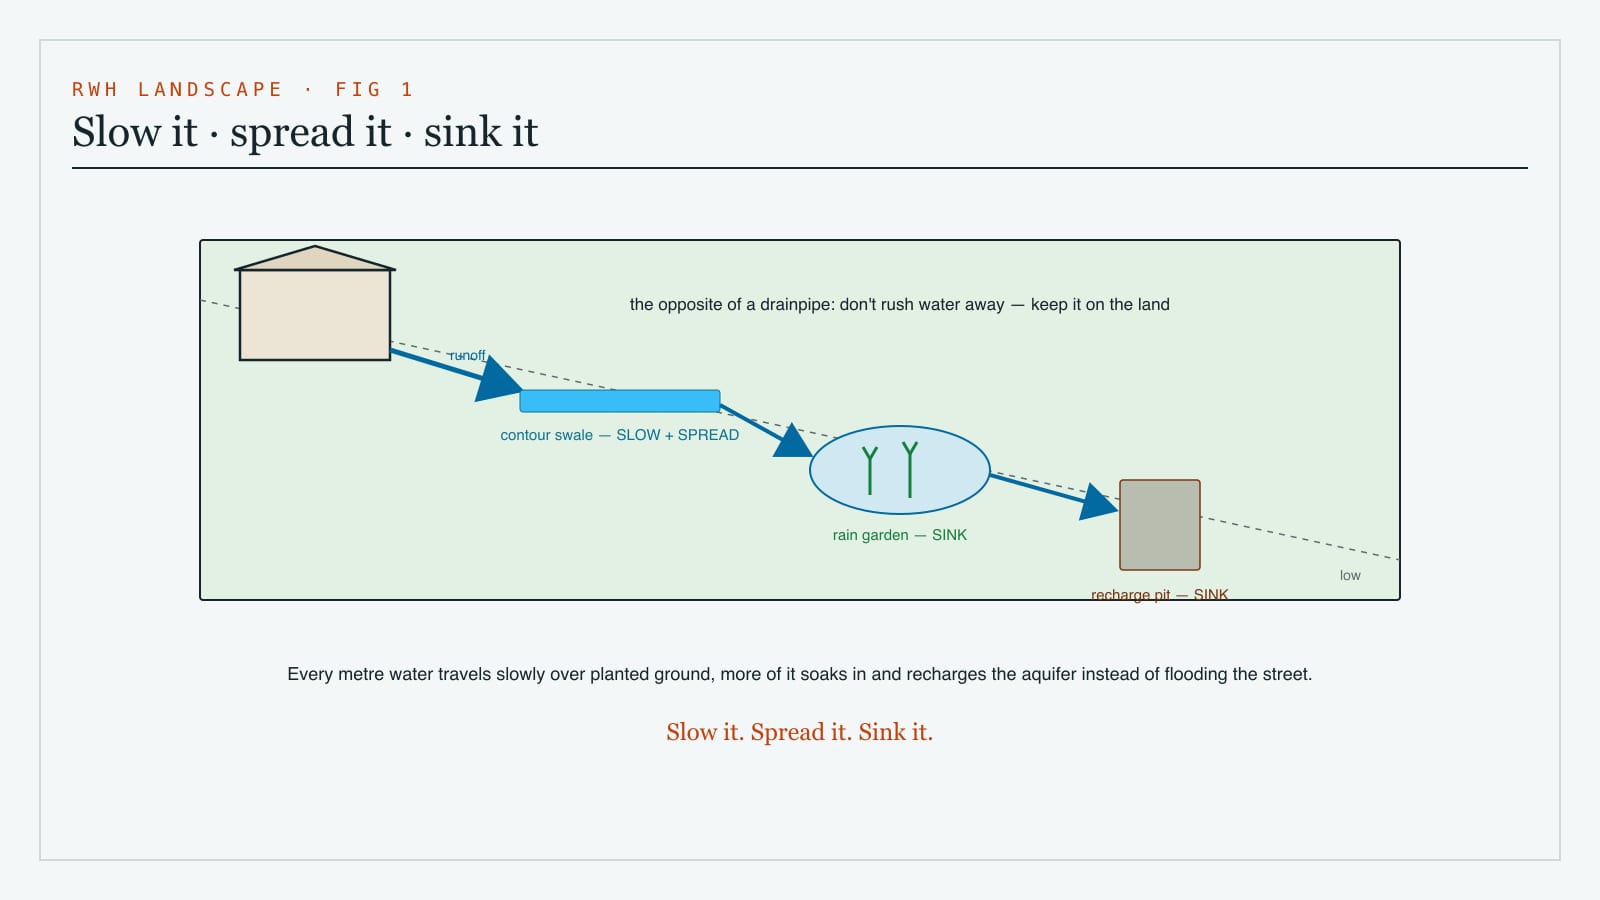
Where a tank stores water for you to use, recharge structures hand water back to the aquifer. They are the landscape counterpart to a storage sump. CGWB's artificial-recharge manuals describe the standard family; all share the same filter principle shown below — water enters, passes down through graded boulders, gravel and coarse sand that strain out silt, and percolates into the soil.
| Structure | Typical size | Best for | Indicative cost (₹) |
|---|---|---|---|
| Recharge pit | 1–2 m wide × 2–3 m deep | Roof/courtyard runoff, small plots | 8,000–20,000 |
| Percolation trench | 0.5–1 m wide × 1–1.5 m deep × any length | Linear catchment, along boundaries | 6,000–15,000 |
| Soak pit (de-silting) | 1 m dia × 1.5–2 m deep | Pre-treatment, garden runoff | 5,000–12,000 |
| Recharge / dry well (bore-connected) | 0.3–0.6 m dia, 20–60 m deep | Hard clay topsoil, deep aquifer | 40,000–1,20,000 |
Sizing rule of thumb. A recharge pit should be able to hold the runoff from a short, intense burst while it infiltrates. A common CGWB-derived design figure: provide roughly 1 cubic metre of pit storage for every 100 sq m of hard catchment in moderate-rainfall zones, and step it up in high-rainfall coastal belts. For a typical 100–150 sq m roof, one well-built recharge pit of about 1.5 m × 1.5 m × 3 m, packed with boulders at the base, gravel in the middle and coarse sand on top, handles the load. Where the topsoil is impermeable black cotton clay, a recharge well that punches through to a sandier stratum below is far more effective than a shallow pit that simply fills and stagnates.
Always feed recharge structures through a de-silting chamber or first-flush arrangement so leaves and grit do not clog the filter media — the same first-flush logic explained in Rainwater Harvesting at Home. And recharge only clean rooftop or garden runoff, never greywater or anything that has touched a sewer.
Holding moisture in the soil: mulch and planting
Sinking water is half the job; keeping it in the root zone is the other half. Bare Indian soil under a 40°C summer sun loses moisture frighteningly fast.
- Mulch everything. A 5–7 cm layer of dry leaves, coir pith, sugarcane trash, bark or even gravel over beds cuts evaporation dramatically, keeps soil temperatures down and feeds the soil as organic mulch breaks down. It is the cheapest water-saving move there is.
- Build sponge soil. Compost and organic matter turn dense soil into a sponge — every 1% rise in soil organic carbon meaningfully lifts water-holding capacity.
- Plant deep-rooted natives. Species adapted to the local rainfall pattern survive on what the landscape harvests. For the home garden, consider vetiver (khus) as a living contour barrier and soil binder, lemongrass, native grasses, and shrubs/trees such as neem, jamun, drumstick (moringa), karanj and curry leaf that thrive on monsoon water and minimal irrigation.
This planted, mulched, sponge-soil approach also delivers cooling and habitat benefits — see Biophilic Landscape Design and Climate-Responsive Landscape Design for how the same moves serve comfort and biodiversity.
Sloped plots: check dams and contour bunds
On a genuinely sloping plot — a hill-station home, a farm plot, a villa on graded terrain — water gathers speed and erosive power. Here you borrow from watershed engineering:
- Contour bunds: low earthen ridges along the contour that pond and infiltrate water over a wide area; the cheapest broad-acre treatment.
- Check dams: small barriers of loose stone (gabion) or masonry across a natural drainage line or gully. They are NOT meant to store a reservoir — they slow the flow, drop the silt, and let water soak into the streambed behind them. Build a series of small check dams rather than one big wall, each with a stable spillway.
- Vetiver hedges: dense lines of vetiver grass across the slope act as living filters that trap silt and slow runoff, stabilising the whole system.
For villa-scale terraced gardens these structures become design features in their own right; Villa Landscape Design shows how level changes and water can be composed rather than merely engineered.
When to sink, when to store — using both together
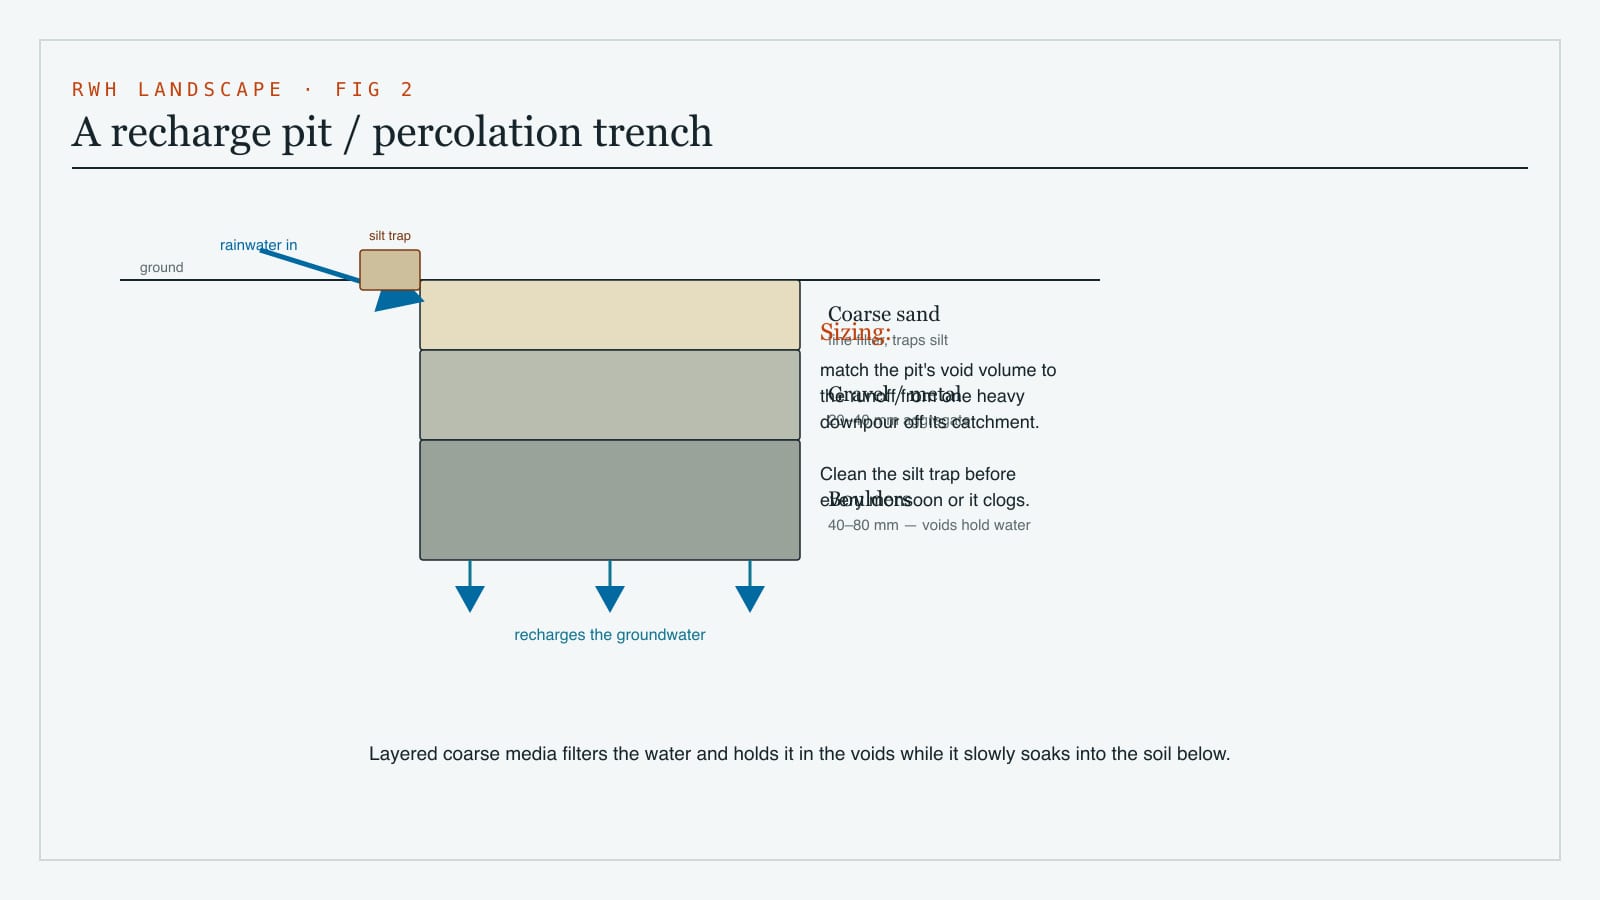
The honest answer to "tank or recharge?" is "both, for different jobs." They are complementary, not rival, strategies.
| Question | Lean towards STORAGE (tank/sump) | Lean towards SINKING (landscape recharge) |
|---|---|---|
| Do you need the water on tap soon? | Yes — for non-potable use, gardening, flushing | No — you want long-term aquifer support |
| Is your aquifer over-exploited / borewell deep? | Helps, but recharge fixes the root cause | Yes — recharge is the priority |
| Is space/budget tight? | A tank is compact but costs more per litre | Swales and pits are cheaper per litre managed |
| Is the soil very permeable? | Less critical | Excellent — water sinks readily |
| Is the soil hard clay (black cotton)? | Storage may be easier than recharge | Use recharge WELLS through to sandy strata |
A sound home plan usually reads: store the first, cleanest, easily captured rooftop water in a modest tank for immediate non-potable reuse (the Rainwater Harvesting at Home guide sizes this), then route the overflow and all surface runoff into the landscape — swales, rain gardens, permeable surfaces and recharge pits — to sink the surplus and refill the borewell you depend on in March. The tank serves this monsoon; the recharge serves every dry season after it.
A realistic monsoon, mosquito and maintenance reality check
Landscape harvesting must be designed so water DISAPPEARS, not lingers. A swale or rain garden should drain within 24–48 hours; if it holds water longer, it is undersized or built on clay without a soak well, and you have created a dengue and chikungunya breeding ground. This is the single most important safety rule — design for fast infiltration, screen any standing-water inlet, and never let a recharge pit become an open pond. Keep de-silting chambers cleared before and mid-monsoon, top up mulch annually, and check that spillways are clear before the first heavy rain. Done right, the system is close to maintenance-free; done lazily, it is a health hazard.
References & further reading
- Central Ground Water Board (CGWB), Manual on Artificial Recharge of Ground Water and Master Plan for Artificial Recharge to Ground Water in India — recharge structure design, sizing norms and aquifer status.
- CPHEEO (Ministry of Housing & Urban Affairs), Manual on Storm Water Drainage Systems — runoff coefficients and drainage design.
- Rainwater Club / S. Vishwanath (Bengaluru) — practical Indian rooftop and open-well recharge guidance and case studies.
- IGBC and GRIHA rating systems — site water-management and runoff/recharge credits for Indian green buildings.
- Melbourne Water, Water Sensitive Urban Design (WSUD) Guidelines — swale, bioretention and infiltration design principles.
- Brad Lancaster, Rainwater Harvesting for Drylands and Beyond — the "slow it, spread it, sink it" earthworks philosophy.
Export this guide
Related Guides — Deep-dive reading
Sloping Site Design: Building on a Gradient
How to read a slope, choose between terracing, cut-and-fill and stilts, and turn a hillside plot in Pune, Bengaluru's outskirts or the Ghats into an asset instead of a liability.
Site PlanningWhy Landscape Architecture Matters More Than the Building
How the green around, above and beyond your home out-cools, out-drains and out-appreciates the structure itself — at every scale from balcony to city.
LandscapeRain Gardens Explained — Catch, Soak and Recharge at Home
What a rain garden is, how it works in section, siting and sizing, the soil mix and plant palette for India, overflow design, and the mosquito myth answered
LandscapeRelated Tools — Try Free
Rainwater Tank Sizer
How big should your rainwater tank be? Computes annual harvest, recommended tank capacity in litres, water-bill savings, and payback — for 10 Indian cities.
RWH CalculatorGarden Planning Toolkit
Get a tailored garden plan — planting layers, Indian species, features and a checklist — from your climate, space, sun and goals.
PlannerLandscape Cost Calculator
Estimate a garden's cost — hardscape, softscape, lawn, irrigation, lighting and annual upkeep — by area, tier and city.
Budget Calculator