
Door Saddle Installation: Threshold Fitting (India 2026)
How to fit a granite or aluminium saddle threshold on mortar or adhesive, level it true, and seal it against monsoon water ingress.
A threshold looks like the simplest part of a door, yet a poorly fitted one is the single most common source of water ingress, rocking under foot, and trip hazards on an Indian site. Good door saddle installation is a sequencing job: you bed a stone or aluminium saddle on a true, level base, set it to the right height relative to two adjoining floor finishes, and seal its perimeter so monsoon water, washing-area splash and dust stay out. This guide walks site engineers, carpenters and fitters through fitting a granite or aluminium saddle threshold step by step — the bedding, the levelling, the sealing, and how the saddle ties into the flooring and the waterproofing membrane.
The saddle (also called the threshold, sill, dehleez, umbara or vasal padi) is the bottom member that bridges the door opening at floor level. It does three jobs at once: it caps the junction between two floor finishes, it provides the surface the leaf shuts down onto (with or without a seal), and at external or wet-area doors it forms the waterstop. Get any one of these wrong and the door either leaks, traps water, or trips people.
Choosing the saddle before you fit it
Material choice drives the entire installation method, so settle it first. The two workhorses in India are a stone (granite) saddle and an aluminium threshold strip; timber saddles are used internally on better joinery but rot in wet zones.
| Saddle type | Where it suits | Bedding method | Indicative ₹ (rule of thumb) |
|---|---|---|---|
| Granite / stone saddle | Main door, bathroom, balcony, wet kitchen | Cement mortar 1:3 or tile adhesive | ₹250-700 per running ft (18-20mm slab, polished, fitted) |
| Aluminium threshold strip (plain) | Internal level changes, floor-finish joints | Adhesive + screws to subfloor | ₹120-350 per running ft |
| Aluminium weather-bar threshold (finned, with seal) | External doors, monsoon-facing entrances | Screwed to sill, bedded in sealant | ₹350-900 per running ft |
| WPC / PVC saddle | Bathrooms (termite/damp-proof, budget) | Adhesive + sealant | ₹150-400 per running ft |
| Ramped / bevelled saddle | Accessible thresholds, level change >6mm | As stone/aluminium, profiled | + ₹100-250 for profiling |
Granite is the default for Indian main doors and bathrooms because it is hard, water-resistant and reads as the auspicious raised umbara of Vastu tradition — kept clean, present and uncracked. Aluminium thresholds are lighter, faster to fit and the natural choice where you want a finned weather-bar with a brush or EPDM seal under an external leaf. Whichever you pick, confirm the height it will finish at before any mortar is mixed.
The height and clearance check
The saddle's top surface sets the door's bottom clearance and the accessibility of the opening. Two finished floor levels meet at the saddle, and the leaf's undercut (typically 6-12mm over finished floor) must clear the saddle's top.
| Parameter | Internal saddle | External / wet-area saddle | Accessible (RPwD) |
|---|---|---|---|
| Saddle height above finished floor | 6-15mm | 15-25mm (raised kerb) | ≤12-13mm, bevelled if >6mm |
| Leaf undercut over saddle | 3-6mm gap maintained | 3-6mm, with seal | flush or sealed brush |
| Slope (external) | nil | 1-2% fall outward | drainage channel + slope |
| Tolerance on level | ±1-2mm over width | ±1mm; never fall inward | flush ±2mm |
The accessibility rule matters: under the RPwD Act 2016 and Harmonised Guidelines 2021, a threshold on an accessible route should be ≤12-13mm, bevelled if it exceeds 6mm, and preferably flush. An external flush threshold needs a drainage channel and outward slope so it does not leak. Never let a raised saddle compromise free egress on a fire or exit door.
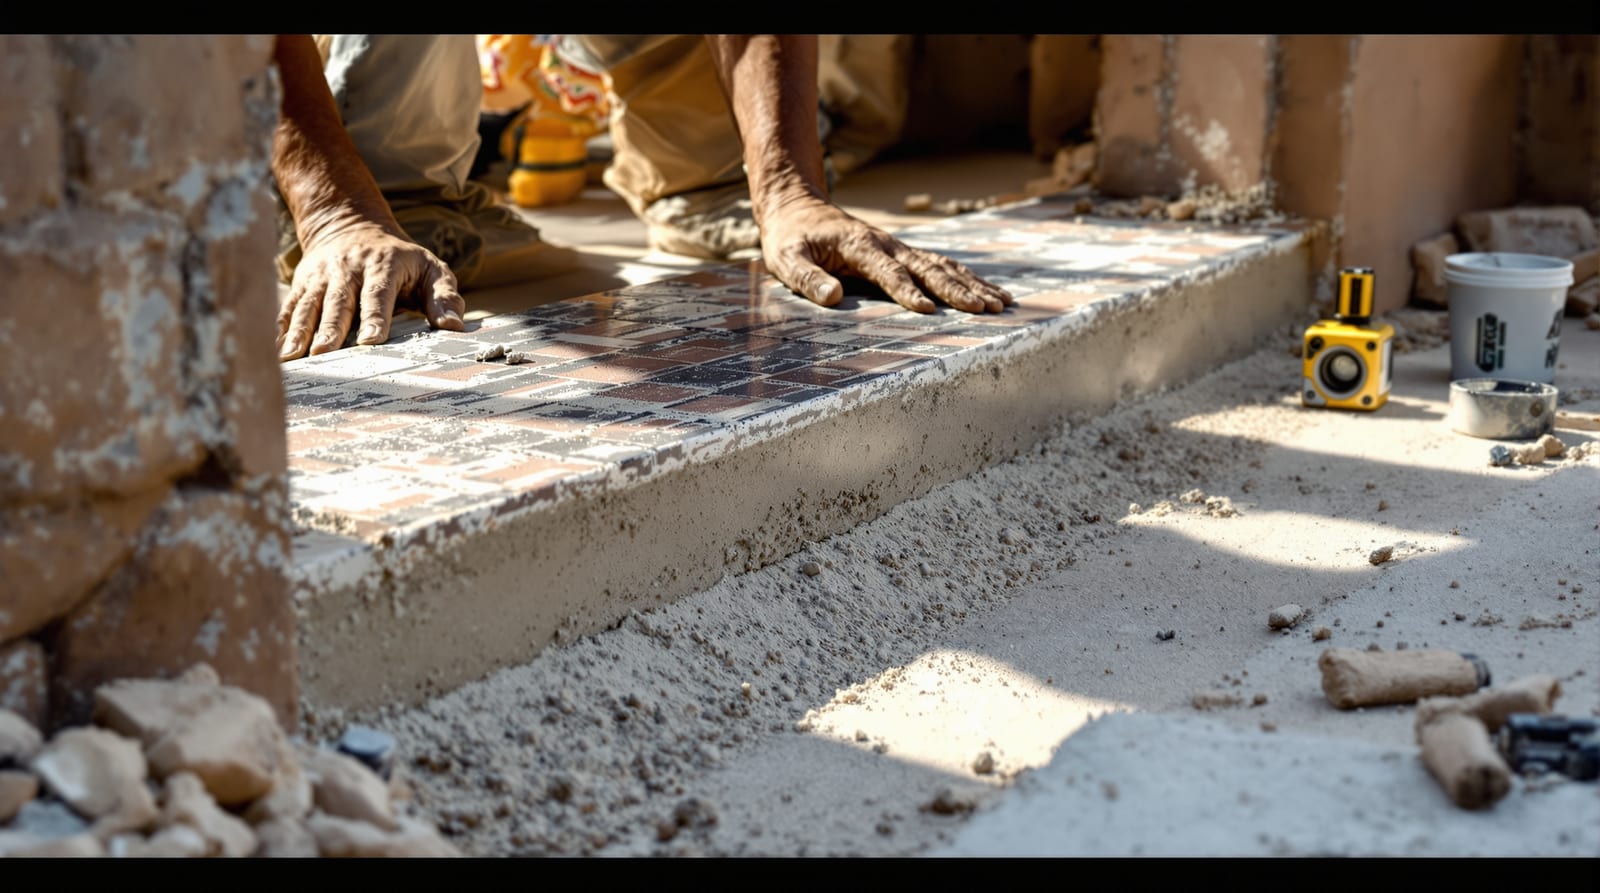
The door saddle installation sequence
The saddle goes in after the frame (chowkhat) is set plumb and the rough floor is ready, but before the final floor finishes are laid up to it — so the tile or marble can be cut neatly against the saddle, not the other way round.
Work through these steps in order:
1. Dry-fit and cut to length. Measure the opening at the floor, cut the saddle so it runs the full frame width (slightly under the frame rebate). A granite saddle is best cut to length and edge-polished at the stone yard; aluminium is cut on site with a fine blade.
2. Prepare the base. Clean and dampen the masonry/RCC base. For wet areas, the waterproofing membrane must already be laid and turned up at the opening so the saddle sits over it, not against bare masonry.
3. Mix the bedding. For a stone saddle use a 1:3 cement mortar bed, 15-25mm thick, or a polymer tile adhesive for thin slabs. For aluminium, lay a continuous bead of construction adhesive plus mechanical screws into the subfloor.
4. Bed and tap down. Lay the saddle on the fresh bed, tap with a rubber mallet, and check the level across the width and along the length. For external doors, set a deliberate 1-2% fall to the outside.
5. Level and align. Use a spirit level and the smaller of the two floor heights as datum. The saddle top must clear the leaf's undercut by 3-6mm. Pack and re-tap until true within ±1-2mm.
6. Cure, then seal. Let mortar take an initial set. Tool a continuous silicone bead (external/wet) or acrylic caulk (internal) along both long edges and at the jamb junctions.
7. Integrate the flooring. Cut and lay the adjoining tile/marble up to the saddle with a neat 2-3mm grout/sealant joint, not a butt against bare stone.
8. Finish. Fit any aluminium weather-bar or seal, check the door swings and shuts with even clearance, and clean off cured squeeze-out.
Bedding choices compared
Cement mortar gives a forgiving 15-25mm bed that lets you dial in the level on uneven RCC — the right choice for most granite saddles. Tile adhesive suits thin slabs over a flat screed and sets faster. For aluminium, adhesive alone creeps over time, so always add screws at 300-400mm centres. Whatever you choose, full bedding with no voids under the saddle is what stops it rocking and cracking later.
Sealing, waterproofing and flooring integration
The saddle is only as waterproof as its weakest joint. At an external or wet-area door, water finds the gap between the saddle and the frame, between the saddle and the floor, and under the saddle itself. Defend all three:
- Under the saddle: the waterproofing membrane turns up the opening and runs under the saddle so any water tracking down the wall is shed to the outside, never into the room.
- Saddle-to-frame: silicone the back edge against the frame foot; in wet areas prefer a WPC/PVC/RCC or aluminium frame, never untreated timber standing on a wet saddle.
- Saddle-to-floor: a tooled silicone or flexible joint both sides; on the external side, slope the saddle and add a throating/drip groove or a finned weather-bar so water cannot wick back.
For the wet-area kerb, bed the granite saddle slightly proud, slope it away from the dry room, and tie it to the bathroom waterproofing. This is the umbara logic made functional: a raised, sealed threshold that keeps water and dust on the right side of the door while staying ≤12-13mm where the route must remain accessible.
Tie the work to your wider frame and threshold detailing — see the door thresholds guide, threshold types, waterproofing door thresholds, door weather bar, zero threshold doors and the main door threshold Vastu note. The saddle's height interacts with the door undercut clearance, so plan both together, and refer back to the complete door guide and door frames pillar for the frame it sits within. To size and price the job, use the door threshold selector and the zero-threshold feasibility checker.
This is finish-carpentry-grade work: a skilled fitter who can cut stone, read a level and tool a clean sealant line will give you a saddle that lasts the life of the building. Rushed bedding, an inward fall, or a missing membrane turn-up are the failures that bring you back in the first monsoon.
Frequently asked questions
Should a door saddle be bedded on mortar or adhesive?
For a granite or stone saddle on an uneven RCC base, a 1:3 cement mortar bed (15-25mm) is best because it lets you correct the level. Use polymer tile adhesive for thin slabs on a flat screed, and construction adhesive plus screws for aluminium thresholds. Full bedding with no voids is the key in all cases.
How high should a door saddle be?
Internally, 6-15mm above the finished floor is typical. External and wet-area saddles sit 15-25mm as a raised kerb with an outward slope. On an accessible route under the RPwD Act 2016 and Harmonised Guidelines, keep it ≤12-13mm, bevel it if it exceeds 6mm, and prefer flush with a drainage channel.
How do I stop water leaking under the saddle in the monsoon?
Turn the waterproofing membrane up the opening and run it under the saddle, slope the saddle 1-2% outward with a drip groove or finned weather-bar, and seal both long edges and the frame junction with external-grade silicone. Bed it fully so there are no voids for water to track through.
Granite or aluminium saddle — which is better?
Granite suits main doors and bathrooms: hard, water-resistant and the traditional umbara. Aluminium suits internal floor-finish joints and external doors needing a finned weather-bar with a brush or EPDM seal. As a rule of thumb granite runs ₹250-700 per running ft fitted; aluminium ₹120-900 depending on the profile.
When in the build do I install the saddle?
After the frame is set plumb and the waterproofing is laid, but before the adjoining floor finishes — so the tile or marble is cut neatly up to the saddle with a sealed joint, not butted against bare stone.
Do I need a skilled carpenter for saddle installation?
Yes for quality work. Cutting and polishing stone, setting a true level within ±1-2mm, getting the external slope right and tooling a clean sealant line are finish-carpentry skills. A rushed saddle with an inward fall or missing membrane turn-up is the classic first-monsoon callback.
Export this guide
Related Guides — Deep-dive reading
Waterproofing Door Thresholds in India (India 2026)
Stopping water tracking under bathroom and external door frames with a raised kerb, granite saddle and a membrane that turns up into the threshold.
Home Doors & EntrancesZero Threshold Doors in India: Level Access (India 2026)
How to detail a flush, step-free door threshold for wheelchairs and ageing-in-place while still keeping monsoon water out.
Home Doors & EntrancesDoor Threshold Standards for Indian Homes: Sill, Weather Bar & Accessibility (2026)
What the strip under your door actually does - water, dust, draft and insect barrier, level transition and trip-safe accessibility - with the right material, the 12 mm accessibility limit, weather-bar and drip-groove detailing for external doors, and the wet-bathroom threshold.
Home Doors & EntrancesRelated Tools — Try Free
Door Threshold Selector
Choose the right threshold — saddle, ramped, aluminium-seal, weather-bar or zero — by door location and accessibility.
Threshold SelectorMonsoon-Readiness Checklist
Pre-rain home audit across 9 categories — terrace, drains, waterproofing, electrical, HVAC, pest, vehicles, documents.
Seasonal AuditFlooring Cost Calculator
Estimate the all-in cost of a floor — material, laying, wastage, skirting and GST — by area and material.
Flooring Calculator