
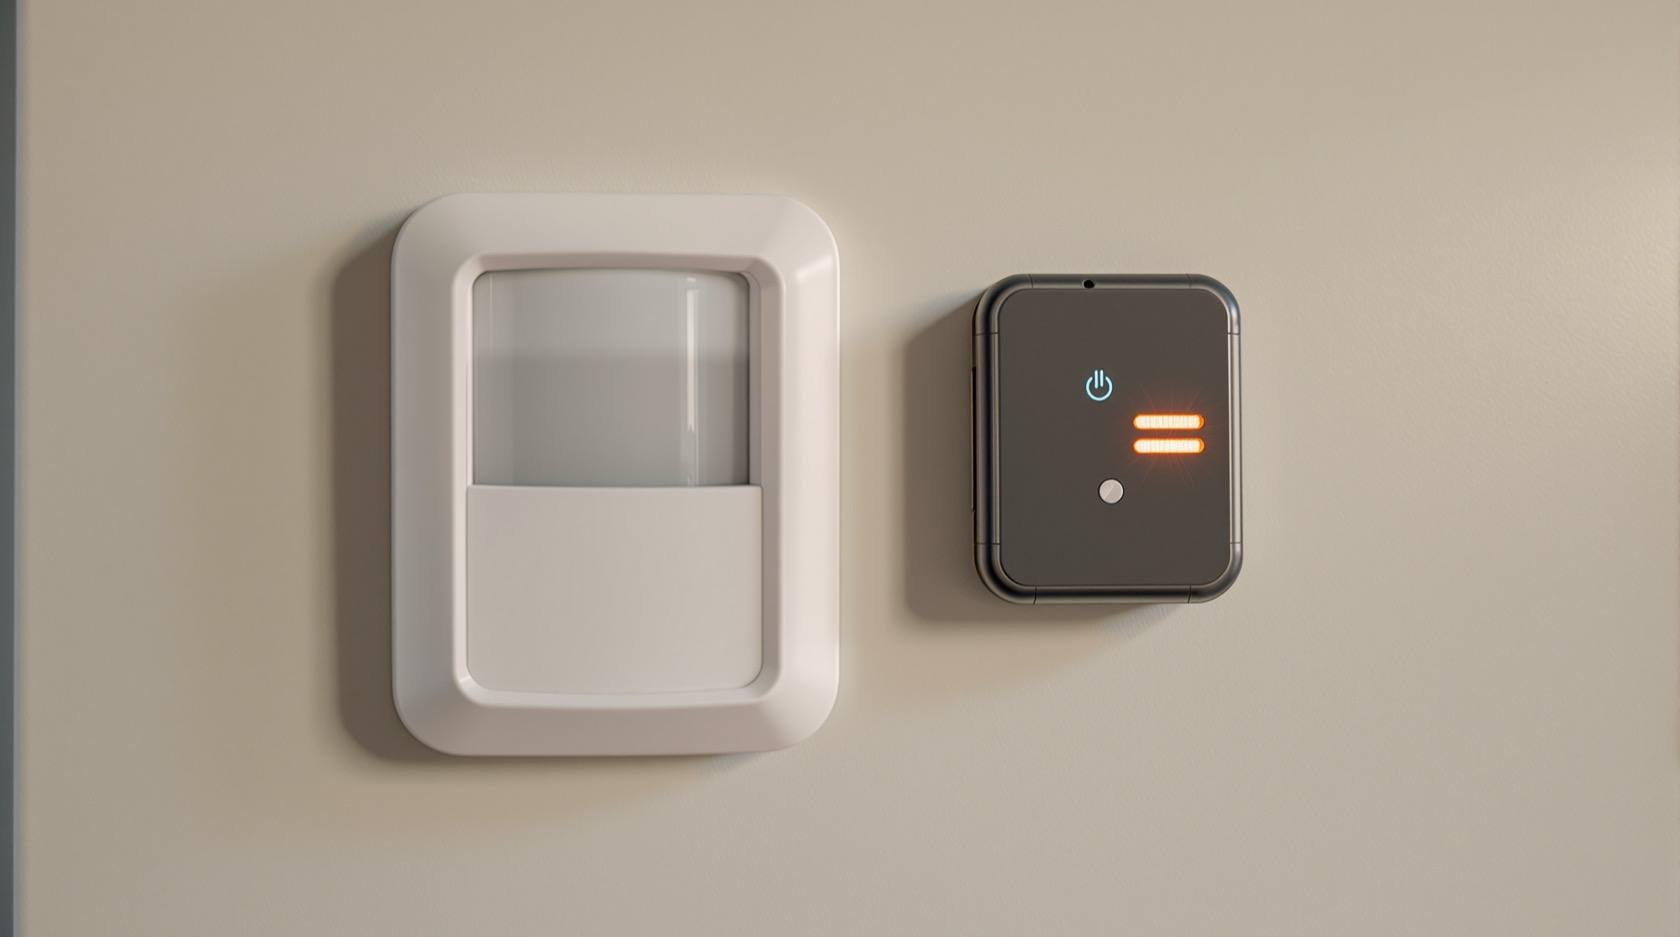
Security Sensor Testing in India (2026): A Homeowner's Monthly Walk-Test
How to regularly test the detectors your alarm depends on — PIR motion, door and window contacts, glass-break and vibration, and perimeter beams — safely and without setting off a real monitored alarm, so an untested sensor never becomes a silent gap the night it matters.
Your alarm is only as good as the detectors feeding it. The panel, the siren, the app on your phone — none of them see anything. The sensors do: the little white box that watches the hall, the two magnets on the back door, the strip that listens for breaking glass, the beam across the side passage. Every one of those is a small electronic promise that it will notice an intruder and tell the panel. And a promise you never check is just a hope.
The trouble is that a dead sensor fails silently. A PIR with a flat battery does not beep at you; a door contact whose magnet has drifted out of alignment does not announce itself; a beam blocked by a potted plant someone moved last month simply stops seeing. The system arms, the keypad says "ready", the green light glows — and there is a hole in your defence you will only discover the night someone walks through it. That is the whole reason this guide exists: a five-minute walk-test, done on a sensible routine, turns every silent sensor into one you have actually watched register.
The good news is that most of this is genuinely safe to do yourself, needs no tools, and catches the commonest failures — a flat battery, a dirty lens, a moved sofa in front of a beam. The one thing you must get right is testing without triggering a real, monitored alarm and sending a response you did not need. This guide walks through both: how to test each kind of sensor, and how to do it in test mode so nobody calls the police or your neighbours.
Scope and safety. This is an upkeep guide for homeowners, not an installation manual. Everything here — walk-tests, opening a door to check a contact, watching an indicator LED, swapping a user-accessible sensor battery, wiping a lens, keeping a logbook — is safe to do yourself. Anything else is not: re-siting a sensor, running or repairing wiring, opening a sealed detector, working at height on an outdoor beam, or reprogramming zones is for your installer or AMC technician. This is not a price guide or a buying guide — for choosing sensors see the relevant buying library; here we only keep what you own working. If your alarm is professionally monitored, life-safety and false-dispatch rules apply: always put the system in test mode or tell your monitoring provider before you start.
Why an untested sensor is the weakest link
An alarm system is a chain, and the sensors are the first link. A magnificent panel, a loud siren and a monitoring subscription are all worthless if the detector that should have started the chain never fired. In practice, when a home alarm fails to catch a break-in, it is rarely the panel that failed — it is one sensor that had quietly stopped working weeks earlier, and nobody knew.
The single most common cause is a flat battery in a wireless sensor. Wireless detectors run on small cells that last a year or two, and when one dies the sensor simply goes quiet. The second most common is obstruction and dirt: a lens filmed with dust, a cobweb across a beam, or furniture rearranged into a motion sensor's field of view so it now watches the back of a wardrobe instead of the room. None of these announce themselves. All of them are caught in minutes by a routine test.
This is the honest value proposition of maintenance: a well-tested cheap sensor beats a neglected expensive one every time. For the whole-system picture this guide sits inside, see the security system maintenance guide, and to slot sensor testing into a year-round rhythm alongside every other check, the security maintenance calendar.
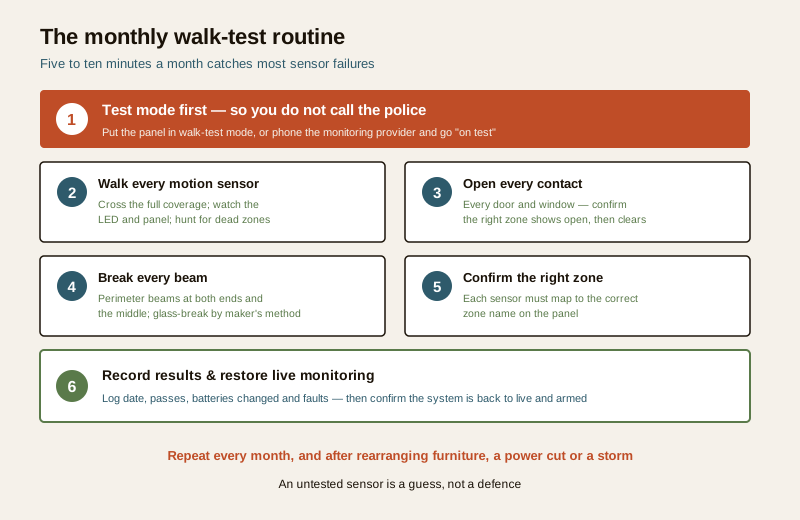
First: put the system in test mode so you do not call the police
This is the step people skip and regret. If your alarm is connected to a monitoring service, or has a siren and auto-dialler that will phone contacts, then walking in front of a sensor while the system is armed can trigger a real alarm — a wailing siren at 8pm, a call to your neighbours, or in some setups a dispatched response you now have to explain and, in some contracts, pay for.
There are two safe ways to avoid this, and you should use one of them every single time:
- Put the panel into walk-test or test mode. Most alarm panels have a dedicated test mode (sometimes called "walk test") that lets you trigger sensors so they register on the keypad or chime, without sounding the siren or notifying anyone. Your installer set this up; the exact keystrokes are in your panel manual. This is the cleanest option because the panel confirms each sensor for you as you trigger it.
- Tell your monitoring provider first. If you cannot find a walk-test mode, call your monitoring company or AMC provider before you start, tell them you are testing, and ask them to put your account "on test" for the next half hour so any signals are ignored. Call again when you finish to confirm you are back to live monitoring. Never assume — a forgotten "on test" left running means real break-in signals get ignored too.
Do not rely on simply disarming the system to test it — a disarmed panel usually will not register motion or door sensors at all, so you learn nothing. Test mode is the setting that lets a sensor fire and be seen without waking the street.
If your system is monitored, this step is not optional. A missed test-mode call is the difference between a quiet five-minute check and a false dispatch that cries wolf. Cry wolf often enough and a real alarm gets treated as another mistake. Always set test mode or notify the provider, and always confirm you are back to live monitoring at the end.
Testing each type of sensor
Once you are safely in test mode, work around the house methodically. The principle for every sensor is the same: trigger it the way an intruder would, and confirm that the panel actually sees it and attributes it to the right place.
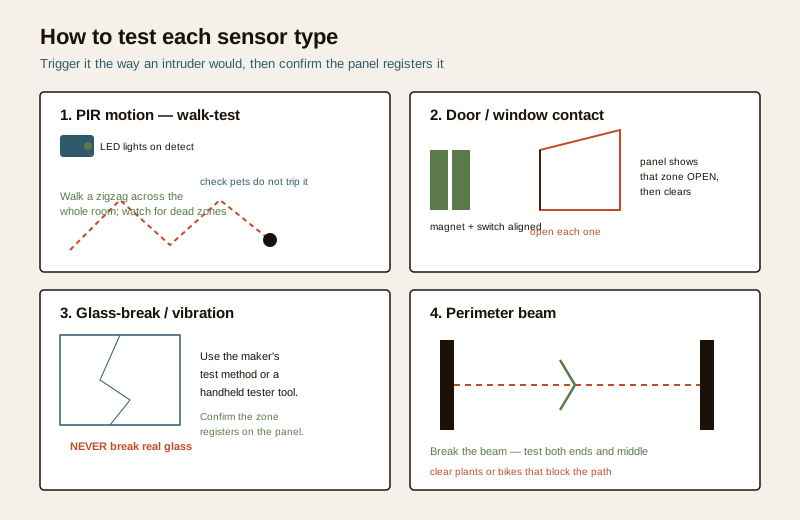
PIR motion sensors — the walk-test
A passive infrared (PIR) sensor watches a room for the moving warmth of a body. To test one, stand at the far edge of where it should be able to see, then walk slowly across its field of view — a zigzag across the room is better than a straight line, because it makes you cross the sensor's detection zones. Watch two things: the small indicator LED on the sensor itself (most light up briefly when they detect movement), and the keypad or app, which in walk-test mode should register the zone.
Cover the whole room, not just the middle. Walk near the corners, along the far wall, and across the doorway an intruder would actually use. What you are hunting for is a dead zone — a patch of the room where you move and nothing registers. A dead zone often means furniture has been rearranged into the sensor's line of sight, the sensor has been knocked and now points at the floor or ceiling, or the unit is failing. If you have a pet-immune sensor, this is also the moment to confirm the system is not being tripped by your dog or cat: watch whether normal pet-height movement registers when it should not. For the deeper detail on how these sensors see and where they belong, see the motion sensors guide.
Door and window contacts — open and confirm
A contact sensor is two parts: a magnet on the moving door or window, and a switch on the frame beside it. When the two separate, the switch reports "open". Testing is delightfully simple: with the system in test mode, open each door and each window fitted with a contact, one at a time, and confirm the panel shows that specific zone as open. Then close it and confirm it clears.
Go through every contact, not a sample. The failures you are looking for are a magnet that has drifted or been knocked out of alignment so the door reads "open" even when shut (or worse, stays "closed" when open), a loose sensor hanging by one screw, and a contact that simply no longer responds. A window contact that never registers is a window an intruder can open with your alarm none the wiser.
Glass-break and vibration sensors — use the maker's method
Glass-break sensors listen for the specific sound signature of breaking glass; vibration (shock) sensors feel the impact of someone trying to force a frame or a shutter. You must never test these by actually breaking glass or hitting the window — that is dangerous and needless. Instead, use the manufacturer's designated test method. Many acoustic glass-break sensors respond to a specific clap, key-jingle or a small handheld glass-break tester tool that plays the trigger sound; vibration sensors are usually tested with a firm tap in the way the maker's manual describes. Check your sensor's manual or ask your installer for the correct method, then confirm the zone registers on the panel. If you do not know the maker's method, that is a question for your installer, not a reason to improvise.
Perimeter beams — break the beam
An outdoor beam sensor projects an invisible infrared beam between two posts across a passage, gate line or boundary; when something breaks the beam, it triggers. Testing is exactly what it sounds like: with the system in test mode, walk through the beam (or pass your hand through it at the right height) and confirm the panel registers it. Do this at both ends and the middle of the run — a beam knocked slightly out of alignment can still work in one spot and miss in another. Check nothing has grown or been placed into the beam path: a plant, a parked bike or a washing line that now breaks the beam will cause constant false triggers, and one you eventually learn to ignore.
Confirm every sensor maps to the right zone
This is the check people forget, and it is important. Each sensor should report to a zone on the panel — "front door", "living room", "side passage" — so that when the alarm sounds you (or a responder) know where. As you test each sensor, confirm the panel names the right zone. A living-room PIR that registers as "garage" is not just untidy; it sends help to the wrong part of the house. If zones are mislabelled or a sensor reports to the wrong one, that is a programming fix for your installer.
How often to test: a sensible routine
Testing is only useful if it actually happens, so the schedule matters more than any single check. A simple, repeatable rhythm beats an ambitious plan you abandon. The table below is a reasonable homeowner routine; your monitoring contract or installer may specify their own intervals, which take precedence.
| Task | Frequency | Who does it |
|---|---|---|
| Quick arm/disarm and keypad check; look for trouble lights | Weekly | Homeowner (DIY-safe) |
| Full walk-test of every sensor in test mode; confirm zones | Monthly | Homeowner (DIY-safe) |
| Check and note wireless-sensor battery status | Monthly, and whenever a low-battery warning shows | Homeowner (DIY-safe) |
| Wipe sensor lenses and clear obstructions/cobwebs | Monthly, or when visibly dusty | Homeowner (DIY-safe) |
| Test glass-break and vibration sensors by maker's method | Quarterly | Homeowner (DIY-safe) |
| Full professional service: wiring, re-siting, alignment, panel | Annually (per AMC) | Qualified installer / AMC |
The heart of it is the monthly walk-test. Once a month, put the system in test mode, walk every motion sensor, open every contact, break every beam, and confirm each registers on the right zone — five to ten minutes for a normal home. Bundle it with the wider monthly routine on the security maintenance calendar, and test again any time you rearrange furniture, after a power cut, or after a storm that may have knocked an outdoor sensor.
Batteries, lenses and obstructions — the boring failures that actually happen
Dramatic sensor failures are rare. The boring ones are constant, and they are what your monthly check is really for.
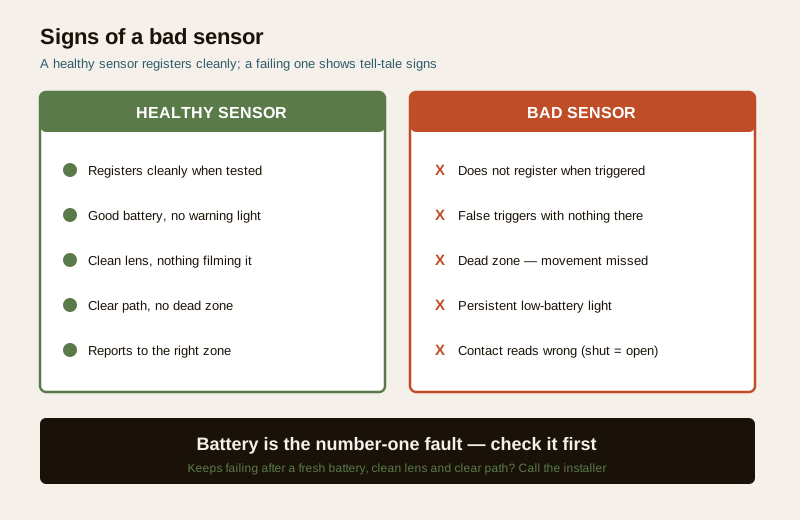
- Batteries in wireless sensors. Low battery is the number-one false-fault in wireless alarms. Most panels show a low-battery warning for a specific sensor — never ignore it; a sensor on a dying battery may work intermittently or not at all. Swapping a user-accessible sensor battery is a safe DIY job: use the exact type the manual specifies, note the date, and re-test the sensor afterwards. Do not wait for the warning on every unit — noting battery status monthly means you replace on your schedule, not at 2am when the panel starts chirping.
- Lenses and sensor faces. A PIR sees through a plastic lens; film it with dust, kitchen grease or a cobweb and its range and reliability drop. Wipe lenses gently with a soft dry or barely-damp cloth — no solvents, no scrubbing, no spraying cleaner directly at the unit. Clear cobwebs, which both block sensors and, ironically, cause false alarms when they drift across a PIR's view.
- Obstructions. Furniture moved in front of a motion sensor, a plant grown into a beam, a curtain now hanging across a contact, boxes stacked into a detection zone. The walk-test catches these because the sensor simply fails to register where it should — but a quick visual sweep for anything new in a sensor's path is worth doing every month too.
For the alarm hardware around the sensors — the panel, siren, backup battery and dialler — pair this with the burglar alarm maintenance guide, and for confirming the siren itself actually sounds, the security siren testing guide.
Signs of a bad sensor
Some faults show up in the monthly test; others announce themselves between tests. Learn the signals:
- It does not register. You walk the room, open the door, break the beam — and the panel shows nothing. The clearest sign of a dead or dying sensor, a flat battery, or a lost connection. Re-test after a battery change; if it still fails, call your installer.
- False triggers. A sensor that fires when nothing is there — a PIR set off by sunlight, a heater, a moving curtain or a cobweb; a beam broken by a plant; a vibration sensor tripped by passing lorries. Persistent false triggers are not just annoying; they train you to ignore the alarm, which is its own danger. Some are a cleaning or obstruction fix; some mean the sensor is wrongly sited and needs a professional to move it.
- A dead zone. Part of a room where movement does not register though it should — usually furniture in the way, a knocked sensor, or a failing unit.
- A persistent low-battery or trouble light for a specific sensor that a fresh battery does not clear — a sign the sensor itself, not the cell, is failing.
- A contact that reads wrong — a shut door showing "open", or an open window showing "closed" — meaning a drifted magnet or a failed switch.
A sensor that keeps failing after you have changed the battery, cleaned the lens and cleared obstructions has crossed from DIY-maintenance into repair. That is the point to stop and call the installer or AMC — do not keep resetting a sensor that keeps failing, because a fault you keep clearing is a gap you keep re-opening.
Record it in the logbook
A test you do not record is a test you cannot trust next month. Keep a simple logbook — a notebook by the panel, or a note on your phone — and after each walk-test jot the date, which sensors you tested, which passed, anything you cleaned or a battery you changed, and any fault you found and what you did about it. Note the date of each battery change so you can see a pattern and plan replacements.
The log does three things. It proves the system was working on a given date, which matters for insurance and for your own peace of mind. It reveals patterns — a sensor that needs its battery changed twice as often as the others is telling you something. And it stops the classic failure of testing everything except the one sensor you always forget. If your alarm handles any camera footage or entry data during servicing, remember that footage and logs are personal data under the DPDP Act 2023; keep them private and share them only with people who need them.
DIY-safe versus call-the-installer
| Safe to do yourself | Call the installer / AMC |
|---|---|
| Walk-testing motion sensors in test mode | Re-siting a sensor to fix a dead zone or false triggers |
| Opening doors and windows to test contacts | Fixing or replacing wiring on a wired sensor |
| Breaking a beam at ground level to test it | Working at height on a roofline or high outdoor beam |
| Swapping a user-accessible sensor battery | Opening a sealed or tamper-protected detector |
| Wiping a lens, clearing cobwebs and obstructions | Reprogramming or relabelling zones on the panel |
| Testing glass-break by the maker's method | A sensor that keeps failing after battery, cleaning and clearing |
| Keeping the logbook and noting faults | The annual full service and alignment |
The rule of thumb: if a check needs no tools and no ladder and you understand what you are testing, it is yours to do. The moment it involves mains wiring, height, opening sealed equipment, or a fault that will not clear, it belongs to a qualified technician. There is no prize for improvising on the thing that is meant to protect your home.
Your monthly sensor test in one checklist
- Put the panel in test/walk mode, or call the monitoring provider and go "on test", before you touch a sensor.
- Walk every PIR across its full coverage; watch the LED and the panel; hunt for dead zones and confirm pets are not triggering it.
- Open every door and window contact one by one; confirm the right zone shows open, then clears.
- Test glass-break and vibration sensors by the maker's method — never by breaking glass.
- Break every perimeter beam at both ends and the middle.
- Confirm each sensor maps to the correct zone name.
- Check wireless-sensor battery status; replace any warned or overdue cell with the right type.
- Wipe lenses and clear cobwebs, plants, furniture and anything new in a sensor's path.
- Record date, results, batteries changed and faults found in the logbook.
- Return the system to live monitoring and confirm it is armed and healthy.
An untested sensor is a guess. A tested one is a defence you have actually seen work. Five to ten minutes a month is the cheapest, surest security upgrade you will ever make — and it protects the money you already spent on the system.
Where to go next
- The security system maintenance guide — the whole-system upkeep picture this sensor test sits inside.
- The burglar alarm maintenance guide and the security siren testing guide — keeping the panel, siren, backup and dialler around your sensors healthy.
- The motion sensors guide — how PIR and other detectors see, and where they belong.
- The security maintenance calendar — slotting the monthly walk-test into a year-round rhythm.
- The maintenance sub-hub and the main security hub — every "keep it working" guide in one place.
References
- Digital Personal Data Protection Act, 2023 — CCTV footage, entry logs and any personal data touched during alarm servicing remain personal data; store them privately and share only with those who need them. Verify current provisions via official sources.
- Manufacturer installation and testing manuals — the authoritative source for how to test glass-break, vibration and beam sensors on your specific system, the correct battery type, and how to enter walk-test mode. Always follow the maker's method over any generic instruction.
This is an educational upkeep guide for homeowners, not an installation manual or legal advice. Everything described as DIY-safe needs no tools, no ladder and no wiring work; anything involving mains electrical work, working at height, opening sealed equipment, re-siting sensors or reprogramming zones is for a qualified installer or your AMC provider. If your system is professionally monitored, always use test mode or notify your provider before testing, and confirm live monitoring is restored afterwards.
Export this guide
Related Guides — Deep-dive reading
Glass-Break Sensors in India (2026): Catching a Smashed Pane Before Entry
How acoustic glass-break sensors listen for the twin sound of breaking glass, why they cover what door and window contacts miss, and how to place one sensor to protect a whole room of windows in an Indian home or shop.
SecurityAlarm Siren Not Working (2026): Why It Triggers but Stays Silent in India
Your burglar alarm detects and the panel reacts, but the siren does not sound, or sounds weak and thin. A calm, ordered diagnostic for Indian homes: the settings, power, backup battery, wiring and hardware faults that leave an alarm that cannot be heard, what you can safely check yourself, and when to call your installer.
SecurityFalse Alarm Prevention for Burglar Alarms in India: Causes & Fixes (2026)
Why home alarms cry wolf — ceiling fans, pets, heat, insects, weak batteries, power blips and poor door alignment — and how correct placement, the right sensors and simple upkeep keep the system trusted and armed.
SecurityRelated Tools — Try Free
Security Backup Power Calculator
Size a UPS/inverter and battery to keep CCTV, NVR, router and alarm running through a power cut — load, Ah, VA and cost.
Backup PowerWindow Cleaning Cost Calculator
Estimate professional window cleaning cost per visit and per year by access and frequency.
Window CalculatorAccess-Control Battery-Backup Calculator
Size the standby battery so an access system keeps running through a power cut, with an egress life-safety note.
Battery Backup