
NVR Not Detecting Camera (2026): The Installer's Ordered Fix for India
An IP camera that will not show up on the recorder is almost always a power, network or add-step problem long before the camera itself has failed. This professional guide walks the diagnosis in order, the accessible checks a facility person can do, and the skilled work a technician must handle.
You have plugged a new IP camera into the recorder, or an existing one has dropped off it, and the NVR simply will not see it. The search list comes up empty, the channel stays blank, or the camera sits there with an "add failed" or "no link" beside it. It is one of the most common calls in Indian CCTV work, and it is also one of the most misdiagnosed, because the instinct is to blame the camera. In practice the camera hardware is the rarest cause. Far more often the problem sits in the chain before it: no power or link reaching the camera, an IP address on the wrong subnet, a plug-and-play setting off, or the ONVIF and credential step not done.
An NVR fault rewards an ordered path far more than swapping parts. Work from the most common and cheapest cause toward the rarest and hardest, prove each link before moving to the next, and you will usually seat the camera on the recorder in a few minutes without pulling cable or climbing to the mount. This guide is written for installers, IT and facility staff who commission and maintain IP CCTV, so it goes past the homeowner basics into subnetting, PoE and ONVIF profiles.
Scope & safety. This is a diagnostic and commissioning guide for CCTV professionals and facility staff, not an installation manual and not a price or buying guide. The accessible checks here are safe: reading a port LED, reseating a patch lead, running the NVR auto-search, checking an IP range and a camera password, enabling ONVIF or plug-and-play, and updating firmware through the interface. Anything involving a camera at height on a ladder, mains or PoE switch electrical faults, re-cabling a run, or VLAN and managed-switch reconfiguration is skilled work for a qualified technician, not improvisation at height. Camera footage and the recorder login are personal data under the DPDP Act 2023, so treat credentials and any exported clips with care. For "repair or replace" and what a part costs, defer to the cost and lifecycle guides.
First, the question that halves the problem
Before touching a setting, establish one thing: does the camera even have power and a link? An NVR cannot detect a camera that is not powered or not electrically connected to it, no matter how correct the settings are. Everything downstream, subnet, ONVIF, credentials, is meaningless until the camera is alive on the wire.
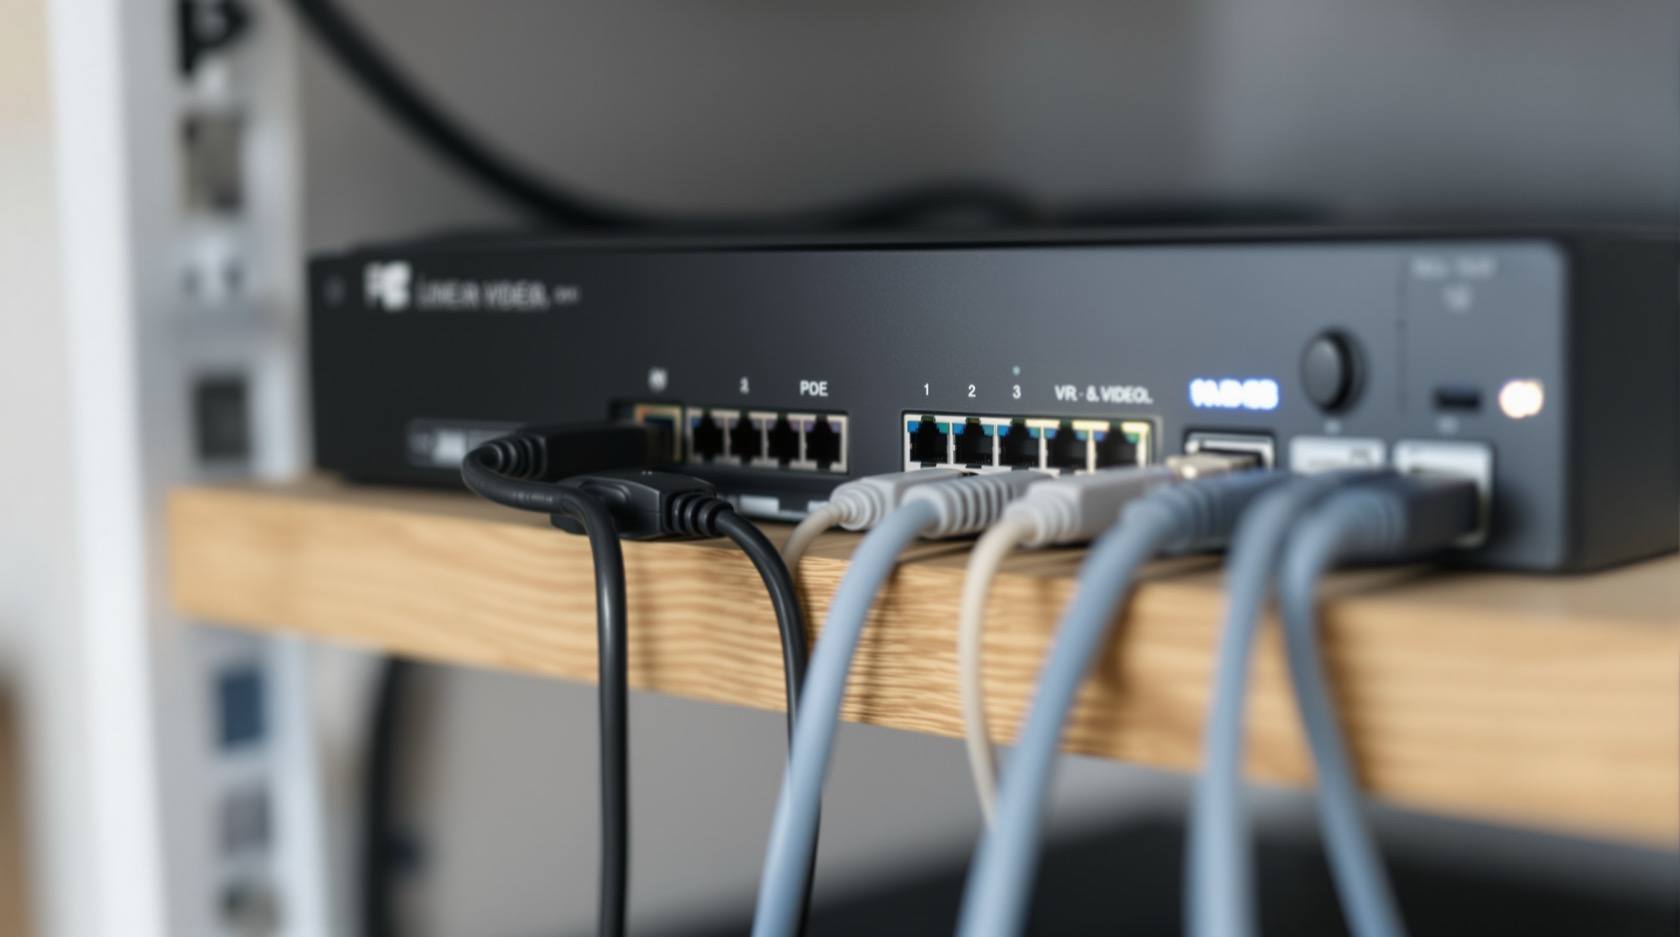
So the very first look is at the physical link, not the menu. On a PoE NVR or PoE switch, the port carries both power and data, so a single dead port explains everything at once. Read the port LED and, if the camera is reachable, watch whether it boots. That single check tells you which half of the problem you are in: a dead physical link, or a live camera the recorder cannot negotiate with.
The likely causes, most common first
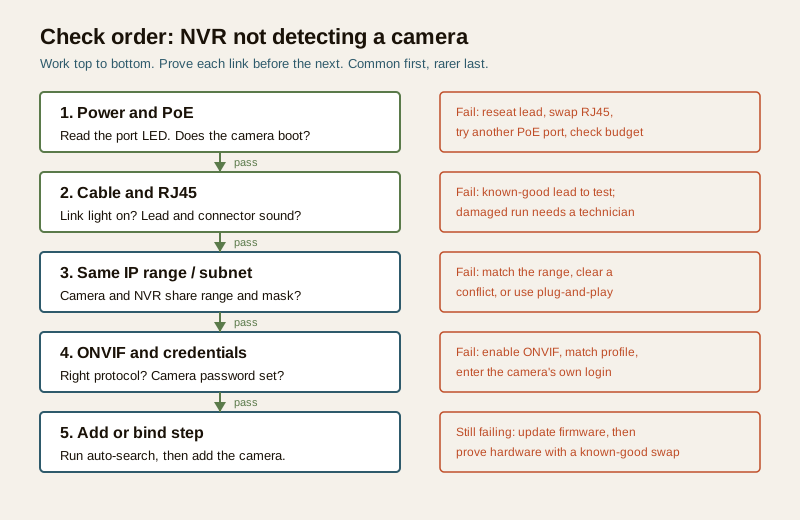
IP-camera detection faults follow a dependable order. The physical and network layers fail far more often than the camera firmware or hardware. Here is that order, from the cause to suspect first to the one to suspect last.
| Cause (common to rare) | Why it happens | The fix |
|---|---|---|
| No power or link | PoE not delivered from the NVR or switch port, tripped budget, bad patch lead or RJ45, port LED dark | Read the port LED, reseat or swap the lead, move to another PoE port, confirm the camera boots |
| IP or subnet mismatch | Camera and NVR on different subnets or IP ranges, an IP-address conflict, camera still on its factory address | Put both in the same range, clear the conflict, or let plug-and-play assign the address |
| Add or bind step not done | Camera never added, wrong ONVIF or private protocol chosen, wrong camera username or password | Run auto-search, pick the right protocol, enter the correct camera credentials |
| Protocol or compatibility | A third-party camera that is not ONVIF-compatible, or needs the correct ONVIF profile | Enable ONVIF on the camera, match the profile, or accept limited or no support |
| Firmware mismatch | NVR and camera firmware out of step, a known interop bug | Update both to compatible firmware through the interface |
| Faulty camera or NVR port | A genuinely dead camera, or a failed PoE or LAN port on the recorder | Prove by swapping to a known-good port and a known-good camera; replace what fails |
The single most important discipline is to resist jumping to the bottom rows. A camera declared "faulty" is, nine times out of ten, sitting on a dead port or the wrong subnet. Work down the ladder, not up from the bottom.
The step-by-step diagnostic path
Walk the path in order and stop the moment the camera seats on the recorder.
Stage 1 — power and the PoE link
1. Read the port LED. On a PoE NVR or switch, each port has a link and often a PoE indicator. A completely dark port for that camera means no link is being made: the fault is the port, the lead or the camera end, not the recorder software.
2. Confirm the camera boots. A powered camera draws current and, on many models, an infrared ring glows faintly in the dark or a status LED lights. If nothing on the camera stirs, no usable power is reaching it.
3. Reseat and swap the patch lead. At the NVR or patch panel end, unplug and firmly re-seat the RJ45 until it clicks. A borrowed known-good lead is the fastest way to rule the cable in or out.
4. Move to another PoE port. If the camera links on a different port, the original port or its PoE delivery is the fault, not the camera. If it stays dark on a known-good port, the problem is downstream in the run or at the camera.
5. Watch the PoE budget. A PoE NVR or switch has a total wattage budget. A recorder loaded with power-hungry cameras can starve the last port added, so a camera that works alone but not when everything is connected points at an exhausted budget, not a fault.
If the camera has power and a link but still will not appear, move to the network layer.
Stage 2 — the same IP range
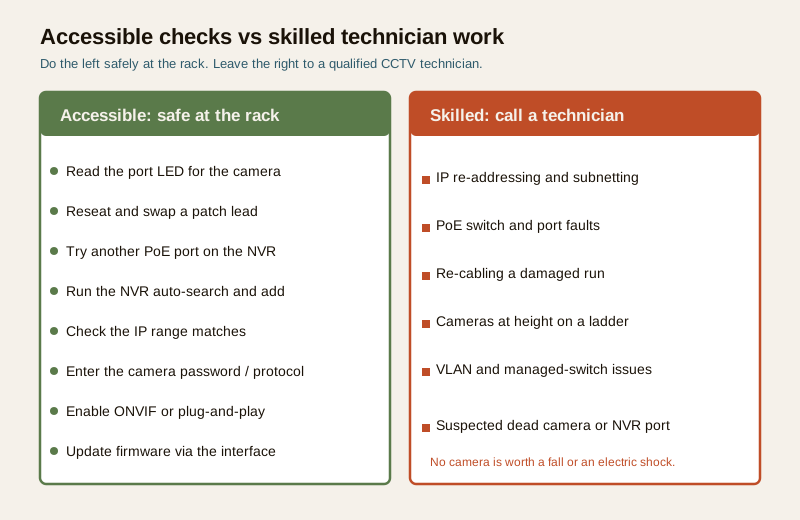
6. Check both are on the same subnet. This is the classic professional trip-up. An NVR's plug-and-play PoE ports usually hand out addresses on an internal range; a camera hard-set to a different range, or an existing camera on the main LAN that does not match the NVR, will never be found. Camera and NVR must share the same IP range and mask to talk.
7. Clear an IP-address conflict. Two devices on the same address knock each other off. A new camera on a factory default that collides with an existing device is a common cause of "it was working, now it is not." Give the camera a unique address in range.
8. Set the camera's IP, or let plug-and-play do it. Either enable the NVR's plug-and-play so it assigns the address automatically, or set the camera's IP manually into the NVR's range using the camera's own tool or web interface. Do one or the other, not a mix that fights itself.
Stage 3 — the add step, ONVIF and credentials
9. Run the auto-search. Use the NVR's search, scan or refresh in the channel or device menu. A camera that appears in the list but is not added simply needs the add or bind step completed. A camera that never appears is still a link or subnet problem, so go back a stage.
10. Pick the right protocol. For the same brand, the private protocol usually gives full features. For a third-party camera, choose ONVIF. Selecting the wrong protocol is a frequent "add failed."
11. Enter the correct camera credentials. The camera has its own username and password, which is not the NVR login. A blank field, the NVR's password, or an un-activated camera default is a very common "add failed" or "user name or password error." Enter the camera's real credentials.
12. Enable ONVIF on the camera. Some cameras ship with ONVIF off. If the NVR sees the camera on the network but cannot bind it over ONVIF, enable ONVIF in the camera's own settings and match the ONVIF profile the NVR expects.
Stage 4 — protocol, firmware and hardware
13. Confirm compatibility. A camera that is genuinely not ONVIF-compatible, or only speaks a closed protocol, may never bind to a third-party NVR. This is a buying-time decision more than a fix, which is why compatibility belongs in the prevention section.
14. Update firmware through the interface. A known interop bug between NVR and camera firmware can block detection. Update both to compatible versions through the recorder or camera interface, following the maker's notes.
15. Prove the hardware last. Only after all of the above: put a known-good camera on the same port and cable. If that works and yours does not, the camera is suspect. Put your camera on a known-good port. If it still fails, the camera or its run is at fault. Now, and only now, is replacement the answer.
Accessible checks versus skilled technician work
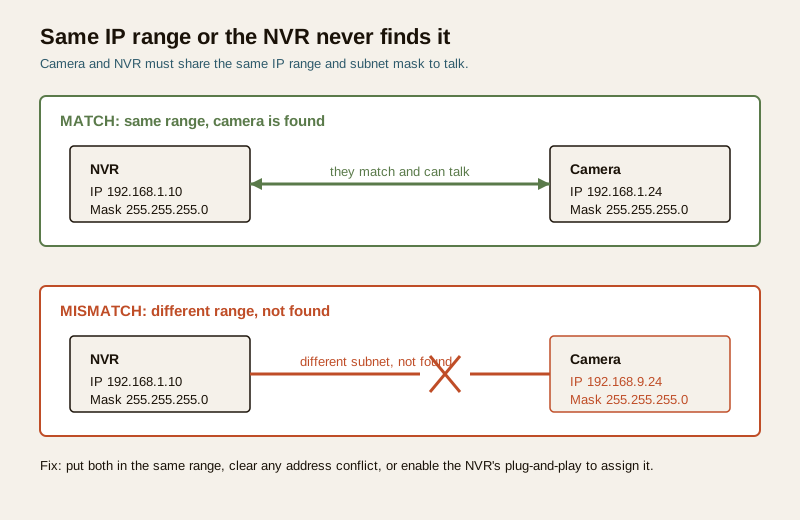
The split matters because it keeps people safe and stops small faults becoming big ones. These are the accessible checks a competent facility person can carry out at the rack, with no ladder and no electrical work:
- Read the port LED for the camera on the NVR or PoE switch to see whether a link exists at all.
- Reseat and swap a patch lead at the rack or patch-panel end, and try another PoE port on the recorder.
- Run the NVR auto-search and complete the add or bind step for a camera that appears in the list.
- Check the IP range so camera and NVR share the same subnet, and clear an obvious address conflict.
- Enter or correct the camera password and select the right protocol when the add fails on credentials.
- Enable ONVIF or plug-and-play in the camera and NVR settings.
- Update firmware on the NVR and camera through their own interfaces.
That is the full extent of accessible work. The following belong to a qualified CCTV technician, and forcing them is how people get hurt or make the fault worse:
- IP re-addressing and subnetting across a live network, where a wrong mask or gateway can knock other devices offline.
- PoE switch and port faults, a failed managed switch, an exhausted or misconfigured PoE budget, or suspected damage inside the switch.
- Re-cabling a run, tracing and replacing a cut, corroded, water-logged or rodent-chewed cable between the camera and the rack.
- Cameras at height, any work on a mount on a wall, eave or pole. A camera is never worth a fall from a ladder.
- VLAN and managed-switch issues, where the camera sits on a segregated network segment that never reaches the NVR, needing switch and VLAN reconfiguration.
Preventing the next "camera not found"
Most repeat detection faults are designed in at purchase and commissioning, not born on the day they appear. A little discipline keeps the recorder seeing every camera.
- Buy compatible, buy ONVIF. If you mix brands, confirm each camera is genuinely ONVIF-compatible and states the profile before it goes on site. A camera that only speaks a closed protocol will fight a third-party NVR forever. Choosing kit is a buying decision, so lean on the buying and compatibility guides at purchase time.
- Document every IP. Keep an as-built list of each camera's IP address, subnet, credentials and firmware version. The single most time-saving artefact in CCTV maintenance is a current IP map; without it, every future fault starts from zero.
- Standardise credentials policy. Activate every camera with a strong, recorded password, never leave a factory default, and store the credentials where the maintenance team can reach them under the DPDP-aware access controls you already run.
- Keep firmware in step. When you update an NVR, check whether the cameras need a matching update, so an interop gap does not surface weeks later as a camera that silently drops off.
- Label the ports. A physical label linking each PoE port to its camera location turns a "which one is dark" hunt into a glance.
A quick recurring-fault checklist
- Is there a current as-built IP and credentials map for the site?
- Are all cameras confirmed ONVIF-compatible with the recorded profile?
- Is the PoE budget within the NVR or switch limit, with headroom for spares?
- Are camera and NVR firmware versions logged and kept compatible?
- After any network change, does someone confirm every channel came back?
Where to go next
If you have worked through this and want to go deeper into a related symptom, these companion guides carry on where this one ends:
- The security-system troubleshooting pillar is the parent guide covering faults across cameras, recorders, alarms and locks.
- If a camera that was added now shows as offline in the app, that network-and-connectivity guide takes over from here.
- For the broader "no feed" symptom on a camera, see CCTV camera not working.
- To prove or rule out a cable run properly, see CCTV cable inspection.
- To keep the recorder itself healthy, see NVR and DVR maintenance.
- For the full picture, browse the CCTV hub.
Key takeaways
- Prove power and the link first. An NVR cannot detect a camera that has no PoE or no connection; read the port LED before you open a menu.
- Match the subnet before you blame the camera. Camera and NVR must share the same IP range and mask; a mismatch or an address conflict is a top cause of "not found."
- Complete the add step correctly. Run auto-search, pick the right protocol, enable ONVIF, and enter the camera's own credentials, not the NVR login.
- Suspect firmware and hardware last. Update firmware through the interface, and only then prove a fault by swapping to a known-good port and camera.
- Keep the accessible checks separate from skilled work. LED, lead, auto-search, IP range, password, ONVIF and firmware are accessible; subnetting, PoE faults, re-cabling, height and VLANs are for a technician.
- Prevent the repeat. Buy ONVIF-compatible kit, document every IP and credential, keep firmware in step, and label the ports.
Export this guide
Related Guides — Deep-dive reading
Boom Barrier Not Operating (2026): Diagnose a Stuck or Dead Parking Gate Arm
A calm, ordered diagnostic path for a facility or security team when an apartment, office or parking boom barrier will not raise or lower, is stuck up or down, or will not respond — starting with the manual release so a jammed arm never traps a vehicle or blocks a fire lane, then power, trigger, safety loop and mechanical causes, and a clear line between safe checks and technician-only work.
SecurityCCTV Recording Failure in India (2026): Live View Works but Nothing Was Saved
You open the recorder to pull footage of an incident and there is nothing there, even though every camera shows a crisp live picture. A calm, ordered guide to why an Indian CCTV system records live but saves nothing, and how to fix it before the next incident.
SecurityCCTV Remote Access in India (2026): Watch From Your Phone, Safely
How to view your own cameras from anywhere without leaving the front door open to the internet — change the defaults, use strong credentials and 2FA, keep firmware current, prefer the vendor's secure cloud relay or a VPN, segment the camera network, and treat footage as personal data.
SecurityRelated Tools — Try Free
Security Cabling & PoE Planner
Estimate cable length, drops, PoE power budget, the right switch, conduit and cost for a CCTV/security cabling plan.
Cabling PlannerPoE Power-Budget Calculator
Whether a PoE switch can power the connected cameras with cable-loss headroom, and how many devices it supports.
PoE BudgetSecurity System Cost Estimator
Estimate the all-in capex with GST, annual running cost and 5-year total cost of ownership of a home or building security system.
Cost Estimator