
Intrusion Sensor Schedule for India (2026): Every Sensor, Zone and Response
A ready-to-adapt sensor schedule that gives every detector an ID, a location, a detection technology, a panel zone input and a defined response, so the panel is programmed, cabled and tested against one shared map.
An intrusion alarm is only as good as the list that describes it. The intrusion sensor schedule is that list — one row for every detector on the job, tying each PIR, door contact, glass-break, beam or panic button to a location, a panel zone input and a defined response. It is the single sheet the whole alarm hangs on: the panel is programmed from it, the cable and power schedules are drawn from it, and commissioning tests against it row by row.
This resource is part of the Studio Matrx professional security resources toolkit and its parent professional security resources guide. It sits at the design-and-procurement stage: after the site survey and zoning plan, before the installer programs the panel and runs cable. Produce it as the consultant or system designer, hand it to the installer and the client, and keep it as the as-built record after commissioning.
Scope & how to read this. This is a ready-to-adapt professional template, not authoritative, legal or contractual wording. Detection ranges, coverage, mounting and battery life come from the manufacturer datasheet and the site survey, never from a generic table — verify each on your project. Sensors that watch identifiable people or interiors touch personal data under the Digital Personal Data Protection (DPDP) Act, 2023, so keep the schedule and any linked footage access controlled. Get professional review for tender or specification documents.
What the schedule is, and where it sits
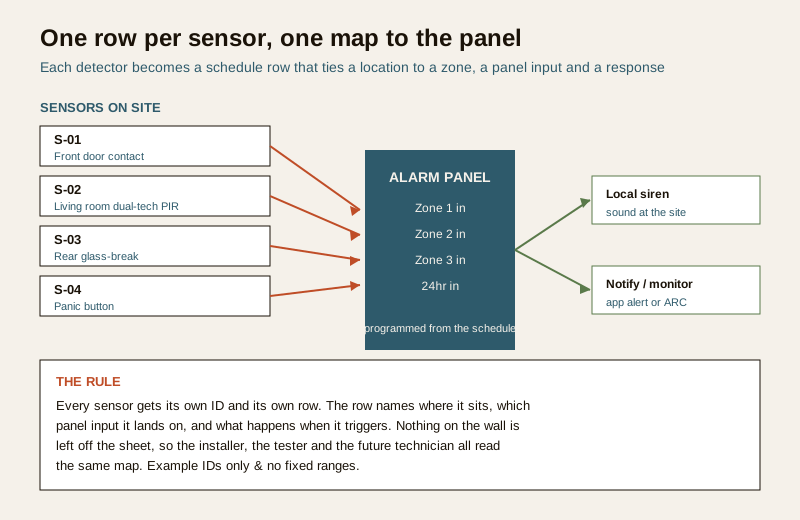
A sensor schedule turns a zoning idea into a buildable, testable list. Every detector is a row. Every row answers the same questions: what is it, where is it, how does it detect, which zone does it belong to, which panel input does it land on, is it wired or wireless, how is it powered, how should the panel treat it, and what happens when it triggers.
Upstream, it draws on the survey and the perimeter alarm system design — the decision about which openings, volumes and boundaries need cover. Downstream, three documents come straight from it: the panel programming (each zone input, its response type and its label), the cable and power schedule (which sensors are wired, and which run on battery), and the commissioning and test log (walk-test each row, confirm the zone lights up, confirm the response fires). If those three ever disagree, it is because the schedule changed and they did not — so the schedule is the master.
The columns, explained
Keep the column set tight enough to fit on a page and complete enough to program and test from. These are the fields that earn their place:
- Sensor ref / ID — a short unique tag such as S-01. This ID is what the panel label, the cable schedule and the test log all refer to. Number in a logical walk order, not randomly.
- Location — plain words a technician and the client both understand: "living room, north corner", "rear utility window".
- Sensor type — door / window contact, motion detector, glass-break, vibration / shock, beam, or panic button.
- Detection tech — how it senses: PIR (passive infra-red), microwave, dual-tech (PIR and microwave together), magnetic reed (contacts), acoustic / shock (glass-break, vibration) or active infra-red (beams). This drives false-alarm behaviour and mounting.
- Coverage / zone area — what it protects in words: "front door opening", "hall volume", "east boundary line". Do not invent a metre figure; take coverage from the datasheet and the survey.
- Panel / zone input — which physical input or wireless zone number on the panel it reports to. Several sensors may share a zone by design; record it deliberately.
- Wired / wireless — the wiring method. Wireless rows also need a supervision and battery note.
- Power — panel-powered over the cable, or its own battery. For battery sensors, note that battery life and low-battery reporting are per the datasheet.
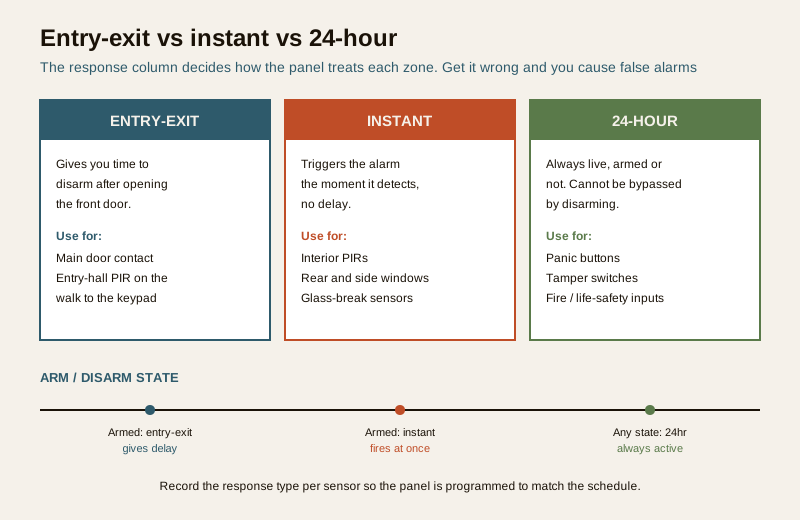
- Response type — entry-exit (delayed so you can disarm on the way in), instant (fires immediately when armed), or 24-hour (always live — panic and tamper belong here). This is the field people get wrong.
- Pet-immune — yes / no. Where pets roam, specify a pet-immune or dual-tech detector so nobody swaps in a plain PIR that alarms on the dog.
- Response — what happens on trigger: local siren, notify app, monitoring station / ARC, or a combination.
- Tamper — is the tamper contact wired and monitored (recommended for every device). Tamper is a 24-hour condition.
- Status — proposed / installed / tested / handed over, updated as the job progresses.
Worked example schedule
Example only — adapt to your project. The rows below are illustrative to show how the sheet reads. IDs, zones and types are generic. Take real coverage, mounting and battery figures from the manufacturer datasheet and your site survey; do not treat anything here as a fixed range or specification.
| Ref | Location | Type | Detection tech | Zone input | Wired / wireless | Response type | Pet-immune | Response | Tamper | Status |
|---|---|---|---|---|---|---|---|---|---|---|
| S-01 | Front door | Door contact | Magnetic reed | Zone 1 | Wired | Entry-exit | n/a | Siren + notify | Yes | Installed |
| S-02 | Living room, corner | Motion detector | Dual-tech (PIR + microwave) | Zone 2 | Wired | Instant | Yes | Siren + notify | Yes | Installed |
| S-03 | Rear utility window | Glass-break | Acoustic | Zone 3 | Wired | Instant | n/a | Siren + notify | Yes | Proposed |
| S-04 | Side boundary | Beam | Active infra-red | Zone 4 | Wired | Instant | n/a | Notify | Yes | Proposed |
| S-05 | Bedroom | Panic button | Manual | 24hr zone | Wireless | 24-hour | n/a | Notify / monitor | Yes | Installed |
| S-06 | Store room door | Door contact | Magnetic reed | Zone 5 | Wireless | 24-hour | n/a | Siren + notify | Yes | Proposed |
Read a single row as a sentence: S-02 is a dual-tech motion detector in the living-room corner, on zone 2, wired, treated as instant when armed, pet-immune, sounding the siren and pushing a notification, with its tamper monitored, and it is installed. That is enough for the installer to program zone 2 and for the tester to walk-test it.
Blank template — copy this
Paste this into your sheet, keep the headers, and add one row per detector. The placeholder rows show the shape; delete them and fill your own.
| Ref | Location | Type | Detection tech | Coverage / zone | Zone input | Wired / wireless | Power | Response type | Pet-immune | Response | Tamper | Status |
|---|---|---|---|---|---|---|---|---|---|---|---|---|
| S-01 | ... | ... | ... | ... | Zone ... | ... | ... | ... | Yes / No | ... | Yes / No | Proposed |
| S-02 | ... | ... | ... | ... | Zone ... | ... | ... | ... | Yes / No | ... | Yes / No | Proposed |
| S-03 | ... | ... | ... | ... | Zone ... | ... | ... | ... | Yes / No | ... | Yes / No | Proposed |
| ... | ... | ... | ... | ... | ... | ... | ... | ... | ... | ... | ... | ... |
Field guide: getting each column right
Zone logic. Group sensors so an alert tells you something useful. Keep entry doors on their own zone, interior volume on another, and the perimeter or boundary on a third, so a triggered zone points to a place. Do not lump the whole house onto one zone — you lose the location and the ability to bypass one area. Set the zoning against the perimeter alarm system design so indoor and outdoor layers line up.
Entry-exit vs instant vs 24-hour. The response column is where schedules go wrong. The door you walk in through, and the detector you pass on the way to the keypad, must be entry-exit or delayed — otherwise you alarm yourself every time you come home. Interior and perimeter detectors you never pass while armed should be instant. Panic buttons and tamper are 24-hour: always live, never silenced by disarming.
Layer the detection. Aim to catch an intruder at more than one point — perimeter contacts and beams first, interior motion next, and a last line on the highest-value room. A single ring is one failure away from missing everything.
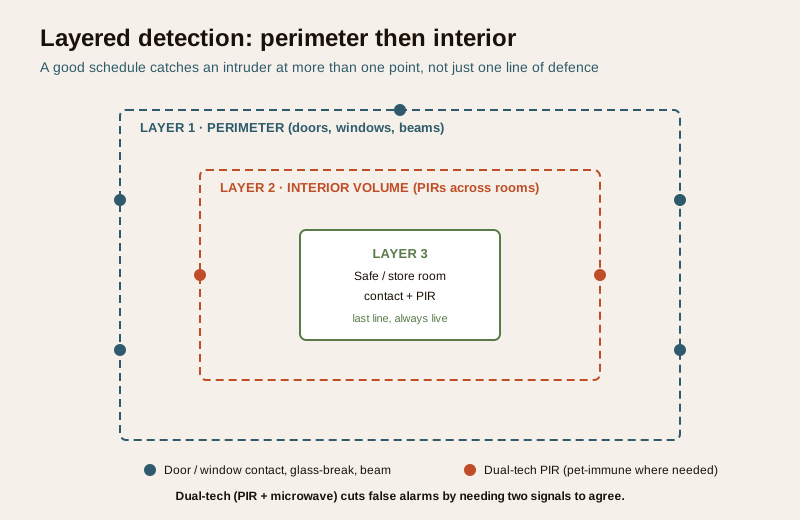
Reduce false alarms with the right tech. False alarms kill trust in an alarm faster than anything. Use dual-tech (PIR and microwave) detectors where heat sources, draughts or reflections would fool a plain PIR — the panel only reacts when both technologies agree. If you are weighing the two technologies, the PIR vs microwave sensor guide explains the trade-off; record the choice you make in the detection-tech column.
Pet immunity. Where pets roam, specify a pet-immune or suitably-mounted detector and mark the pet-immune column yes, so nobody later swaps in an ordinary PIR that trips on the dog. Confirm the arrangement against the datasheet and the pet's size and habits.
Wireless supervision and battery. Wireless sensors save cabling but add two duties to the row: supervision (the panel notices if a sensor stops reporting) and a battery plan (low-battery warnings and a replacement routine). Note both in the power and status columns. A wireless sensor with a dead battery and no supervision is an invisible hole.
Panic and tamper as 24-hour. Panic buttons summon help whether or not the system is armed, so they are 24-hour. Tamper contacts — on every device and the panel box — are 24-hour too, so opening a sensor or cutting a cable raises an alarm at any time. Wire and monitor tamper on every row.
Common mistakes to design out
- Unzoned system. Everything on one zone, so a trigger tells you the house is alarmed but not where. Split into meaningful zones.
- No tamper. Sensors and panel with tamper unwired, so a device can be opened or a cable cut silently. Wire tamper and treat it as 24-hour.
- Cheap single-tech everywhere. Plain PIRs in every difficult spot, then a wave of false alarms and a client who disarms the system for good. Match the detection tech to the location.
- No battery plan for wireless. Wireless sensors fitted with no supervision and no replacement routine, quietly going dark. Record supervision and a battery schedule.
- Wrong response type on the entry path. The front-door detector set to instant, so the owner alarms themselves daily. Make the entry path entry-exit.
- Schedule not kept as-built. Positions and zones change on site but the sheet is not updated, so the panel, the labels and the test log drift apart. Update the schedule as the master.
How it connects to the other documents
The sensor schedule is the hub of the alarm paperwork:
- Panel and zoning — the panel is programmed straight from the zone-input and response-type columns; the zone labels are the sensor locations.
- Perimeter and beams — outdoor detection lines, including beams, are designed in the perimeter beam sensor guide and the perimeter alarm system design, then listed as rows here.
- Cable and power schedule — the wired / wireless and power columns feed the cabling take-off and the battery list.
- Cost and BOQ — the count and mix of rows drives the bill of quantities; ground your budget with the burglar alarm cost guide rather than a fixed price per sensor.
- Commissioning and test log — each row is walk-tested at handover; the status column tracks proposed to tested to handed over.
- Camera schedule — where CCTV shares the same premises, keep the camera schedule in step so alarm zones and camera views cover the same weak points.
Completion checklist
- Every detector on site has a row and a unique ID.
- Each row names a location, a detection tech, a zone input and a response.
- Entry path is entry-exit; interior and perimeter are instant; panic and tamper are 24-hour.
- Pet-immune specified wherever pets roam.
- Wireless rows carry supervision and a battery plan.
- Tamper wired and monitored on every device.
- No fabricated ranges, models or prices — datasheet and survey govern the numbers.
- Schedule updated as-built after commissioning and kept with the handover pack.
Key takeaways
- The intrusion sensor schedule is one row per detector, mapping each to a location, detection technology, panel zone input and response — the master the panel, cabling and testing all follow.
- The response column (entry-exit, instant, 24-hour) and the tamper and pet-immune fields are where schedules most often go wrong; set them deliberately.
- Layer detection, use dual-tech to cut false alarms, and give wireless sensors supervision and a battery plan.
- Take ranges, coverage and battery life from the manufacturer datasheet and the site survey — never a generic table.
References
- Manufacturer datasheets for each detector and the alarm panel — the authoritative source for detection coverage, mounting, supervision and battery life; follow them over any generic figure.
- Digital Personal Data Protection Act, 2023 — where sensors or linked cameras capture identifiable people, treat access to the schedule and footage as personal data.
- Bureau of Indian Standards catalogue for any electrical or life-safety standard referenced in the install; verify the current edition at https://www.services.bis.gov.in/
This is an educational template to adapt, not legal, contractual or design authority. Detection ranges, mounting and battery figures come from the manufacturer and your site survey; cabling and any mains-electrical connection are qualified professional tasks. Get professional and legal review for tender and specification documents.
Export this guide
Related Guides — Deep-dive reading
False Alarm Prevention for Burglar Alarms in India: Causes & Fixes (2026)
Why home alarms cry wolf — ceiling fans, pets, heat, insects, weak batteries, power blips and poor door alignment — and how correct placement, the right sensors and simple upkeep keep the system trusted and armed.
SecurityGlass-Break Sensors in India (2026): Catching a Smashed Pane Before Entry
How acoustic glass-break sensors listen for the twin sound of breaking glass, why they cover what door and window contacts miss, and how to place one sensor to protect a whole room of windows in an Indian home or shop.
SecurityAccess Control Testing Checklist for India (2026): Every Door Opens and Locks as Designed
A ready-to-adapt per-door and system checklist to verify an access-control installation at commissioning and as a periodic check, with the egress and fire-to-release life-safety tests that must always pass before sign-off.
SecurityRelated Tools — Try Free
Burglar Alarm System Selector
Answer a few questions about your property, cabling, coverage, monitoring and power and get the right burglar alarm — wired / wireless / hybrid, self or professionally monitored — with the design non-negotiables.
Alarm SelectorCCTV Camera Coverage & Count Calculator
Estimate how many CCTV cameras you need, the NVR channels, storage in TB for your retention period, and an indicative all-in cost with GST.
CCTV CalculatorCCTV Commissioning & Handover Checklist
An interactive go/no-go checklist to run at handover — cameras day and night, recording, alerts, passwords and documents — before you clear the final bill.
Handover Checklist