
Floor Scratch Repair India: Fixing Scratches and Scuffs on Wood, Laminate, Vitrified, Marble, Granite and Vinyl Floors
How to repair scratches and scuffs on every floor type in Indian homes: wax sticks and markers for wood and laminate, buffing fine scratches on vitrified and PGVT, honing and re-polishing marble and granite, heat and plank-swap fixes for vinyl and SPC, plus DIY versus call-a-pro guidance and how to stop scratches happening.
A scratch on the floor catches your eye every single time you walk past it — a pale streak across a wooden plank, a dull line on a glossy vitrified tile, a scuff trail where a chair was dragged. The good news is that most floor scratches in Indian homes are shallow surface marks, and most of those you can fix yourself in twenty minutes with a five-rupee wax stick or a microfibre pad. The catch is knowing which scratches are skin-deep and which have cut through the wear layer — because the wrong "fix" on the wrong floor can make the damage permanent. This guide walks through repairing scratches and scuffs on every floor type Indians actually live on, when to DIY versus call a pro, and how to stop them coming back.
Surface scratch or deep scratch? Look before you touch
Every repair decision starts with one question: did the scratch break through the protective top layer, or only scuff it? On a wooden or laminate floor that top layer is a printed decor film and a lacquer or melamine wear coat; on a vitrified tile it is the fired glaze; on marble or granite it is the polished surface of the stone itself; on vinyl and SPC it is a clear PVC wear layer. A surface scratch sits inside that layer and only dulls or whitens it — it usually disappears under a damp finger or a drop of oil, because the liquid fills the micro-groove and refracts light the same way again. A deep scratch has cut down to the substrate: on laminate you will see the brown HDF core or a different colour at the bottom of the groove; on a tile you can catch a fingernail in it; on stone it is a real gouge with raised edges.
The fingernail test is the simplest field check anyone can do. Drag a fingernail across the scratch at right angles. If your nail glides over and catches nothing, it is a surface scratch — buff, fill or blend it. If your nail snags in the groove, it is deep — that means filling, professional honing, or in the worst case swapping the damaged plank or tile. The diagram below shows the difference in cross-section.
A two-rupee field trick before you do anything: wipe the scratch clean, then wet it. If a wet wipe makes the mark vanish, it is purely cosmetic and a clear oil, a touch-up marker or a coat of finish will hide it for good. If it stays visible when wet, it has real depth and needs filling or professional work.
Repair by material — the master table
Each floor type scratches differently and is repaired differently. Use this as your map; the sections below give the step-by-step.
| Floor type | Fine surface scratch | Deeper scratch / gouge | DIY or pro? | Indicative cost |
|---|---|---|---|---|
| Solid hardwood | Wood wax stick or matching marker; buff; touch-up oil/lacquer | Fill with wood filler, sand local area, re-stain and recoat; whole floor can be sanded and refinished | DIY for spot fixes; pro for sand-and-refinish | Wax stick ₹150-500; full refinish ₹80-200/sq ft |
| Engineered wood | Same as solid for the wear coat | Limited sanding (thin top veneer); deep damage = plank swap | DIY spot; pro for plank swap | Marker/wax ₹150-500; plank swap ₹150-400/plank fitted |
| Laminate | Laminate repair wax/filler in matching shade; blend | Cannot be sanded or refinished — swap the plank | DIY fill; pro/handyman for swap | Repair kit ₹300-800; plank swap labour ₹300-800/plank |
| Vitrified / PGVT / GVT | Buff with white polishing compound or fine pad; clear scratch-conceal | Glaze gouges are hard to fix invisibly; deep = replace the tile | DIY buff; pro to replace a tile | Polishing compound ₹150-400; tile swap ₹150-350/tile fitted |
| Marble | Re-hone the spot with fine diamond pad + re-polish/crystallise | Professional diamond grinding and polishing of the area | Light DIY possible; pro recommended | Spot pro work part of polishing ₹15-45/sq ft |
| Granite | Buff with granite polishing compound; very scratch-resistant | Rare; professional diamond polishing | Mostly pro | Polishing ₹12-30/sq ft |
| Vinyl / LVT | Buff scuff with melamine sponge; clear vinyl scratch filler | Heat-and-blend or replace the plank/tile | DIY for scuffs; handyman for swap | Filler/sponge ₹100-400; plank swap ₹150-400/plank |
| SPC / WPC | Buff fine marks; clear repair wax in matching tone | Replace the click plank (lift back to the wall) | DIY fill; handyman for swap | Repair wax ₹300-600; plank swap labour ₹300-700/plank |
Costs are indicative and vary by city, brand and vendor; add 18% GST on materials. Brands you will find in Indian hardware shops and online include Pidilite and Fevicol wood fillers, Asian Paints touch-up products, and imported laminate and vinyl repair kits.
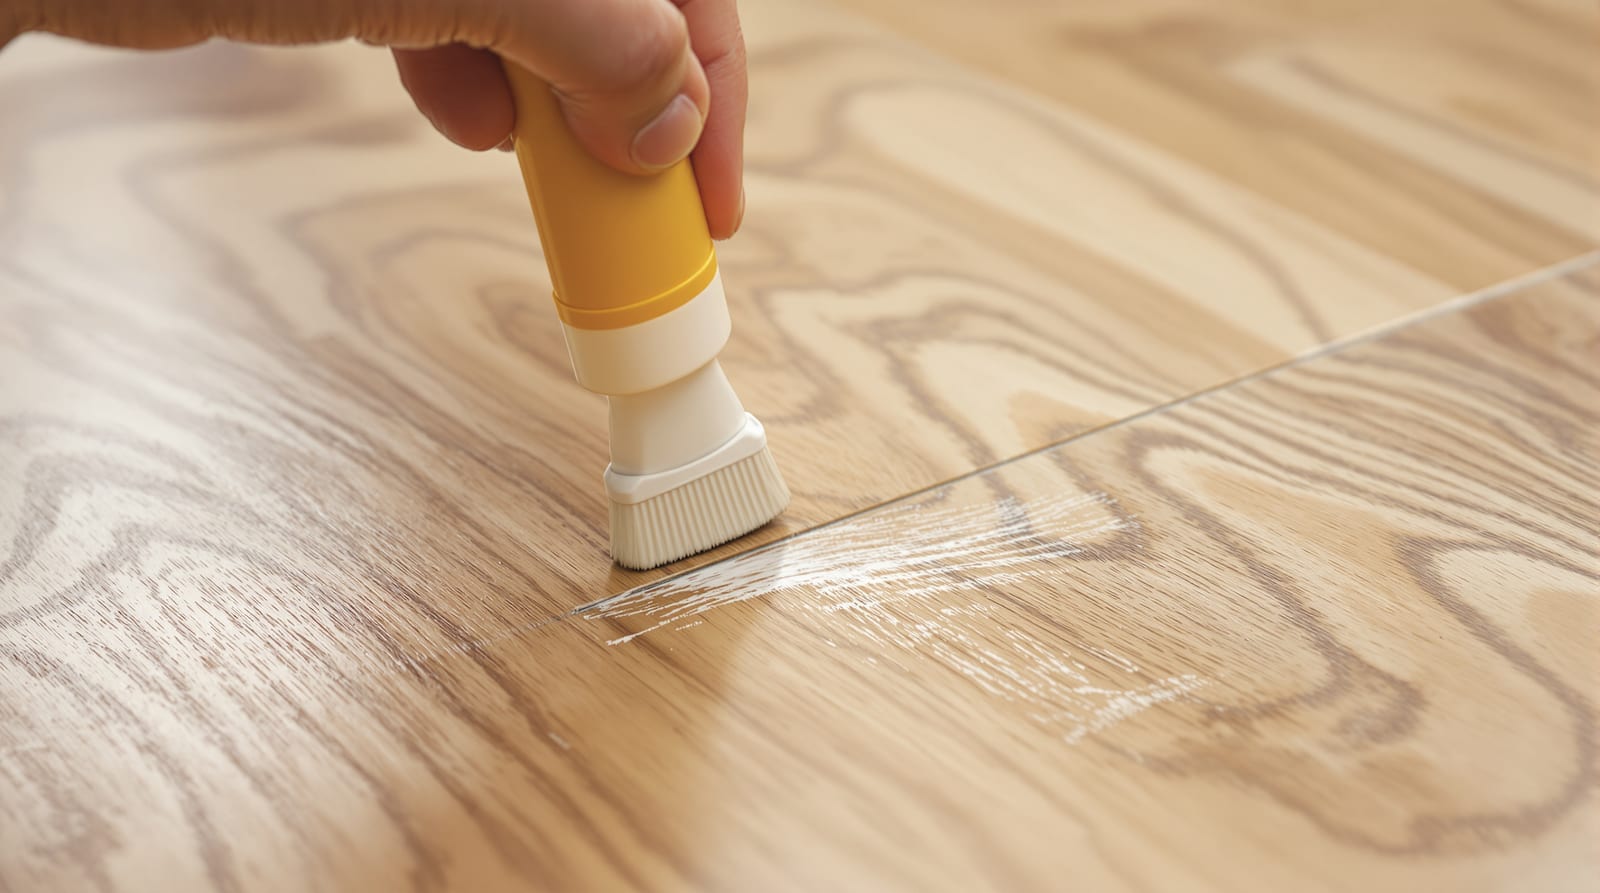
Wood and laminate: wax sticks, markers, blend, recoat
Wood and laminate are where DIY scratch repair wins most often, because the damage is usually in the lacquer or melamine wear coat, not the material below.
For a fine scratch or scuff on solid or engineered wood, start with the gentlest option. Clean the area with a damp microfibre cloth and let it dry. Rub a tiny amount of the floor's own maintenance oil, or even a drop of olive or coconut oil on a soft cloth, along the scratch; on an oiled or matte-lacquer floor this alone often makes a light scratch disappear. If it is still visible, use a wood touch-up marker matched to your shade — draw along the groove, wipe the excess off the flat surface immediately, and let it set. For a scratch you can just feel, melt a wood wax repair stick (warm it with a hairdryer or a lighter held a safe distance away), press the soft wax into the groove with a plastic scraper, level it flush, and buff with a cloth once hard. Finish a lacquered floor with a dab of clear floor lacquer so the repaired spot matches the surrounding sheen.
Laminate is the important exception: it is a printed photographic layer, not real wood, so it can never be sanded or refinished. A light scratch can be hidden with a laminate repair wax or filler crayon in the matching decor colour — clean, fill, scrape flush, buff. But a deep scratch that exposes the brown HDF core cannot be made invisible; the honest fix is to swap that plank. Because laminate, SPC and WPC are floating click floors, a handyman can lift the planks back from the nearest wall, replace the damaged one, and re-lay — far easier than it sounds, and the reason you should always keep spare planks from the original lot.
Solid hardwood is the most forgiving in the long run: when scratches and wear accumulate over five to ten years, the whole floor can be sanded back and refinished, erasing everything at once. Engineered wood can sometimes take one or two light sandings depending on its top veneer thickness, but a thin veneer cannot, so treat engineered scratches as spot repairs or plank swaps rather than candidates for full sanding.
Vitrified and PGVT tiles: why the glossy ones show every mark
Vitrified tiles are extremely hard and scratch-resistant, which is why most "scratches" on them are not scratches at all — they are metal-marking, where the soft sole of a steel stool leg or a dragged vessel leaves a grey streak of metal on the glaze. These wipe off with a cream cleaner or a melamine sponge and a little scrubbing; they are not damage.
Genuine fine scratches on the glaze can be reduced by buffing with a white polishing compound or a very fine non-scratch pad, worked in small circles and wiped clean. The hard truth, though, is that polished glazed tiles — PGVT and the high-gloss GVT everyone loves — show scratches far more than matte or double-charged tiles, because a mirror surface reveals every interruption to the reflection, just as a scratch is obvious on a glossy car but invisible on a matte one. There is no way to fully re-glaze a fired tile at home. A deep gouge through the glaze cannot be polished out invisibly; the realistic fix is to chisel out that single tile and re-fix a spare from the same dye-lot. This is exactly why a labelled spare box from your original purchase is the cheapest insurance you can own. For the full method, see our guide on cracked tile replacement, which applies equally to a badly scratched tile.
When you next buy tiles for a high-traffic or pet-heavy area, choosing matte, textured or double-charged vitrified over high-gloss PGVT will save you years of visible scratching.
Marble and granite: hone and re-polish
Natural stone scratches are a different animal because the scratch is in the stone, not in a coating — so you cannot fill it, you have to abrade the surface back level and re-polish it.
Marble is relatively soft and scratches more easily than granite; it also etches (dulls) from acids like lemon, vinegar or harsh cleaners, and people often mistake an etch mark for a scratch. A true light scratch or scuff on marble can be improved with a fine diamond hand pad worked wet over the spot, followed by a marble polishing powder or crystallisation compound to bring the shine back — but blending a spot repair invisibly into a polished marble floor is genuinely skilful, and for anything beyond a faint mark you are better off calling the marble-polishing crew who already grind and crystallise floors for ₹15-45 per sq ft. Never attack a marble scratch with sandpaper or an abrasive scouring pad; you will leave a dull patch worse than the scratch.
Granite is one of the hardest flooring stones and rarely scratches in normal use; when it picks up a fine surface mark, a granite polishing compound buffed in usually restores it, and deeper work is a professional diamond-polishing job. For the wider care routines that prevent both stones from dulling, see our guides on marble polishing and care and granite floor care.
Vinyl, LVT and SPC: heat, buff, or replace the plank
Vinyl floors have a clear PVC wear layer over a printed design, so light scuffs are usually surface marks on that wear layer. A black scuff comes off with a melamine sponge; a fine scratch can be buffed and then sealed with a clear vinyl scratch filler or a thin coat of vinyl floor polish to restore the sheen. Some installers use a gentle heat trick — warming the area with a hairdryer to soften the vinyl slightly so a shallow scratch relaxes and closes — but keep the heat moderate and moving, because too much will distort the plank.
A deep scratch that has cut through the wear layer into the printed film cannot be hidden, and the right fix is to replace that plank or tile. Glue-down LVT planks are prised up and re-stuck; click SPC and WPC planks are unclicked back to the nearest wall and re-laid with a spare. SPC's rigid stone-composite core makes it tougher and more dent-resistant than flexible LVT, but its wear layer still scratches if you drag grit across it, so the same buff-or-swap logic applies.
DIY or call a pro? A simple decision rule
| Situation | Do it yourself | Call a professional |
|---|---|---|
| Light surface scratch / scuff (nail glides over) | Yes — wax stick, marker, oil-blend, buff | — |
| Black metal marks on tiles | Yes — cream cleaner / melamine sponge | — |
| One deep scratch on laminate, vinyl, SPC | Fill if minor; swap plank if you are handy | Handyman/installer for a clean swap |
| Deep gouge through tile glaze | — | Tile mason: replace the tile from spare lot |
| Marble scratch beyond a faint mark | Faint only | Marble polishing crew: hone + crystallise |
| Many scratches across a whole wood floor | — | Sand-and-refinish contractor |
| Granite scratch | Buff fine marks | Stone polisher for anything deeper |
The rule of thumb: if the fix is reversible and cheap (wax, marker, buffing, a spare plank you can re-lay), try it yourself. If the fix is abrasive and irreversible (sanding a floor, grinding stone, chiselling out a tile) and you have not done it before, the cost of getting a pro is far less than the cost of a botched permanent repair.
Stopping scratches before they start
Almost every floor scratch in an Indian home traces back to three things: grit underfoot, furniture without pads, and dragging instead of lifting. Control those and you will barely ever need this guide again.
- Felt pads under everything. Stick felt or rubber glides under every chair, sofa, table, bed and stool leg, and re-check them every few months — a worn pad with a grain of sand embedded in it becomes a scratching tool. This is the single highest-value habit for any floor.
- Grit control at the door. Most scratching grit is sand and dust walked in from outside. Place a coarse outdoor mat plus an absorbent indoor mat at every entry, and a no-shoes-indoors habit (already common in Indian homes) keeps abrasive street grit off the floor entirely.
- Sweep or dry-mop before you mop. Mopping over loose grit grinds it across the surface. Dry-sweep or vacuum first, especially on glossy PGVT and vinyl that show every mark.
- Lift, do not drag. Move heavy furniture on sliders or with two people lifting; never drag a steel-legged cot or a sofa across tile or wood.
- Castors and entry zones. Use soft, floor-safe castors on office chairs (or a chair mat), and trim pets' nails on hardwood and vinyl.
- Right material for the traffic. In pet homes and high-traffic rooms, matte and textured finishes, double-charged vitrified, SPC and quality laminate hide and resist scratches better than high-gloss surfaces.
For the day-to-day cleaning routines that keep scratches from showing, read our floor cleaning guide. The maintenance deep-dives for each surface go further: wooden floor maintenance, vitrified tile maintenance, and marble polishing and care all cover scratch-prevention habits specific to that material, and a badly scratched tile is handled exactly like a cracked one in our cracked tile replacement guide. To budget a professional re-polish or refinish, the Studio Matrx floor polishing cost calculator gives you a quick estimate.
Frequently asked questions
How do I know if a floor scratch can be repaired at home?
Do the fingernail test: drag your nail across the scratch. If it glides over without catching, it is a surface scratch inside the wear layer or polish — a wax stick, touch-up marker, oil-blend or buffing will fix it yourself. If your nail snags in the groove, the scratch is deep and usually needs professional honing, or swapping the damaged plank or tile.
Can scratches be removed from vitrified or PGVT tiles?
Fine surface scratches can be reduced by buffing with a white polishing compound or fine non-scratch pad, and most grey "scratches" are actually metal marks that wipe off with a cream cleaner. But polished PGVT shows scratches far more than matte tiles, and a deep gouge through the fired glaze cannot be polished out invisibly — the realistic fix is to replace that tile with a spare from the same dye-lot, which is why you should always keep a labelled spare box.
How do I fix a deep scratch on a laminate floor?
You cannot sand or refinish laminate because the surface is a printed film, so a light scratch is hidden with a matching laminate repair wax or filler crayon, and a deep scratch that exposes the brown core is fixed by swapping the plank. Laminate is a floating click floor, so a handyman can lift the planks back to the nearest wall, replace the damaged one with a spare, and re-lay.
Will sandpaper remove a scratch from marble?
No — never use ordinary sandpaper or a scouring pad on marble; it leaves a dull, rough patch worse than the scratch. Marble is honed and re-polished with fine diamond pads and a crystallisation or polishing compound, which for anything beyond a faint mark is best left to a marble-polishing crew who already grind and polish floors for ₹15-45 per sq ft.
What is the best way to stop floors from scratching?
Three habits prevent most damage: stick felt pads under all furniture legs and re-check them regularly, control grit with mats at every door and a no-shoes-indoors rule, and always sweep before mopping so you are not grinding sand across the surface. Lift furniture rather than dragging it, and in high-traffic or pet homes choose matte or textured finishes over high-gloss ones.
Export this guide
Related Guides — Deep-dive reading
Wooden Floor Maintenance in India: Care for Wood, Engineered & Laminate Floors
How to clean, protect, recoat and repair wood, engineered and laminate floors in India's humid, monsoon-prone climate.
Flooring & SurfacesMarble Polishing and Care India: Stop Etching and Stains, Daily pH-Neutral Cleaning, Diamond Polishing and Re-Sealing
How to keep marble floors gleaming in Indian homes: why marble etches and stains, pH-neutral daily care, the professional diamond grinding to crystallisation polishing process, how often to re-polish and reseal, and removing etch marks and oil stains.
Flooring & SurfacesWooden Flooring in India: Solid, Engineered, Laminate & Wood-Look SPC Compared (2026)
The decision-oriented hub for wood floors in Indian homes — the three families plus wood-look SPC, the warm look, honest monsoon-and-termite caveats, where wood works, finishes, installation types, ₹/sq ft ranges and maintenance.
Flooring & SurfacesRelated Tools — Try Free
Flooring Cost Calculator
Estimate the all-in cost of a floor — material, laying, wastage, skirting and GST — by area and material.
Flooring CalculatorDoor Material Comparison Tool
Compare 2–4 door materials on cost, durability, maintenance, security and moisture resistance.
Comparison ToolFloor Polishing Cost Calculator
Estimate marble, granite, mosaic, Kota or wood floor polishing cost by area, condition and gloss.
Flooring Calculator