
CCTV Coverage Schedule for India (2026): Mapping Every Camera to a Purpose
A ready-to-adapt design-stage schedule that lists every zone to be covered, ties each one to a camera reference and a coverage purpose, and makes gaps and overlaps visible before you write the camera schedule and BOQ.
A camera on a wall is not coverage. Coverage is a decision — this area matters, for this reason, and we will watch it to this level of detail. The document that records those decisions is the cctv coverage schedule: a single table that lists every zone to be covered, ties each one to a camera reference and a purpose, and lets anyone read the design and see, at a glance, what is watched, why, and what is not. Without it, a system is just a pile of cameras someone bought; with it, coverage is intentional and every gap is a choice on the record rather than a surprise after an incident.
This is a design-stage deliverable. It sits after the brief and the risk assessment have told you what you are protecting and against what, and before the camera schedule and the bill of quantities (BOQ) turn those intentions into models, counts and cost. It is the companion to the coverage-planning explainer: the CCTV coverage planning guide explains the thinking — purpose levels, field of view, camera count versus detail — while this page gives you the document that captures it row by row.
Scope & how to read this. This is a ready-to-adapt professional template, not authoritative, legal or contractual wording. It is a design aid that records intent; the engineered specifics — resolution, lens, pixel density on target, lux and mounting heights — are worked out and verified against the site, the manufacturer data and the light conditions, not read off this page. Get professional review before a schedule feeds a tender or BOQ. Because a coverage schedule describes surveillance of identifiable people, treat it as sensitive under the Digital Personal Data Protection (DPDP) Act, 2023.
What the coverage schedule is, and where it sits
The coverage schedule is the bridge between intent and hardware. The security design brief and risk assessment produce a list of assets and threats — a main gate that anyone can walk to, a car park where vehicles are lost, a rear boundary that backs onto open ground. The coverage schedule takes that list and, zone by zone, decides how each will be watched: to notice, to recognise a known face, or to identify a stranger clearly. Only then does the camera schedule pick actual models and lenses to hit those intentions, and only then does the BOQ count and cost them.
Who produces it: the security consultant, designer or architect running the CCTV design. Who receives it: the client, the reviewing engineer, and downstream the installer and the estimator. Why it matters: it is the one place where coverage is stated as a set of deliberate choices. Reviewers can challenge it, the client can sign it, and later, if someone asks why the side lane was never covered, the answer is on the schedule — a decision, dated and owned, not an oversight.
The key idea: every zone has a coverage purpose
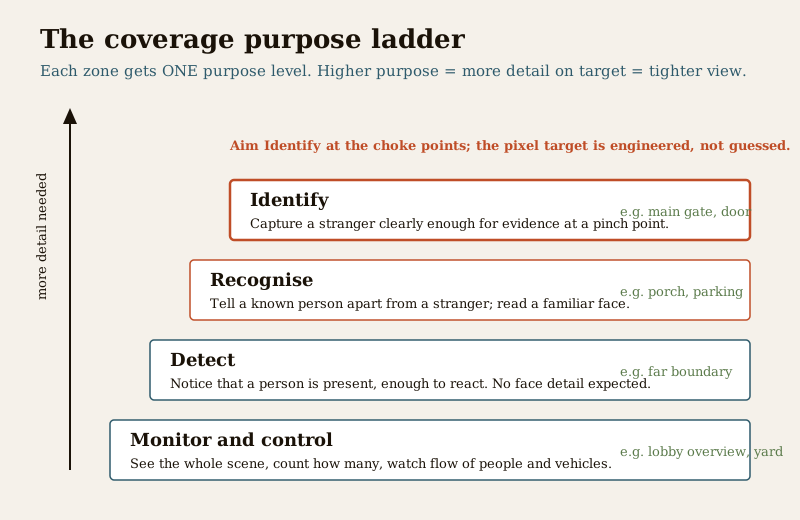
The engine of the whole schedule is a single column — the coverage purpose for each zone. A camera watching a wide forecourt to see how many people are milling about has a completely different job from one at a gate that must capture a stranger clearly enough to matter later. Naming that job first is what stops a design from spreading cameras evenly and identifying nobody. The common purpose levels, from least to most demanding, read like this:
- Monitor and control — take in the whole scene, count people or vehicles, watch the flow. Suits lobbies, forecourts and open yards where situational awareness, not detail, is the point.
- Detect — notice that a person or vehicle is present and react. Enough to raise an alarm or send a guard, not to read a face. Suits far boundaries and large low-value areas.
- Recognise — tell a known person from a stranger, or read a familiar face and vehicle. Suits porches, inner gates and parking, where you mostly deal with people you expect.
- Identify — capture a stranger in enough detail to be useful as evidence. Reserved for the pinch points that everyone must pass: the main gate, the front door, the shop shutter.
Assigning one purpose per zone is a design decision with consequences: purpose drives the camera type, the lens, the resolution and the placement. Aim Identify at the choke points and settle for Detect on the wide edges. A single camera asked to both survey a whole yard and identify a face at the gate will do neither well; two cameras, each with one clear purpose, will. The exact pixel density that delivers each level is engineered against the distance involved and verified on site — describe the purpose qualitatively here and let the camera schedule carry the numbers.
Worked example: a coverage schedule (illustrative)
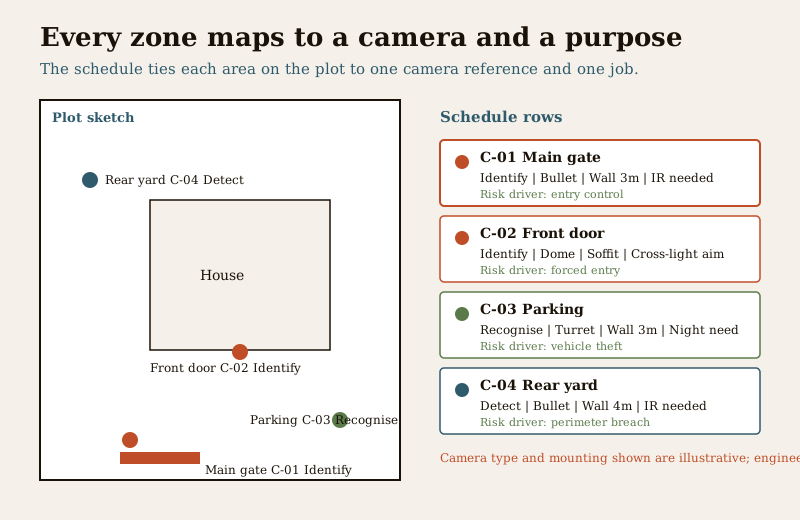
Here is the schedule filled in for a small compound, to show the shape. The values are generic and illustrative — camera types, mountings and references are placeholders to demonstrate the columns, not specifications. Adapt every row to your own project, and never treat these as fixed choices.
Example only — adapt to your project. Camera references, types and mounting heights below are illustrative placeholders. The real type, lens, resolution and mounting are engineered to the site and verified; do not copy them as a specification.
| Zone / area | Purpose / level | Risk driver | Camera ref | Camera type | Mounting | Day / night need | Notes |
|---|---|---|---|---|---|---|---|
| Main gate | Identify | Entry control | C-01 | Bullet | Wall 3m | IR needed | Aim across the light, not into low sun |
| Front door / porch | Identify | Forced entry | C-02 | Dome | Soffit | Low-light need | Cross-light so the face is not a silhouette |
| Car / two-wheeler park | Recognise | Vehicle theft | C-03 | Turret | Wall 3m | Night need | Cover plates and the approach, not just the bay |
| Side gate / low wall | Recognise | Secondary access | C-04 | Turret | Wall 2.5m | IR needed | Easy-to-scale point, do not leave a gap |
| Rear yard / boundary | Detect | Perimeter breach | C-05 | Bullet | Wall 4m | IR needed | Situational; pairs with the perimeter CCTV guide |
| Lobby / stair foot | Monitor and control | People flow | C-06 | Dome | Ceiling | Indoor light | Count and observe, no Identify claim here |
| Neighbour-facing wall | Do not cover | Privacy | (mask) | (none) | (none) | (none) | Privacy mask; excluded on purpose (DPDP) |
Read that last row carefully: a zone deliberately not covered belongs on the schedule too. Recording the exclusion is what makes the design honest and defensible.
Blank template: copy this and fill it in
This is the core of the page. Copy the table below into your own sheet or document and add one row per zone on the plot. Keep the columns; add project-specific ones (for example a lux note, an FOV reference or a channel number) as your design needs them.
| Zone / area | Purpose / level | Risk driver | Camera ref | Camera type | Mounting | Day / night need | Notes |
|---|---|---|---|---|---|---|---|
| ... | ... | ... | ... | ... | ... | ... | ... |
| ... | ... | ... | ... | ... | ... | ... | ... |
| ... | ... | ... | ... | ... | ... | ... | ... |
| ... (private area) | Do not cover | Privacy / DPDP | (mask) | (none) | (none) | (none) | Record the exclusion on purpose |
A useful discipline: number the zones off a marked-up plan so that "C-03" on the schedule, on the plan and later on the camera schedule all mean the same physical camera.
Field guide: filling and reading the columns
Each column is a small decision. Fill them in this order and the schedule almost writes itself.
- Zone / area — a plain-language place from the plan: "main gate", "car park", "stair foot". Every area worth a decision gets a row, including areas you decide not to cover.
- Purpose / level — the job for that zone, from the four levels above. This is the most important cell; set it before you think about a camera. If you cannot name a purpose, you do not yet have a reason for the camera.
- Risk driver — the one-line reason from the brief or risk assessment: "entry control", "vehicle theft", "perimeter breach". This is what a reviewer or client challenges, and what justifies the spend.
- Camera ref — a stable label ("C-01") that ties the plan, this schedule, the camera schedule and the BOQ together. Keep it consistent everywhere.
- Camera type and mounting — indicative only at this stage (bullet, dome, turret; wall, soffit, ceiling and rough height). The camera schedule confirms the exact model and the engineered mounting.
- Day / night need — whether the zone must work in the dark, and how (ambient light, IR, or a lit approach). This flag alone changes the camera and the lighting design, so capture it early.
- Notes — the site truths that break naive designs: backlight at a gate, a scalable wall, plates versus faces, an approach that must be seen before the target.
Reading the finished schedule: gaps, overlaps and masking
A completed schedule is a coverage map, so read it once as a whole before it goes anywhere.
- Flag gaps. Walk the plan against the schedule. Every entry point should carry an Identify or Recognise row; every asset a purpose. A gap is fine only if it is a stated decision, written into the schedule, not an accident.
- Flag overlaps. Two cameras watching the same patch may be a deliberate handover between views, or wasted channels and storage. Decide which, and note it.
- Check the purpose is honest. Do not label a wide overview camera "Identify"; it cannot deliver it. The purpose must match what the eventual camera can actually do at that distance, which the camera schedule verifies.
- Confirm day and night per row. A gate that only works in daylight is not covered at 2 a.m. The night need drives both the camera and the lighting or IR plan.
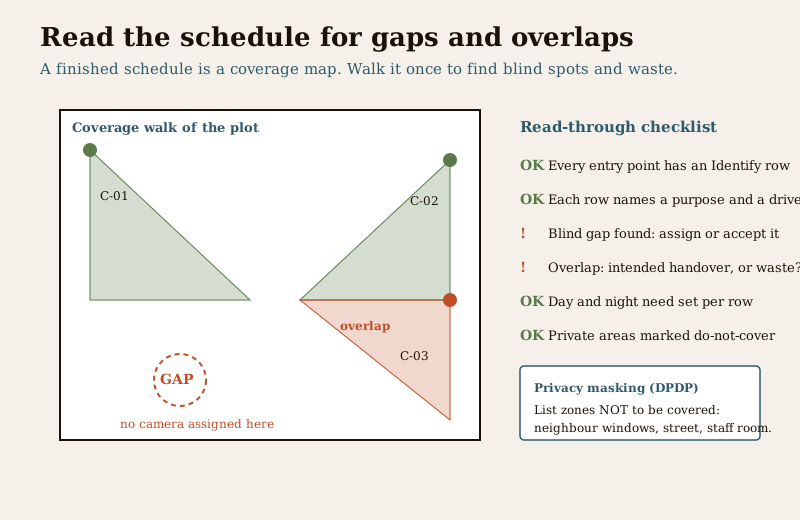
Privacy masking is part of the design (DPDP). Under the DPDP Act, 2023, footage of identifiable people is personal data. Cover only your own property and shared areas with a legitimate purpose. List the zones that must NOT be captured — a neighbour window, the public street beyond the boundary, a staff changing area — as explicit "do not cover" rows, and carry them through to camera aim and digital privacy masks. Recording what you deliberately exclude is as much a part of a professional schedule as recording what you cover, and it is exactly what a reviewer or a data query will look for. See the security design brief template for the purpose and lawful-basis context that should already be set before this stage.
How the schedule feeds the rest of the design
The coverage schedule is an input, not an endpoint. Once it is agreed, it drives the documents downstream:
- The camera schedule turns each row into a chosen model, resolution and lens that meets the stated purpose at the real distance. Your purpose column is its brief.
- The field-of-view (FOV) schedule takes each camera reference and works out the lens and view angle to hit the purpose — Identify at a gate needs a tighter view than Monitor over a yard.
- Storage sizing uses the camera count, resolution and day/night recording implied here. Feed the confirmed count into the CCTV storage and HDD sizing guide so retention is sized to reality, not a guess.
- The network and power budget follows the camera count and type: how many channels, how much PoE. Carry the totals into the PoE switch and network budget guide.
- The BOQ counts and costs everything the schedule and its downstream documents specify — cameras, recorder, drives, cabling, mounts and labour.
Because every later document traces back to a row here, a clean coverage schedule is the cheapest place to fix a design. Move a camera on paper, not on a ladder.
Completion checklist
Before the schedule leaves your desk, confirm each of these is a genuine yes.
| Check | Confirm |
|---|---|
| Every asset and entry point from the brief has a row | Yes / No |
| Each row states one purpose level and one risk driver | Yes / No |
| Camera references are unique and match the marked-up plan | Yes / No |
| Day / night need is set for every covered zone | Yes / No |
| Deliberate gaps are recorded as decisions, not left blank | Yes / No |
| Overlaps are marked as intended handover or flagged as waste | Yes / No |
| Purpose labels are honest — no "Identify" on a wide overview | Yes / No |
| Do-not-cover zones and privacy masks are listed (DPDP) | Yes / No |
| No fabricated pixel, lux, model or price figures stated as fact | Yes / No |
Key takeaways
- A coverage schedule makes coverage intentional. Every zone maps to a camera reference and a purpose, so what is watched — and what is not — is a decision on the record.
- Purpose comes first. Monitor and control, detect, recognise, identify: name the job before you pick a camera, and aim Identify at the choke points.
- Record the exclusions. Deliberate gaps and do-not-cover privacy zones belong on the schedule as much as covered ones, especially under the DPDP Act, 2023.
- Keep the numbers downstream. Describe purpose qualitatively here; the engineered resolution, lens, lux and mounting are worked out and verified in the camera and FOV schedules.
- It is an input. The schedule feeds the camera schedule, the FOV schedule, storage sizing, the network budget and the BOQ — so fix the design here, on paper, where it is cheap.
Start from intent with the security design brief template, understand the reasoning in the CCTV coverage planning guide, and browse the full toolkit in the professional security resources library.
References
- Digital Personal Data Protection Act, 2023 — CCTV footage identifying people is personal data; cover only your own property and shared areas with a legitimate purpose, and record what you deliberately exclude.
- Manufacturer camera and lens documentation — the authoritative source for the resolution, lens and pixel density that deliver each coverage purpose at a given distance; engineer to it rather than to any generic figure.
- Bureau of Indian Standards catalogue — verify the current edition of any standard referenced in a CCTV design at https://www.services.bis.gov.in/
This is an educational template to adapt, not authoritative, legal or contractual wording. Engineered specifics come from the site, the manufacturer data and a qualified designer; get professional and legal review before a coverage schedule feeds a tender, specification or BOQ.
Export this guide
Related Guides — Deep-dive reading
Camera Field-of-View Schedule for India (2026): Proving Each Camera Sees What It Should
A ready-to-adapt professional schedule that records, per camera, the scene it must cover and to what purpose level - monitor, detect, recognise or identify - so coverage intent is stated at design and proven at commissioning.
SecurityProfessional Security Resources for India (2026): The Documents Behind a Secure Project
The overview and map of the whole professional-deliverable toolkit — the brief, schedules, BOQ, checklists, handover pack and logs a consultant, designer, PMC or facility manager produces across a security project, and how each document connects to the next.
SecuritySecurity Design Brief Template for India (2026): Capturing What the System Must Do
A ready-to-adapt security design brief template — the very first deliverable a consultant and client agree on, capturing objectives, threats, scope, users, subsystems, performance intent, constraints and privacy before anyone designs or buys anything.
SecurityRelated Tools — Try Free
CCTV Camera Coverage & Count Calculator
Estimate how many CCTV cameras you need, the NVR channels, storage in TB for your retention period, and an indicative all-in cost with GST.
CCTV CalculatorSecurity System Cost Estimator
Estimate the all-in capex with GST, annual running cost and 5-year total cost of ownership of a home or building security system.
Cost EstimatorCCTV Camera Overlap Calculator
The overlap or blind gap between two adjacent cameras, from coverage width and spacing, plus the spacing for a target overlap.
Overlap