
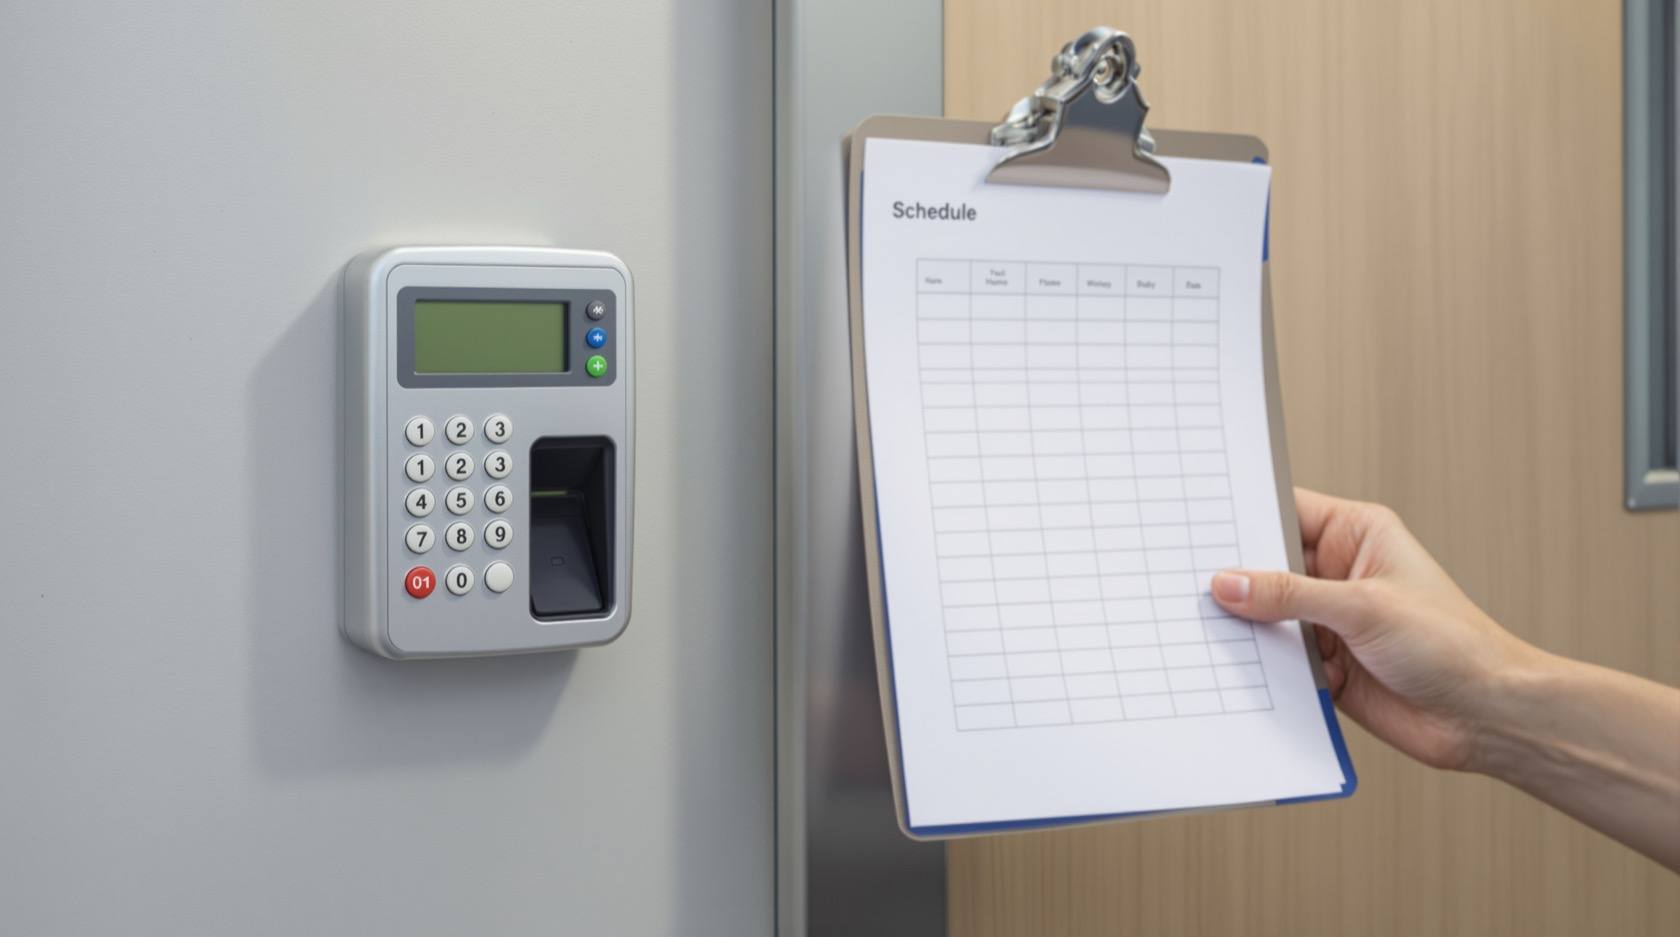
Access Control Door Schedule for India (2026): Every Door, Every Rule
A ready-to-adapt access control door schedule with one row per door — reader side, credential, lock type, fail-safe versus fail-secure, request-to-exit, monitoring and emergency override — so every opening is secured, released and, crucially, safe in a fire.
Every access control project lives or dies on one document, and it is not the flashy dashboard or the spec sheet. It is the access control door schedule — a plain table with one row per door, spelling out how each opening is secured, how it is read, how it is released, and, above all, how it behaves when the fire alarm sounds. Get this table right and the whole install falls into place. Get one egress door wrong and you can trap people behind a locked door in an emergency.
This is the master list that a security consultant, architect, PMC or facility manager fills in during design and hands down the chain. It sits after the brief and the gate and perimeter access strategy, and it feeds almost everything downstream: the cabling and containment drawings, the power budget and battery backup, the controller and door-count for the system cost estimate, the BOQ, and finally the commissioning tests where every door is proven. It is the single sheet a fire officer, an electrician and an installer can all read.
Scope & how to read this. This is a ready-to-adapt professional template, not authoritative, legal or contractual wording, and not a substitute for the project fire strategy. The lock behaviour of every egress door on an escape route must be set with the fire strategy and the National Building Code egress requirements, verified with the fire officer having jurisdiction. Get professional and legal review for contract documents. Specifics come from your project, the code and the AHJ, not from this page.
What the door schedule is, and where it sits
Think of the door schedule as the contract between the security design and the physical building. The floor plan tells you where the doors are; the schedule tells you what each door must do. It is produced during detailed design, issued for pricing, frozen for installation, and then used line by line at commissioning to sign the system off. It is also the reference a future facility manager reaches for when a reader fails or an access group changes.
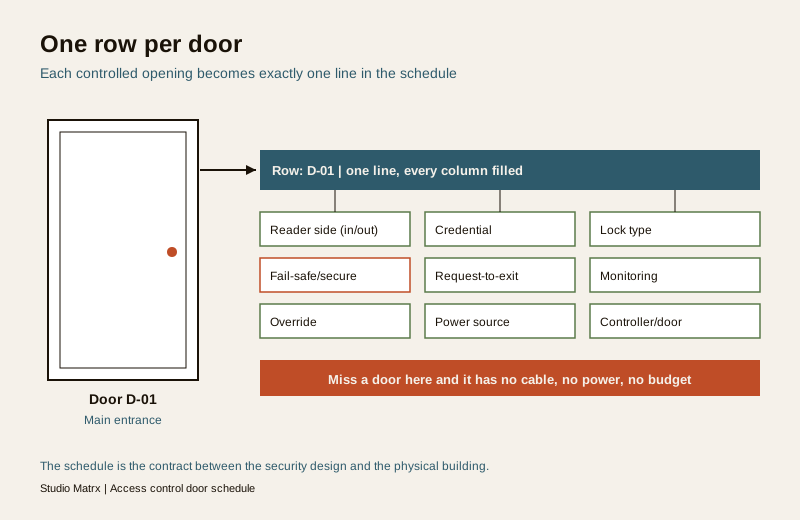
Because it drives procurement and cabling, an incomplete schedule is expensive: a door missed here is a cable pulled twice, a controller port short, a power supply undersized. So the discipline is simple: one row per controlled opening, every column filled, no blanks left to the installer to guess.
The columns, explained
Each column answers one question about the door. Keep the order below; it reads left-to-right the way you walk a door.
- Door ref / ID — a unique code such as "D-01". This ID follows the door through the cabling drawings, the BOQ and commissioning. Never reuse an ID.
- Location — plain-language position ("Main entrance, ground floor"). Anyone should be able to find the door from this alone.
- Door type — single or double leaf, glass, timber, fire-rated shutter, turnstile, boom. The type constrains which lock is even possible.
- Reader side(s) — where you read a credential: "In" only, or "In and Out" for anti-passback or a controlled exit. Many doors are free to exit and only read on the way in.
- Credential — card, PIN, biometric, mobile, or a combination such as "card and PIN" for higher-security doors. See the biometric access control guide for where a fingerprint or face reader earns its place.
- Lock type — the physical locking device: electromagnetic (EM) lock, electric strike, electric bolt, or a motorised lock. The smart lock schedule covers standalone smart locks that are scheduled the same way.
- Fail-safe vs fail-secure — the single most important column, covered in its own section below. It defines what the lock does when power is lost.
- REX / request-to-exit — how the door releases from the secure side to let someone out: a push button, a sensor, or the door handle itself. On an egress door this is a life-safety element, not a convenience.
- Door contact / monitoring — whether the door is monitored for open, closed, forced or held-open-too-long. Monitoring turns a lock into a system that can raise an alarm.
- Emergency override / break-glass — the manual means to release the door in an emergency, typically a break-glass unit on the escape side wired to drop the lock. Every egress door needs one.
- Power source — which power supply and circuit feeds the lock, and whether it is on battery backup. This feeds the power budget.
- Controller / door number — which access controller and which door port on it. This is what the installer terminates to.
- Schedule / access group — who may pass and when: "All staff, 24x7", "Managers only, office hours". This maps to the software configuration.
- Status — design, tendered, installed, commissioned. A living column that tracks the door through the project.
Worked example (illustrative only)
Here is a short filled schedule so you can see the shape. The values are generic and illustrative — adapt every one to your project, and set fail-safe or fail-secure with your fire strategy.
Example only — adapt to your project. No real model numbers, prices or code clauses are stated. Lock behaviour on egress doors below is illustrative; confirm it against your fire strategy and the AHJ.
| Door ID | Location | Type | Reader side | Credential | Lock type | Fail-safe / secure | REX | Monitoring | Override | Controller/door | Access group | Status |
|---|---|---|---|---|---|---|---|---|---|---|---|---|
| D-01 | Main entrance | Double, glass | In and Out | Card + PIN | EM lock | Fail-safe (egress) | REX + break-glass | Contact + forced/held | Break-glass, escape side | AC-1 / D1 | All staff, 24x7 | Installed |
| D-02 | Server room | Single, timber | In only | Card + biometric | Electric strike | Fail-secure (asset) | Handle free-exit | Contact + forced | Not an egress door | AC-1 / D2 | IT only, by request | Design |
| D-03 | Fire exit, rear | Single, fire-rated | None (exit only) | None (free egress) | EM lock | Fail-safe (egress) | Push-bar + REX | Contact + held-open | Break-glass, escape side | AC-2 / D1 | Exit only, alarmed | Tendered |
| D-04 | Store room | Single, timber | In only | Card | Electric bolt | Fail-secure (asset) | REX button | Contact | Mechanical key | AC-2 / D2 | Stores staff | Design |
Read D-01 and D-03 as the life-safety rows: both are on escape routes, both are fail-safe, both release for escape and carry a break-glass. D-02 and D-04 protect assets, are not on an escape route, and are fail-secure so they stay locked if power drops. That contrast is the heart of the schedule.
The life-safety column: fail-safe vs fail-secure
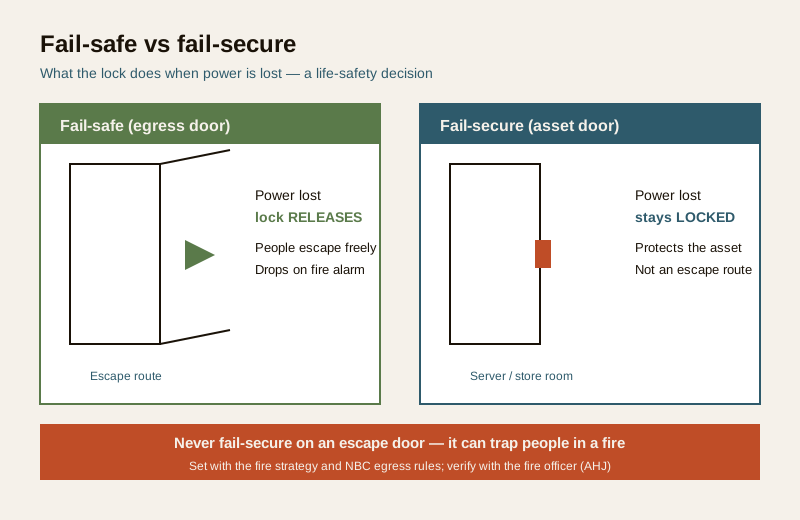
This is where a door schedule stops being paperwork and becomes a safety decision.
- Fail-safe (also called fail-open or fail-unlocked): the lock releases when power is lost. An EM lock is inherently fail-safe — cut the current and the magnet lets go. Egress doors on an escape route are normally fail-safe so that a power cut or a fire-alarm signal frees people to get out.
- Fail-secure (fail-locked): the lock stays locked when power is lost. This suits a door protecting an asset — a server room, a store, a strong room — where you would rather it stay shut in a power cut. It must never be used on a door people rely on to escape.
Life-safety, non-negotiable. Free egress comes first. Any door on an escape route must let people out for escape without a key, a card or a PIN, and must release on power loss and on the fire-alarm signal. Fail-safe versus fail-secure and the exact release method are set with the project fire strategy and the National Building Code egress requirements, and verified with the fire officer having jurisdiction. This schedule records that decision; it does not make it. When in doubt, egress wins over security — never trap people.
The practical wiring consequence: egress-critical EM locks are usually tied into the fire alarm so that an alarm drops power and releases every door on the route at once. Note that link in the schedule or a companion fire-interface drawing, and prove it at commissioning by triggering the alarm and walking every escape door.
Blank template (copy-ready)
Copy this into your sheet, add one row per controlled door, and fill every cell. Leave nothing for the installer to assume.
| Door ID | Location | Door type | Reader side(s) | Credential | Lock type | Fail-safe / fail-secure | REX / request-to-exit | Door contact / monitoring | Emergency override / break-glass | Power source | Controller / door no. | Access group / schedule | Status |
|---|---|---|---|---|---|---|---|---|---|---|---|---|---|
| ... | ... | ... | ... | ... | ... | ... | ... | ... | ... | ... | ... | ... | ... |
| ... | ... | ... | ... | ... | ... | ... | ... | ... | ... | ... | ... | ... | ... |
| ... | ... | ... | ... | ... | ... | ... | ... | ... | ... | ... | ... | ... | ... |
Keep a companion notes block under the table for anything a single cell cannot hold: the fire-alarm interface, anti-passback pairs, interlocks, and any door where the AHJ has given specific direction.
Field guide and common mistakes
Fill the schedule with these habits, and check it against this figure before you issue it.
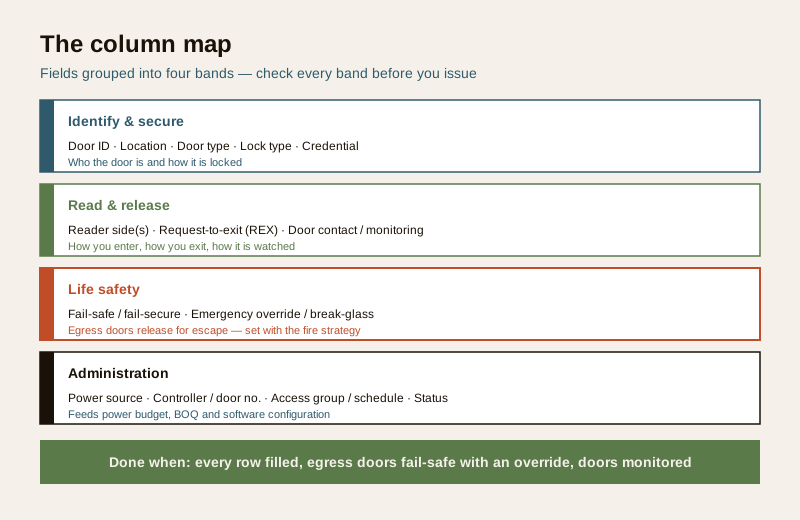
- Walk every door physically or on the plan. Do not schedule from memory. A door you forget is a door with no access, no cable and no budget.
- Decide fail-safe or fail-secure with the fire strategy first. Never default the whole schedule to one setting. Egress doors fail-safe; asset doors fail-secure; and confirm each with the fire officer.
- Give every egress door a REX and a break-glass. Free exit is not optional. If a door on an escape route has no manual override in the schedule, the row is not finished.
- Monitor doors that matter. A lock with no contact is invisible to the system — you will never know it was forced or propped open. Schedule monitoring on entrances, secure rooms and fire exits.
- Mind anti-passback and interlocks. If a door reads both sides for anti-passback, or two doors form an airlock, note it — the installer must wire and configure it deliberately.
- Keep the door ID stable. The same "D-01" must appear on the plan, the cabling drawing, the BOQ and the commissioning sheet. Renumbering mid-project causes chaos.
Three mistakes cause most of the pain, and all three are life-safety or reliability failures:
1. Fail-secure on an escape door — a door people must escape through that stays locked in a power cut is a trap, and the most dangerous error on the sheet. Catch it in review.
2. No emergency override — an egress door with no break-glass or manual release relies entirely on the electronics working. Electronics fail; people still need out.
3. No monitoring — an unmonitored door can be forced or held open with nobody alerted, defeating the point of access control and weakening any door and window security assessment built on top of it.
Data protection: the logs are personal data
The access control system this schedule builds will record who went through which door and when. Under the Digital Personal Data Protection (DPDP) Act, 2023, those logs and any linked biometric or card-holder records are personal data. Note in the schedule or its cover sheet who administers access, how long logs are retained, and who may view them, and keep credential and log data secured. A door schedule that quietly enables mass tracking of staff or residents without a clear, proportionate purpose is a data-protection problem as much as a security one.
How it connects to the other documents
The door schedule is the hub these deliverables spoke off:
- The gate and perimeter plan feeds it the outer-boundary doors — see the gate access control guide.
- The BOQ and cost estimate count controllers, readers and locks straight from this table; the access control system cost guide explains the drivers.
- The smart lock schedule handles standalone locks in the same one-row-per-door style — see the smart lock schedule.
- Credential choices point to the biometric access control guide for where fingerprint, face or mobile reads belong.
- The wider deliverable set is indexed in the professional security resources guide and the security resources hub.
Key takeaways
- The access control door schedule is one row per controlled door, defining how each is secured, read, released and monitored.
- The fail-safe versus fail-secure column is a life-safety decision: egress doors fail-safe and release for escape; asset doors fail-secure. Set it with the fire strategy and the National Building Code, verified with the AHJ.
- Every egress door needs a request-to-exit and a break-glass override, and any door worth controlling needs monitoring.
- The three deadly mistakes are fail-secure on an escape door, no emergency override, and no monitoring — catch them in review.
- Treat the resulting access logs as personal data under the DPDP Act, 2023, with a clear purpose and retention.
References
- National Building Code of India egress and means-of-escape requirements (current edition, SP 7) — the authority on free egress; verify the applicable clauses with your fire strategy and the AHJ. This template does not set egress requirements.
- Digital Personal Data Protection Act, 2023 — access logs and biometric or card-holder records identifying people are personal data; keep purpose legitimate, access controlled and retention limited.
- Manufacturer documentation for your specific locks, readers and controllers — the authoritative source for wiring, fail-safe or fail-secure configuration and fire-alarm interfacing; follow it over any generic instruction.
- Bureau of Indian Standards catalogue for any electrical or life-safety standard referenced in an install; verify the current edition at https://www.services.bis.gov.in/
This is an educational template to adapt, not legal, contractual or fire-safety advice. Egress and life-safety decisions belong to the project fire strategy and the fire officer having jurisdiction; cabling and any electrical connection are qualified professional tasks. Consult professionals for legal, fire-safety and data-protection questions.
Export this guide
Related Guides — Deep-dive reading
Access Control Testing Checklist for India (2026): Every Door Opens and Locks as Designed
A ready-to-adapt per-door and system checklist to verify an access-control installation at commissioning and as a periodic check, with the egress and fire-to-release life-safety tests that must always pass before sign-off.
SecurityAccess Control Maintenance in India (2026): Readers, Locks and Fail-Safe Egress
How to keep a card, keypad, fingerprint or face access-control system reading reliably and locking securely — and, above everything, how to test that its doors still release on a fire alarm and on power loss, so an access-controlled door never becomes a life-safety trap.
SecurityFail-Safe vs Fail-Secure Locks: The Guide (India 2026)
Why fail-safe vs fail-secure is the single most important access-control decision, and how to get it right for every door.
Home Doors & EntrancesRelated Tools — Try Free
Access-Control Battery-Backup Calculator
Size the standby battery so an access system keeps running through a power cut, with an egress life-safety note.
Battery BackupAccess-Control Power Calculator
Total current and power an access system draws, to size the power supply — locks, readers and controllers.
AC PowerInterior Contract Clause Checklist
16 sections and 98 checkboxes covering scope, BOQ, milestones, penalties, warranty, and disputes.
Contract Checklist