
Revit for Architecture Students — A Beginner's Tutorial (India)
Why BIM differs from AutoCAD, the interface, the Category→Family→Type→Instance hierarchy, levels & grids, your first model, schedules & sheets, the free education licence & a 12-week path
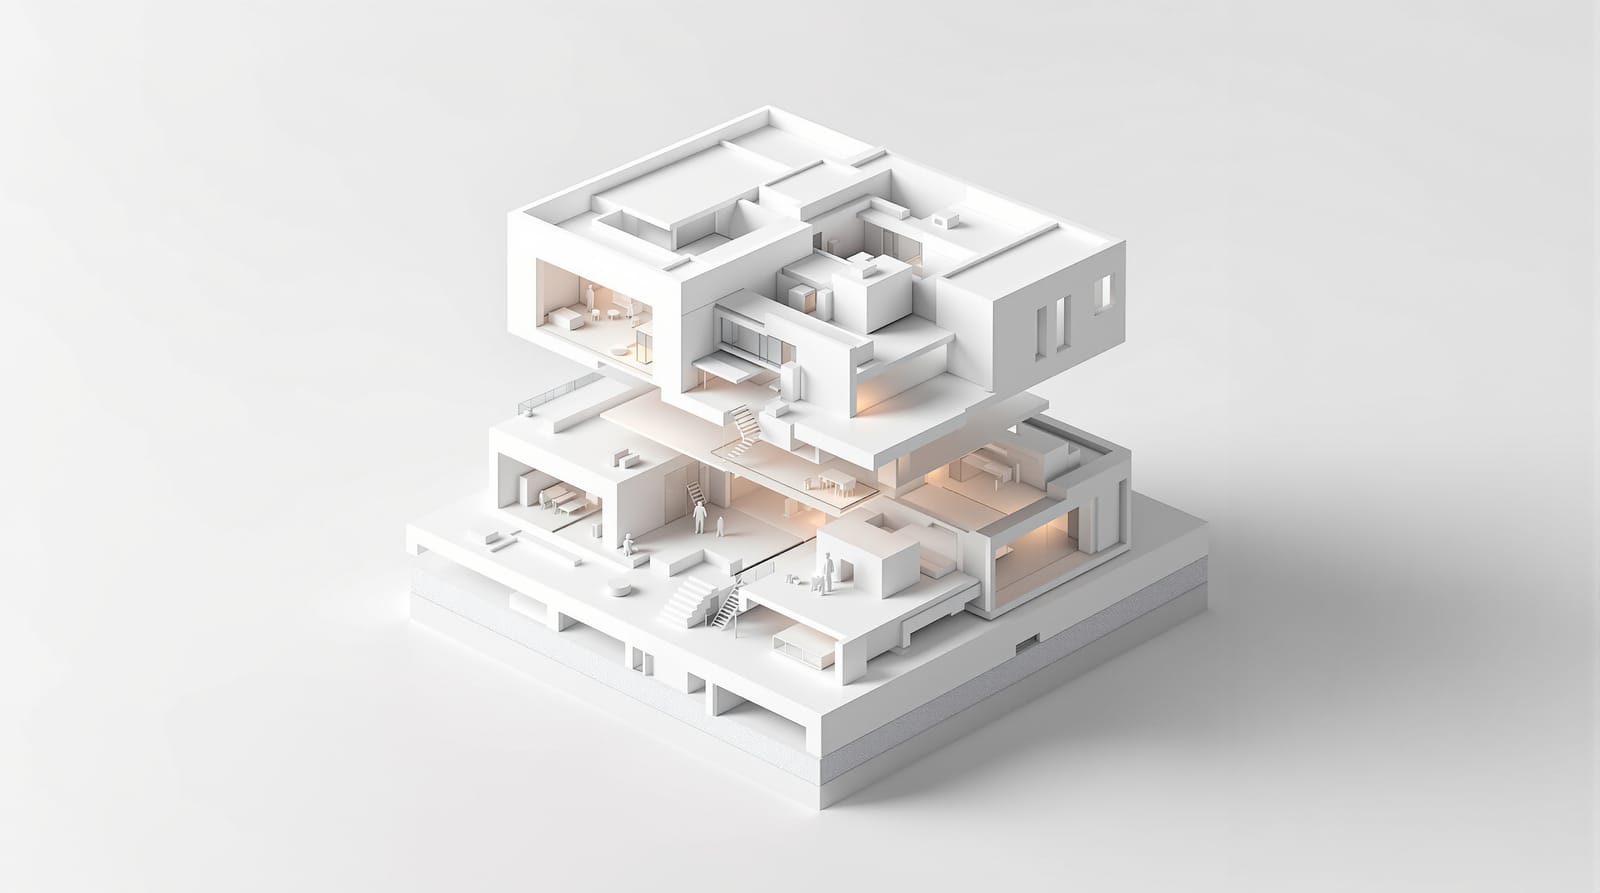
Revit is not a drawing program — it is a building database that happens to draw. That single shift is the whole reason Revit feels alien when you come from AutoCAD, and the whole reason it is worth learning. In AutoCAD you draw lines that represent a wall. In Revit you place an actual wall — an object that knows its height, material, fire rating and cost — and every plan, section, elevation and schedule is just a different view of that one intelligent model. Change the wall once and all of them update. That is BIM, and Revit is the tool most Indian firms use to do it.
This is a hands-on beginner's tutorial for B.Arch students: what Revit is, how the interface is organised, the one hierarchy you must understand (Category → Family → Type → Instance), how to start your first model, and a realistic 12-week path on Indian student licences and hardware. For the wider discipline — BIM standards, LOD, clash detection, the collaboration workflow and where the industry is heading — read the companion BIM Architecture in India. For where Revit sits among all the tools, see the Architecture Software Learning Path.
What Revit actually is
Revit (by Autodesk) is a BIM authoring tool — Building Information Modelling. You model with real building components (walls, floors, roofs, doors, windows, stairs), and Revit maintains a single coordinated database behind every view. Three ideas define it:
- Parametric building objects. Everything you place is a smart object with properties, not a dumb line. A door knows its width; widen it and the wall opening, the plan symbol and the door schedule all change together.
- Bidirectional associativity. All views are live views of one model. Move a wall in the 3D view and the plan, every section and the area schedule update automatically. There is no "redraw the section" — the section is the model, cut differently.
- Information, not just geometry. Each element carries data — material, manufacturer, cost, phase, fire rating — which is what makes scheduling, quantity take-off and downstream collaboration possible.
| AutoCAD | Revit | |
|---|---|---|
| You create | Lines, arcs, text that represent a building | Real building objects in a single model |
| Views | Each drawing is separate; you redraw | All views auto-generated from one model |
| Change a wall | Edit every drawing by hand | Edit once; everything updates |
| Carries data | No (geometry only) | Yes — schedules, quantities, properties |
| Best for | 2D drafting, details, legacy workflows | Coordinated design, documentation, BIM delivery |
This is why the leap is worth it: Revit front-loads effort (modelling is slower than drawing at first) and pays it back enormously in coordination, revisions and documentation — exactly the phases where student and professional projects bleed time.
The Revit interface — a five-minute orientation
Open Revit, start a new project from the Architectural template, and you meet five zones.
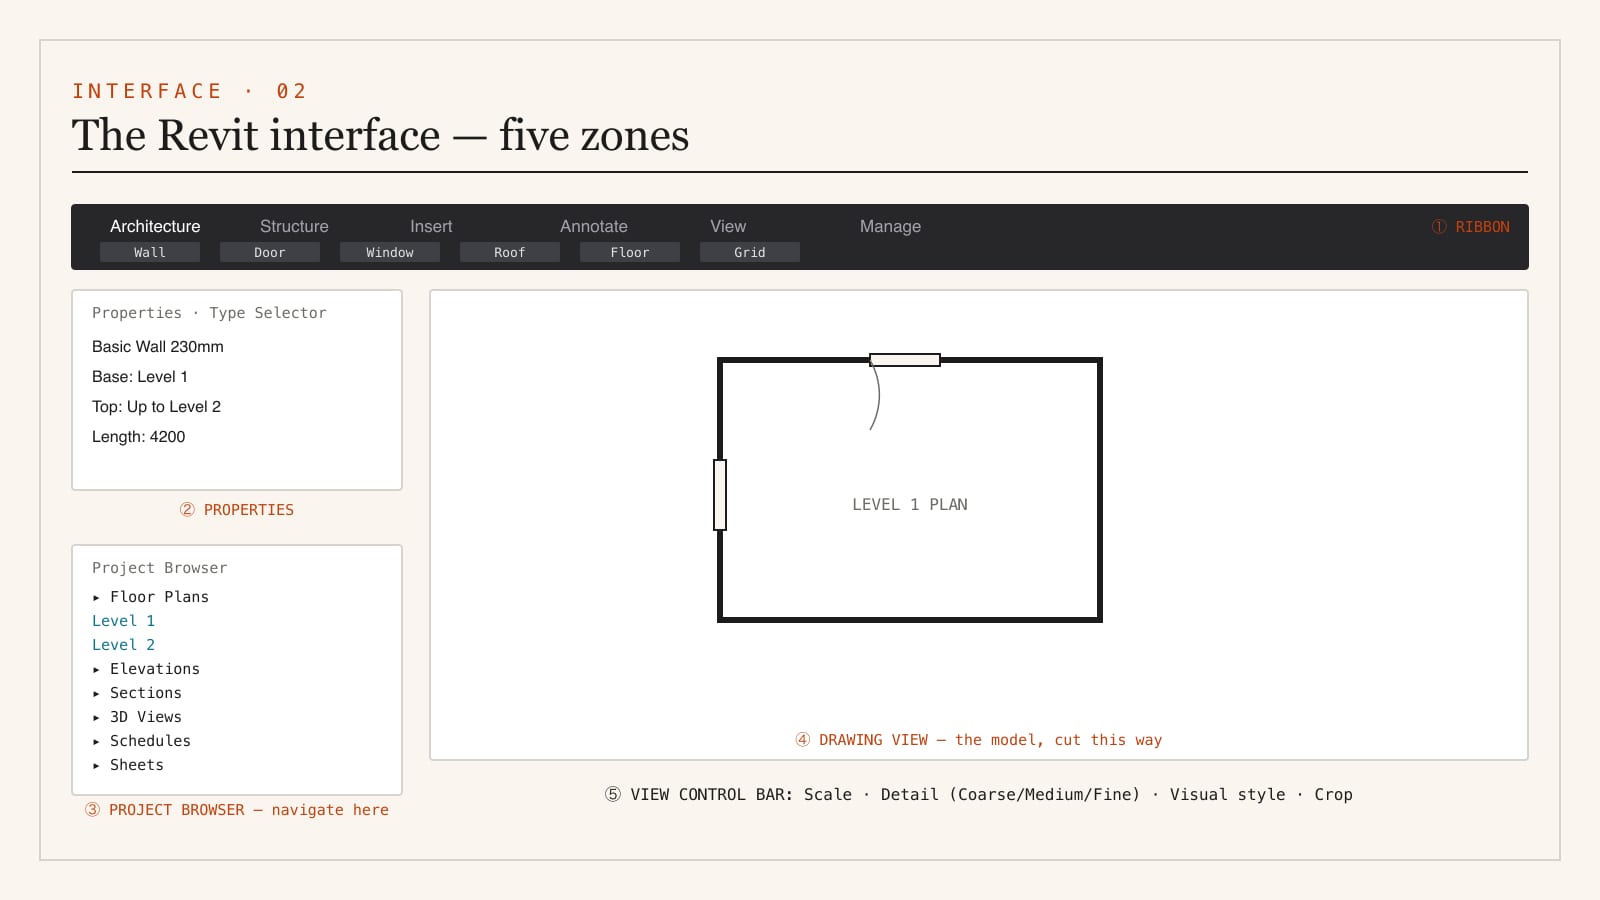
- The Ribbon — tabs across the top: Architecture, Structure, Insert, Annotate, View, Manage. The Architecture tab holds your bread and butter — Wall, Door, Window, Component, Roof, Floor, Stair, Grid, Level.
- Properties palette (left) — shows the properties of whatever is selected: a wall's type, height, base and top constraints. The Type Selector at its top lets you swap one element for another type.
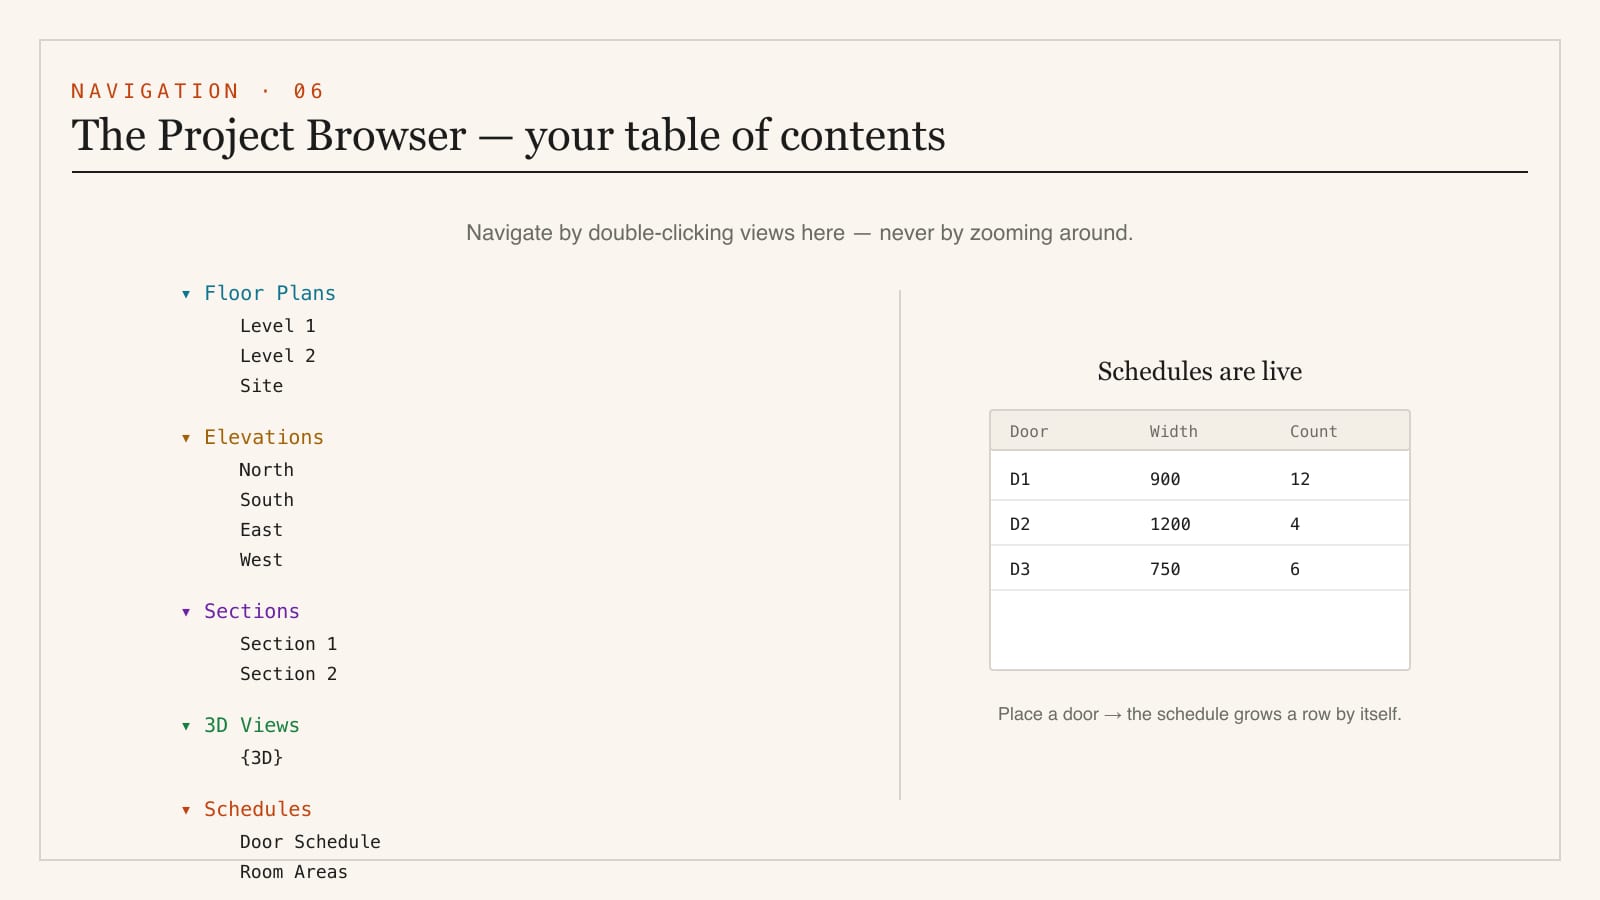
- Project Browser (left, below Properties) — the table of contents of your entire project: every Floor Plan, Ceiling Plan, Elevation, Section, 3D View, Sheet, Schedule and loaded Family, in a tree. This is how you navigate Revit — you don't pan to find a view, you double-click it here.
- The drawing view (centre) — whatever view is open. The same model looks like a plan, a section or a 3D depending which view you double-clicked.
- View Control Bar (bottom) — scale, detail level (Coarse / Medium / Fine), visual style, crop region, temporary hide/isolate.
The single habit that unlocks Revit: navigate by the Project Browser, not by zooming. Beginners get lost trying to "find" their building; experts double-click "Level 1" or "Section 1" and the right view appears.
The one hierarchy you must understand: Category → Family → Type → Instance
Everything in Revit is organised by this four-level hierarchy. Internalise it now and 80% of Revit's logic falls into place.
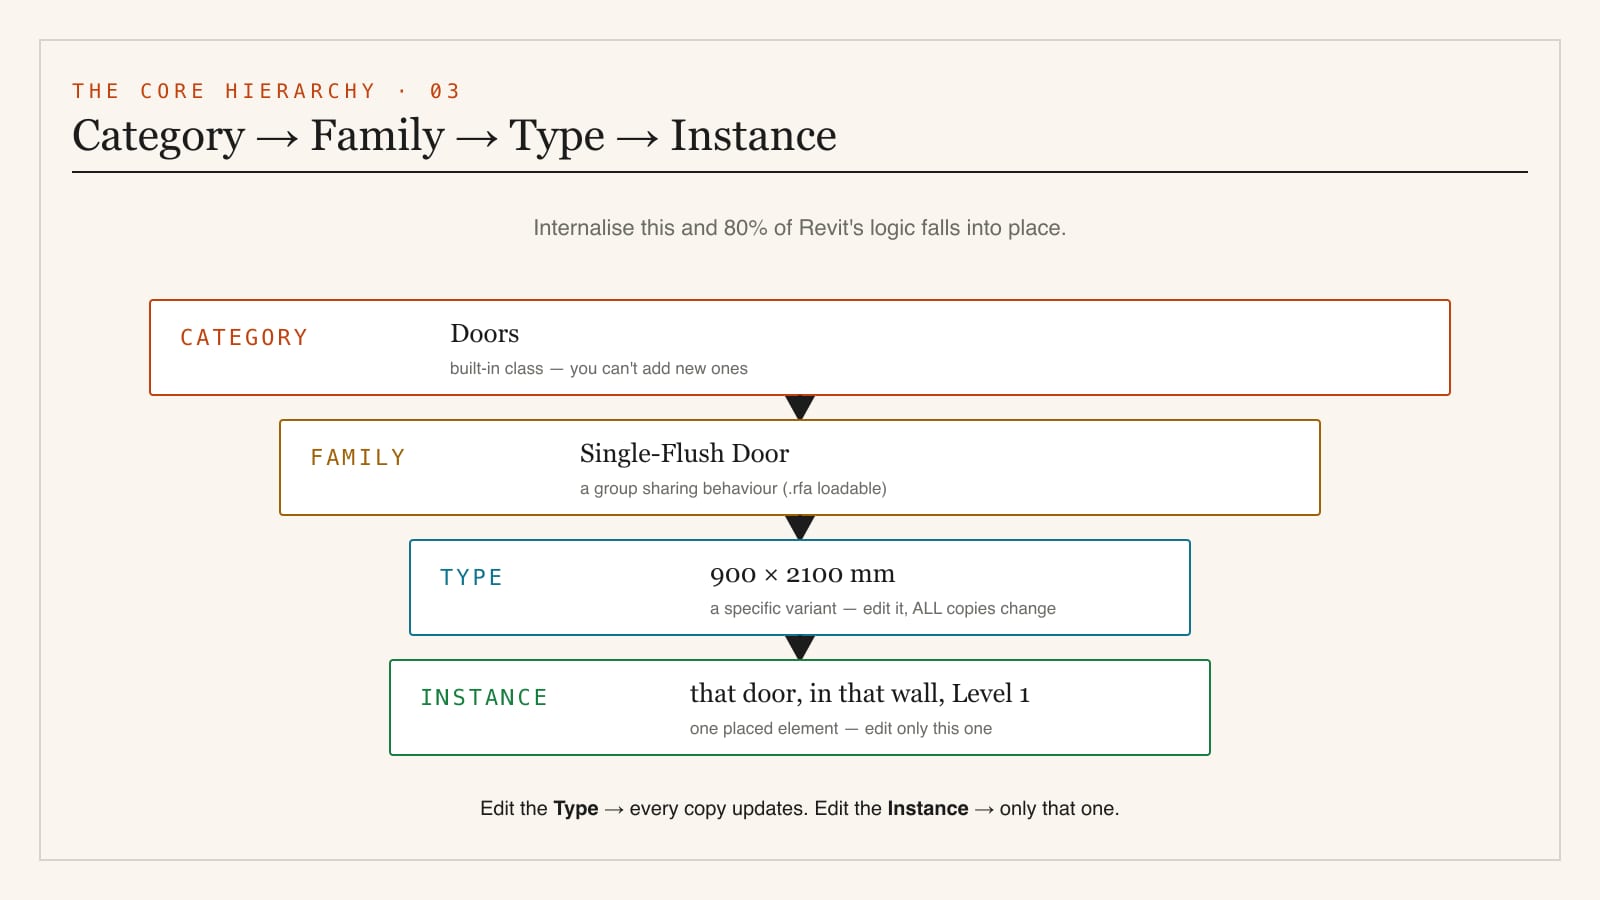
- Category — the broadest class: Walls, Doors, Windows, Floors, Furniture. Categories are built into Revit; you cannot create new ones.
- Family — a group of related elements that share behaviour: a "Single-Flush Door" family, a "Basic Wall" family. There are three flavours: System families (walls, floors, roofs — built into the project), Loadable families (doors, windows, furniture — separate '.rfa' files you load in), and In-place families (one-off custom geometry).
- Type — a specific variant within a family: a "900 × 2100 mm" single-flush door, or a "230 mm Brick" wall. Editing a type changes every instance of it in the project.
- Instance — one actual placed element: that door, in that wall, on Level 1. Instance properties (like its host wall or sill height) affect only that one.
The practical payoff: change the Type and every copy updates; change the Instance and only that one does. Knowing which level you are editing is the difference between fixing one door and accidentally resizing forty.
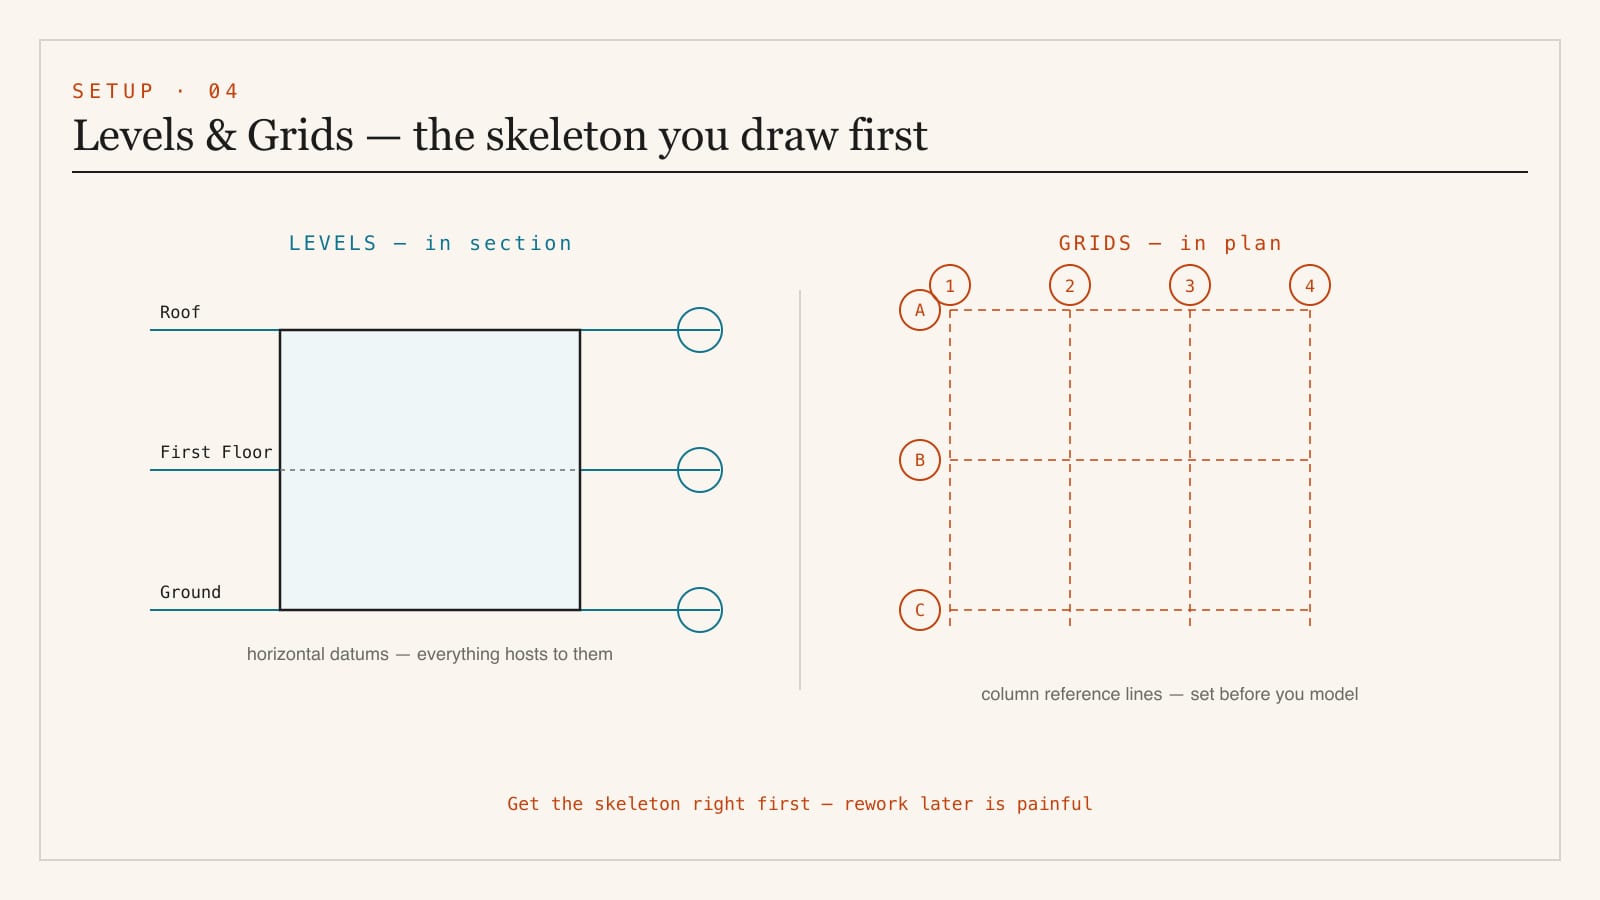
Levels and grids — the skeleton you draw first
Before any walls, you set up Levels (horizontal datums — Ground, First Floor, Roof) and Grids (the column reference lines). They are drawn in an elevation/section view (Levels) and a plan (Grids), and everything else hosts to them. Get them right first; rework later is painful.
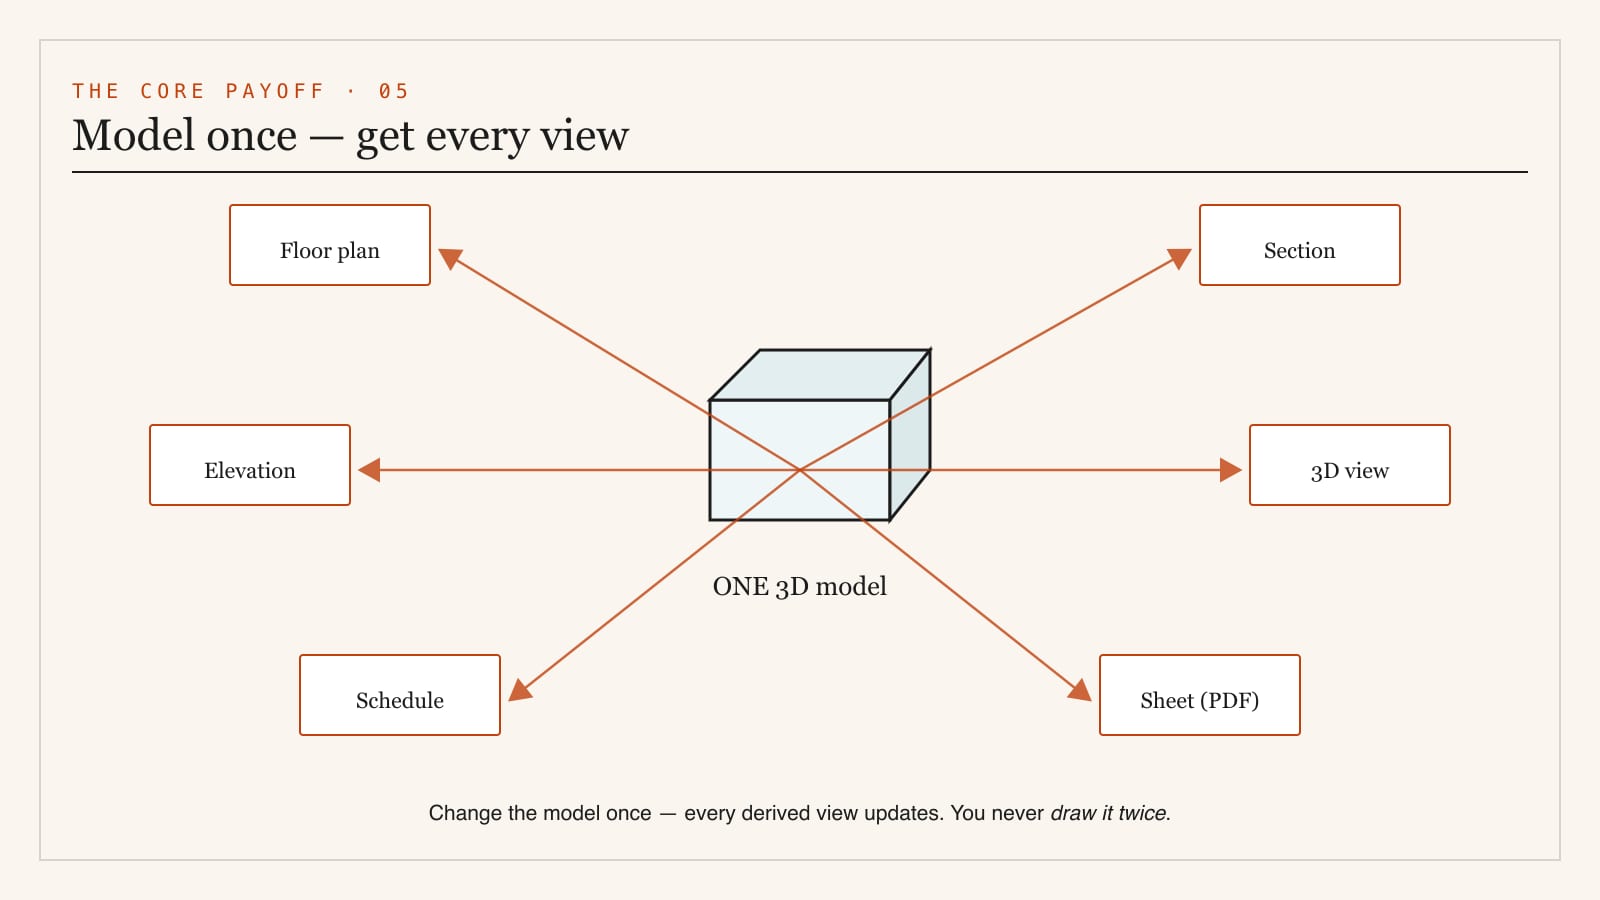
Model once, get every view — the core payoff
This is the idea worth tattooing on your monitor. You build one 3D model. Revit derives plans, sections, elevations, a 3D view, schedules and sheets from it automatically — and keeps them all synchronised. A revision is made once and propagates everywhere.
Build your first model — a one-room walkthrough
You can do this in your first sitting. It teaches the whole loop.
1. Set Levels — open a section/elevation view, check Level 1 and Level 2 exist, set the floor-to-floor height (say 3000 mm).
2. Draw Walls — Architecture tab → Wall. In the Type Selector pick a basic wall (e.g. "Generic 230 mm"). Set the base to Level 1 and the top constraint to "Up to Level 2," then draw a rectangle of four walls in the Level 1 plan.
3. Add a Floor — Architecture → Floor → sketch the boundary inside the walls → finish.
4. Add a Roof — Architecture → Roof by Footprint on Level 2.
5. Place a Door and Window — Architecture → Door, click on a wall (Revit cuts the opening automatically); same for Window. Notice the plan symbol and the 3D opening appear together.
6. Open the {3D} view — click the little house icon, or double-click "{3D}" in the Project Browser. Your room is already a coordinated model. Open the section view: it is already cut. You drew nothing twice.
Drag the wall, change the door type, raise Level 2 — watch every view update. That is Revit's entire promise, demonstrated in ten minutes.
The Project Browser, schedules and sheets
- Views — plans, sections, elevations, 3D, all listed and navigated from the Browser.
- Schedules — a live table generated from model data: a door schedule, room areas, a window count, even a cost estimate. Add a door and the schedule grows a row by itself. This is BIM's "information" in action.
- Sheets — your final deliverable. Drag views and schedules onto a titleblock sheet; print to PDF. Because views are live, a late design change reflows onto the sheets automatically.
Worksharing — a note for team projects
On studio group projects or in a firm, multiple people edit one model at once via Worksharing: a central model on a shared location and local copies each person works in, syncing changes up and down. You do not need this for solo work, but knowing it exists explains why Revit is built the way it is — coordination is the point. The full collaboration and clash-detection workflow is covered in BIM Architecture in India.
Licensing and pricing in India — the honest picture
- Revit is subscription-only (Autodesk discontinued perpetual licences). A commercial subscription runs into lakhs per year, which is why students must use the free education licence — never a cracked build.
- The Autodesk Education licence is free and fully featured for verified students and educators: a one-year licence, renewable while you remain enrolled, through Autodesk Education. You get Revit plus AutoCAD, 3ds Max, Civil 3D and the rest of the AEC Collection. Sign up with your institutional email / bonafide certificate.
- Education-licence files carry an educational stamp and are meant for learning, not commercial sale — perfectly fine for college work and portfolios.
- Do not use cracked Revit. It breaks updates, corrupts central models, and there is simply no reason to when the legitimate version is free for you. (See the cracked-software warning in the Software Learning Path.)
- Indian alternatives worth knowing: Snaptrude (an India-built, browser-based BIM tool with a generous free tier — excellent for early design and for laptops that struggle with Revit) and ArchiCAD (Graphisoft's BIM tool, popular in some Indian practices). Revit remains the most widely demanded on hiring lists.
Hardware — what you actually need
Revit is RAM- and CPU-hungry and increasingly leans on the GPU for large models. A realistic 2026 student machine:
| Tier | Spec | Rough budget |
|---|---|---|
| Minimum | i5 / Ryzen 5, 16 GB RAM, RTX 3050, SSD | ₹60,000–75,000 |
| Comfortable | i7 / Ryzen 7, 32 GB RAM, RTX 4060, fast NVMe SSD | ₹1,00,000–1,40,000 |
| Heavy (large/linked models) | i7/i9 / Ryzen 9, 32–64 GB RAM, RTX 4070+ | ₹1,50,000+ |
32 GB RAM is the upgrade that matters most once your model has families, links and detail. Revit is Windows-only — there is no native Mac version; Mac students run it via Boot Camp (Intel Macs) or a Windows VM / cloud workstation (Apple Silicon), so factor that in before buying a MacBook as your only machine.
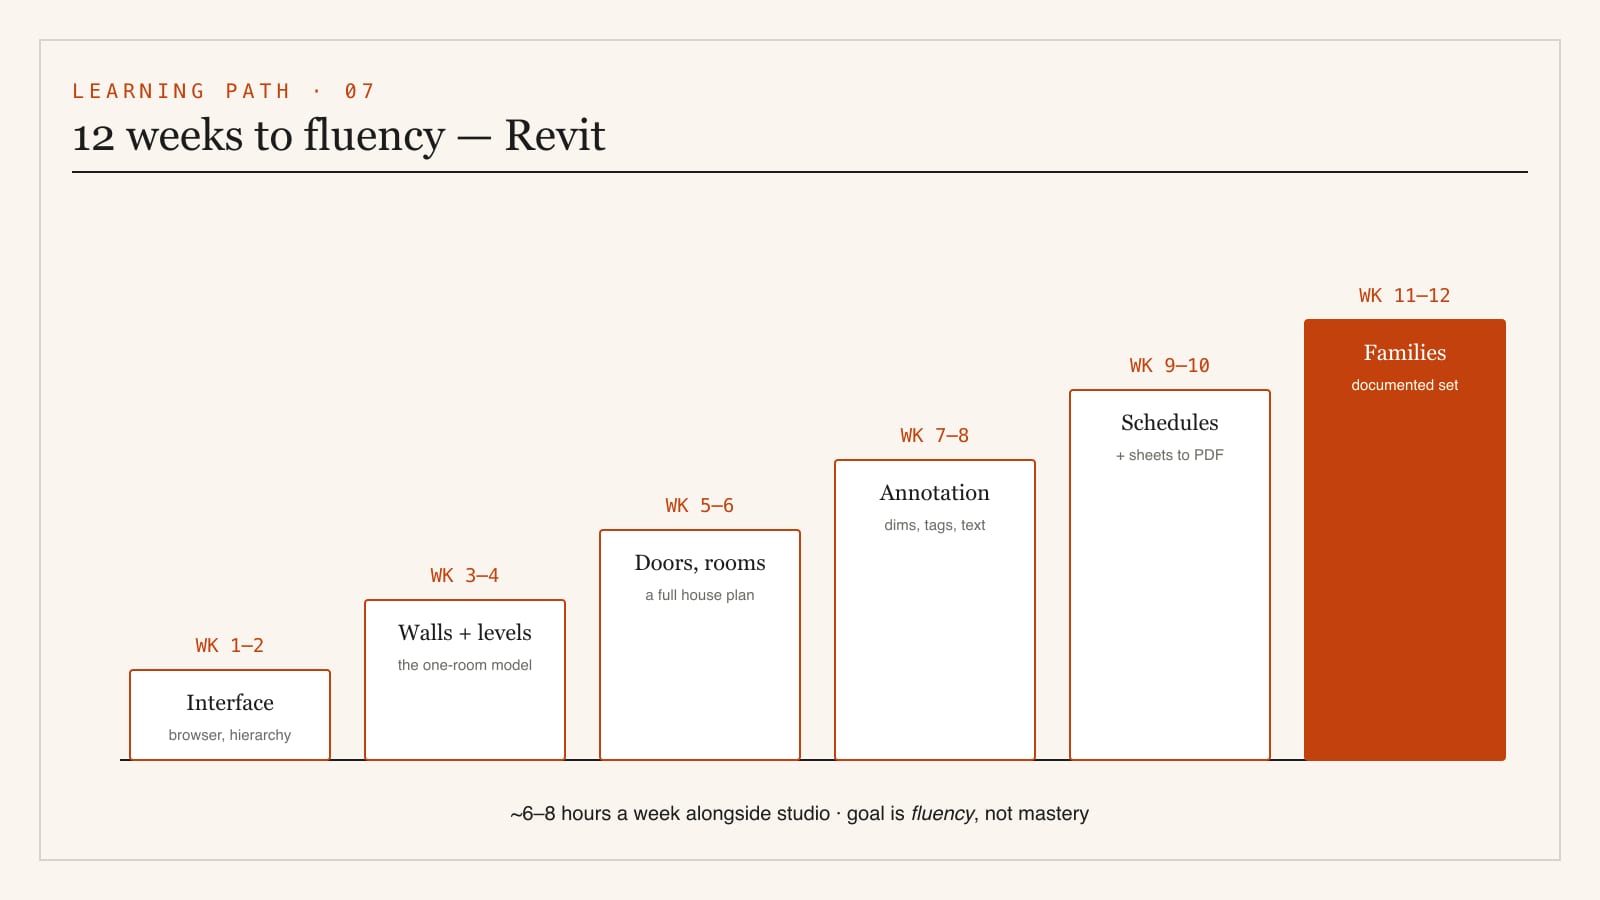
A realistic 12-week path to fluency
Roughly 6–8 hours a week alongside studio. The goal is fluency — model a small building, document it on sheets, and read someone else's model.
| Weeks | Focus | You should be able to… |
|---|---|---|
| 1–2 | Interface + the hierarchy — ribbon, Project Browser, Category→Family→Type→Instance | Navigate by the Browser; explain the hierarchy |
| 3–4 | Walls, floors, roofs, levels, grids — the one-room model | Model a small coordinated building shell |
| 5–6 | Doors, windows, components, stairs, rooms | Build a complete single-storey house plan |
| 7–8 | Views + annotation — dimensions, tags, text, detail level | Produce clean, annotated plans and sections |
| 9–10 | Schedules + sheets + titleblocks | Generate a door/room schedule and lay out sheets to PDF |
| 11–12 | Families + a portfolio set — edit/load families, render a 3D view | Deliver a documented Revit project end to end |
Where to learn — free and reliable
- Autodesk's own Revit learning resources — structured, free, canonical.
- Autodesk Community forums — where real model problems get answered.
- YouTube — pick one complete "model a house in Revit" series and finish it rather than hopping between tutorials.
- Apply it to a live studio brief by week 5 — documenting your own design in Revit teaches more than any abstract exercise.
Common beginner mistakes
1. Treating Revit like AutoCAD — drawing lines instead of placing objects. Unlearn this first.
2. Navigating by zooming instead of double-clicking views in the Project Browser.
3. Confusing Type and Instance edits — resizing forty doors when you meant one.
4. Skipping Levels and Grids — setting up the skeleton late causes painful rework.
5. Exploding imported CAD or modelling everything in-place — bloats the file.
6. Ignoring constraints — walls that don't "Up to Level 2" don't update with the design.
7. Cracked software — breaks updates and central models; the education licence is free.
Where Revit fits in your bigger toolkit
- For the BIM discipline, standards, LOD and clash detection → BIM Architecture in India
- For the full five-tier software roadmap → Architecture Software Learning Path
- For free-form and parametric modelling → Rhino + Grasshopper for Architecture Students
- For turning the model into images → Architectural Visualization in India
- For the portfolio that shows this work → Building Your Architecture Portfolio
Revit asks for patience up front — the first week feels slower than drawing. But the moment you change one wall and watch every drawing update itself, the logic clicks, and you stop drawing buildings and start building them.
Export this guide
Related Guides — Deep-dive reading
The Software Stack — A Working Learning Path
Module 2 of the Student Foundations Track — AutoCAD to Revit to Rhino to V-Ray, the Five-Tier Learning Path, Indian Licensing Discipline, Hardware Requirements, File-Format Ecosystem, Generative-AI Architecture Tools in 2026, and the Pitfalls Every B.Arch and B.Des Student Must Avoid
Student FoundationsRhino + Grasshopper for Architecture Students — A Beginner's Tutorial (India)
The interface, NURBS vs mesh, your first Grasshopper definition step by step, data trees, the plugin stack, Indian student licences, hardware budgets & a 12-week path to fluency
Student Foundations50 Construction Drawing Symbols Every Homeowner Should Know
A visual glossary — the doors, windows, stairs, fixtures, electrical points, plumbing marks, section cuts and material hatches that turn a wall of lines into a readable house.
Construction DrawingsRelated Tools — Try Free
Material Schedule Generator
Generate a room-wise finish schedule — walls, floors, ceilings, trim, and joinery by location.
Material ScheduleCross-Ventilation Analyzer
Estimate airflow and air changes per hour (ACH) from room size, window areas, layout, and local wind — with NBC 2016 Part 8 compliance check.
Ventilation CalculatorConcept Generator
Get 3 AI-generated design concepts for any room with style, materials, and cost estimate.
DesignAI