

Rhino + Grasshopper for Architecture Students — A Beginner's Tutorial (India)
The interface, NURBS vs mesh, your first Grasshopper definition step by step, data trees, the plugin stack, Indian student licences, hardware budgets & a 12-week path to fluency
Rhino and Grasshopper are the two halves of one toolchain — Rhino is the 3D modeller you draw in, and Grasshopper is the visual-programming canvas that lives inside it and lets you describe geometry with rules instead of drawing it by hand. For an Indian architecture student, learning the pair is the single highest-leverage software investment after the AutoCAD–SketchUp basics: it is the gateway to facade systems, form-finding, environmental analysis and digital fabrication, and it is what the parametric studios on every hiring list actually use.
This is a hands-on beginner's tutorial — what the software is, how the interface is laid out, how to build your very first Grasshopper definition, and a realistic 12-week path to fluency on Indian hardware and Indian student licences. For the why — the design theory, the Indian practices working in parametric, and thesis-scale workflows — read the companion Parametric Architecture in India. For where Rhino sits in the wider toolchain, see the Architecture Software Learning Path.
What Rhino and Grasshopper actually are
Rhino (Rhinoceros 3D, by Robert McNeel & Associates) is a NURBS surface modeller. Where SketchUp pushes and pulls flat faces and Revit assembles building objects, Rhino lets you build any geometry — a teacup, a chair, a stadium roof — from precise mathematical curves and surfaces. It is geometry-agnostic: it does not care whether you are designing a building or a shoe, which is exactly why it became the lingua franca of computational design.
Grasshopper is a visual programming environment that ships free inside Rhino (it has been built-in since Rhino 6; in Rhino 8 it is fully native). Instead of writing code, you drag components onto a canvas and connect them with wires. Each component does one small job — make a circle, move a point, divide a curve — and the wires carry geometry and data from one to the next. Change a number at the start and the whole chain updates instantly. That is the entire idea: you build a recipe, not a result.
| Rhino | Grasshopper | |
|---|---|---|
| What it is | A 3D NURBS modeller | A visual-programming canvas inside Rhino |
| You work by | Drawing curves and surfaces directly | Connecting components with wires |
| Output | A fixed model you edited by hand | A definition that regenerates geometry from rules |
| Best for | Precise one-off modelling, editing, documentation | Repetition, variation, analysis, fabrication data |
| Cost | Paid (one-time licence) | Free — included with Rhino |
The two are inseparable in practice: Grasshopper generates geometry that previews live in the Rhino viewport, and you "bake" (commit) the results into Rhino when you want a permanent, editable model.
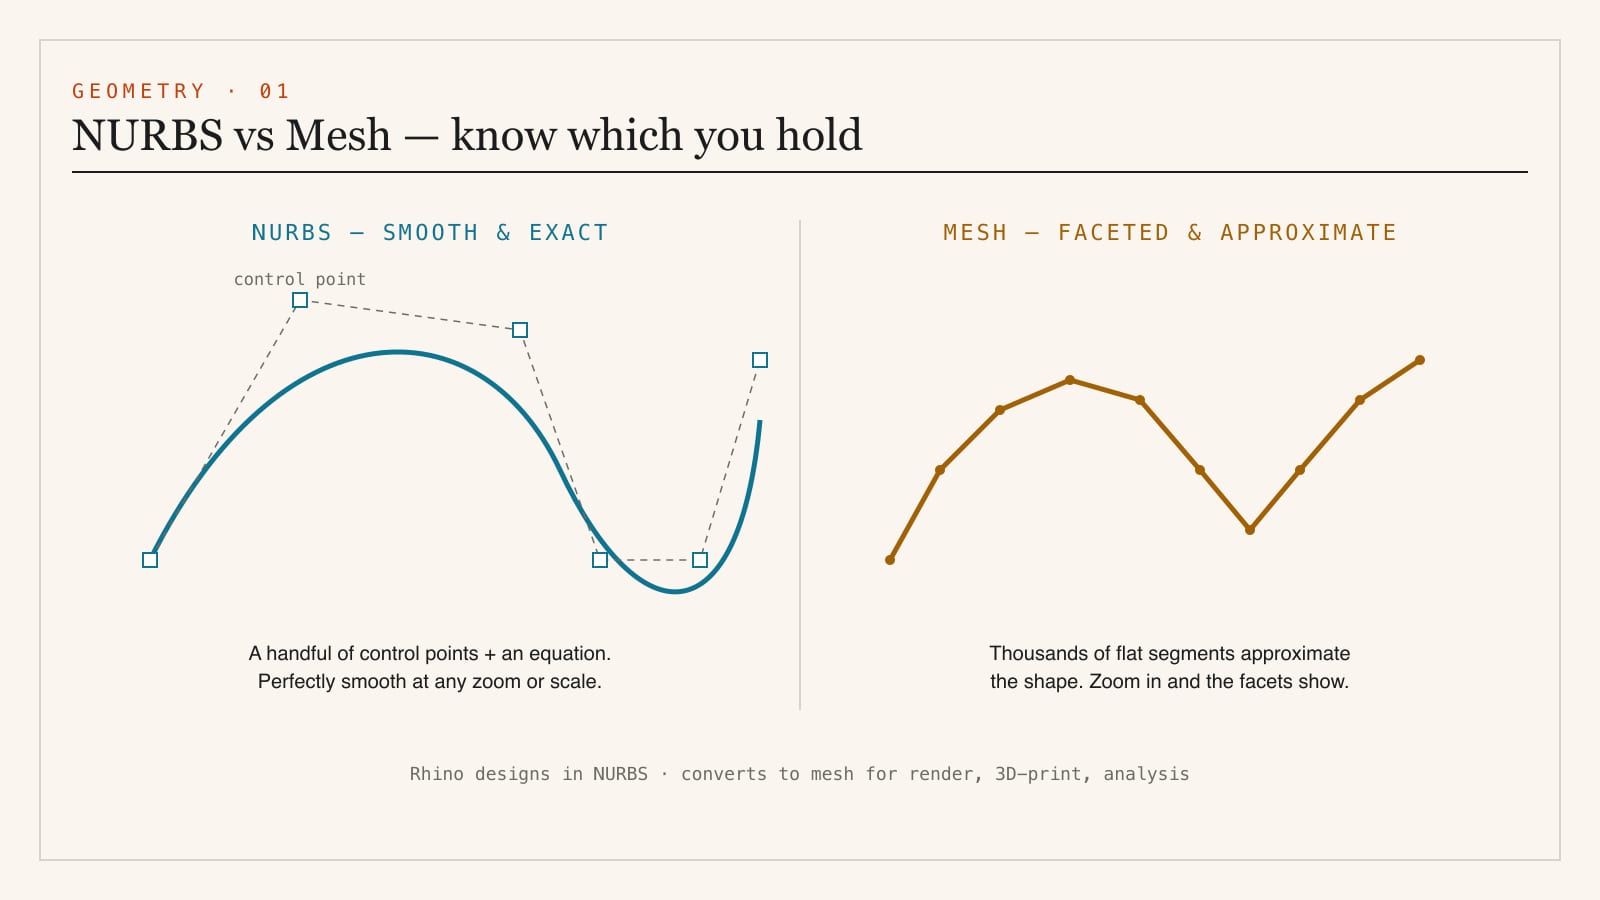
NURBS vs mesh — the one concept to grasp first
Rhino is built on NURBS (Non-Uniform Rational B-Splines): smooth curves and surfaces defined by a handful of control points and a mathematical equation, so they stay perfectly smooth at any zoom and any scale. A mesh — what SketchUp, Blender and game engines use — approximates the same shape with thousands of flat triangles or quads. NURBS is exact and lightweight for design; mesh is what you convert to for rendering, 3D printing or analysis. Knowing which you are holding saves hours of confusion later.
The Rhino interface — a five-minute orientation
Open Rhino and you meet five zones. Spend five minutes here and the rest of the tutorial makes sense.
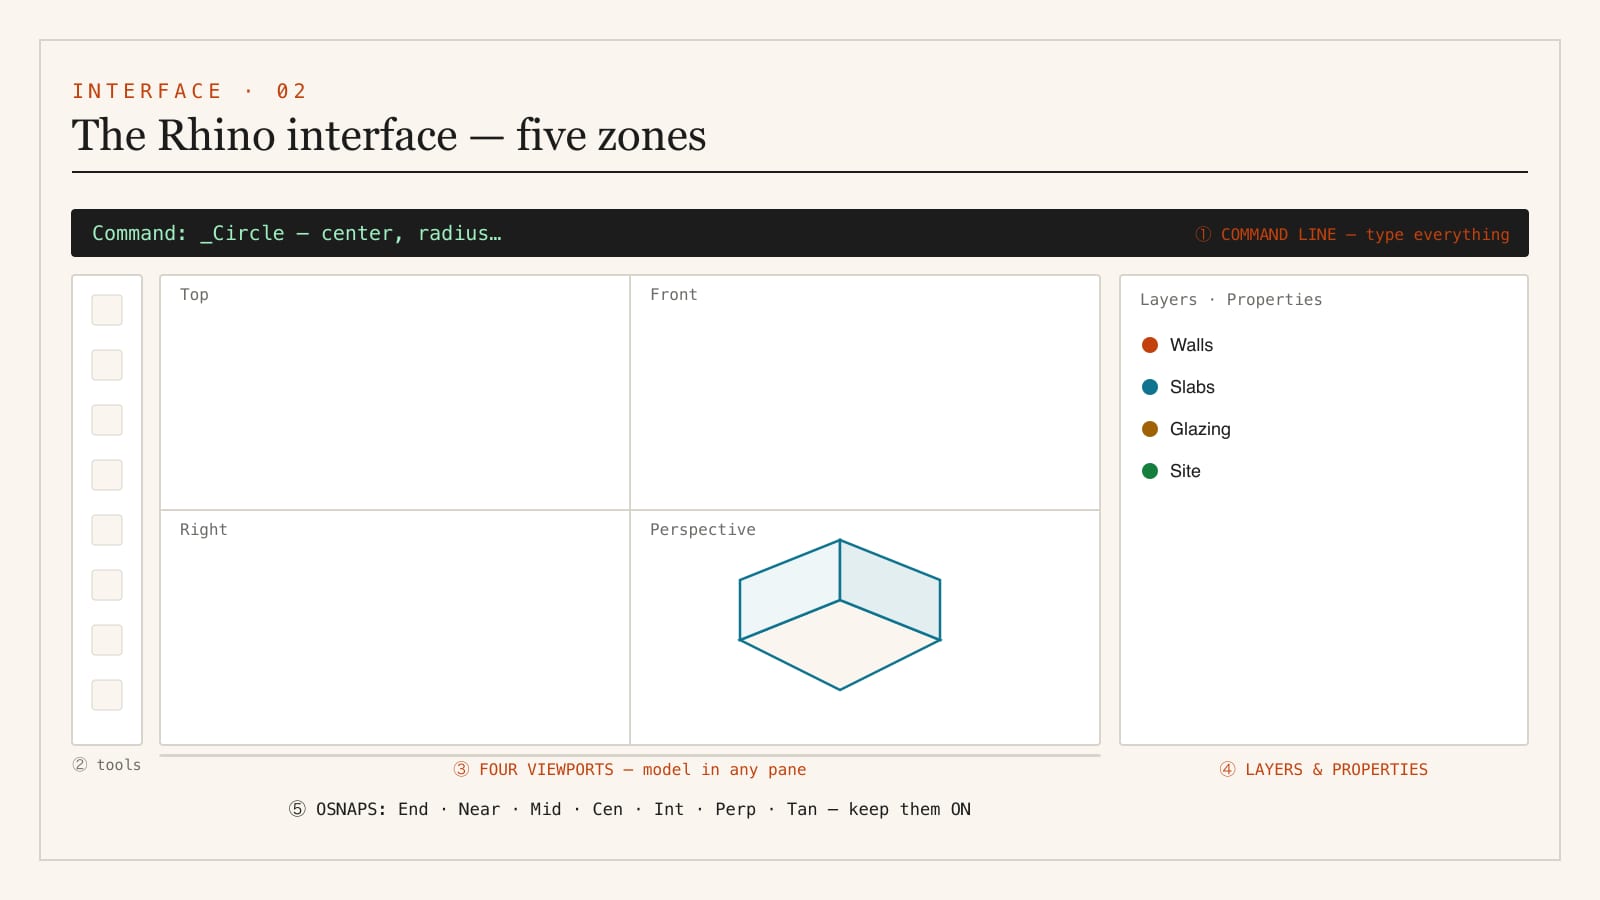
- Viewports — by default four panes: Top, Front, Right and Perspective. You model in any of them; double-click a title to maximise it.
- The command line — the single most important habit in Rhino. Everything is a typed command. Type 'Circle', press Enter, and Rhino prompts you for centre and radius. Learning to read and obey the command line is what separates fast Rhino users from slow ones. You can ignore the toolbars entirely once you know the command names.
- Toolbars / sidebars — icon shortcuts for the same commands. Useful at first, less so later.
- Osnaps (object snaps) — the bar at the bottom: End, Near, Point, Mid, Cen, Int, Perp, Tan. Tick these so your cursor snaps precisely to existing geometry. Modelling without Osnaps is the No. 1 beginner error — your model looks right but nothing actually touches.
- Layers and Properties panel — right side. Organise geometry onto named layers from day one; it is the difference between a clean file and chaos.
Ten commands that cover most of week one: 'Line', 'Circle', 'Rectangle', 'Curve' (control-point curve), 'ExtrudeCrv', 'Loft', 'Move', 'Copy', 'Rotate', 'BooleanUnion'. Type each, watch the command line, follow the prompts. That is the whole learning loop.
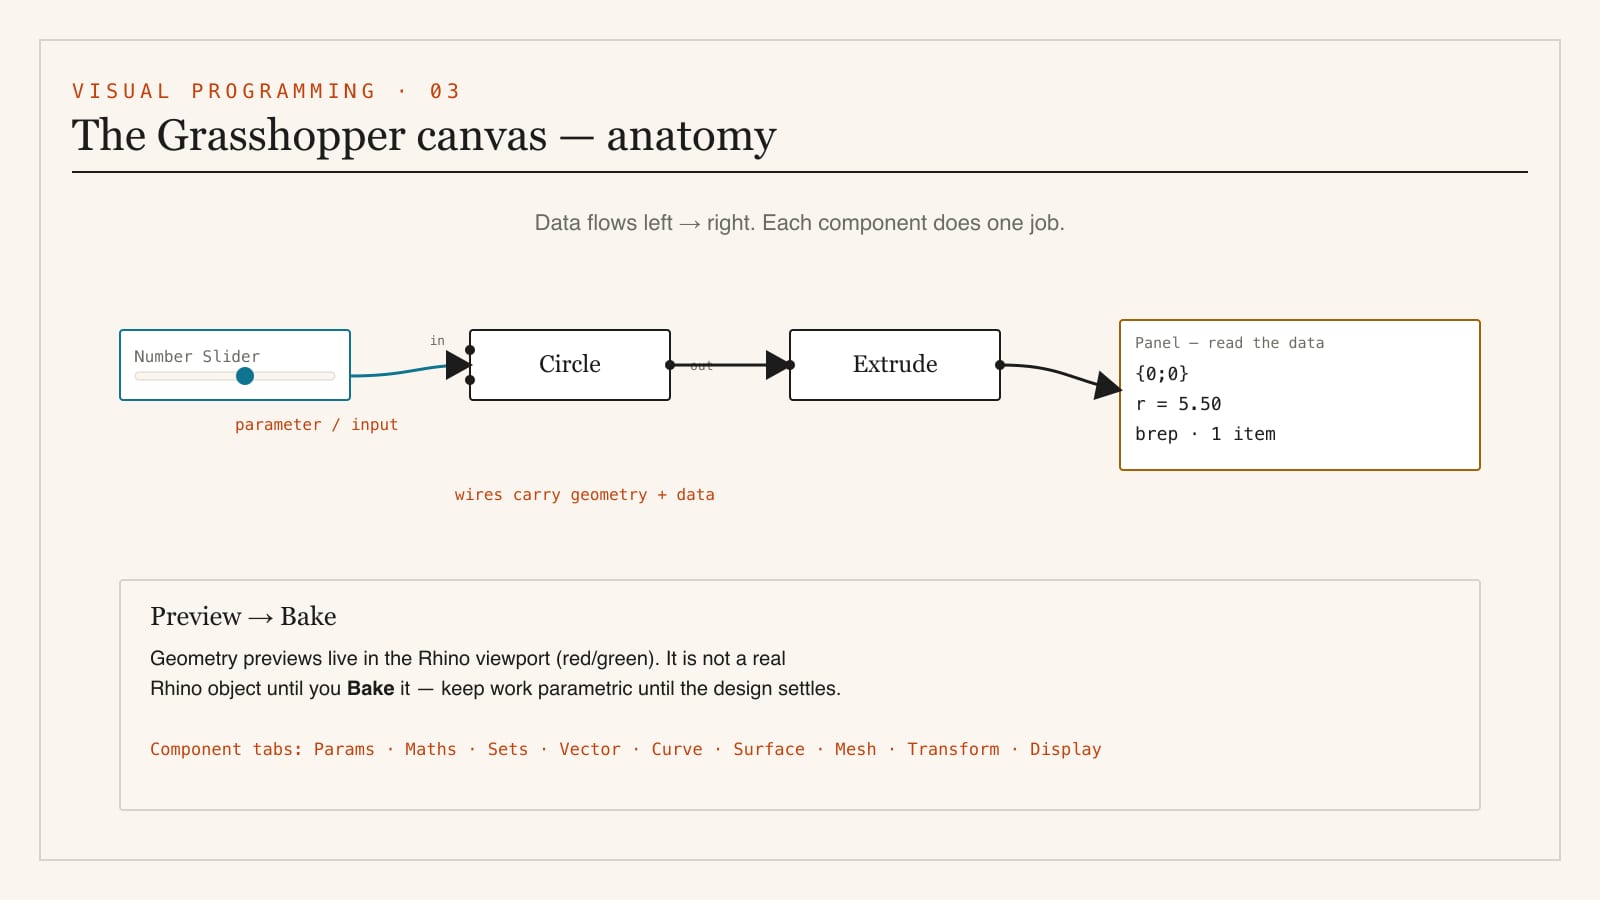
The Grasshopper canvas — anatomy of a definition
Type 'Grasshopper' in the Rhino command line and a separate canvas window opens. This is where parametric work happens.
- Component tabs (the ribbon) — across the top, grouped by purpose: Params, Maths, Sets, Vector, Curve, Surface, Mesh, Intersect, Transform, Display. Every component you will ever need lives under one of these.
- Components — the boxes you drag onto the canvas. Each has inputs on the left and outputs on the right. Hover over any nub to see what data it expects (a number? a point? a curve?).
- Wires — drag from an output nub to an input nub to connect them. Data flows left to right, always.
- Number Slider — double-click an empty canvas, type a number like '5.5', and a slider appears. Drag it and downstream geometry updates live. This is your "parameter."
- Panel and Param Viewer — read-out components that show you the actual data running through a wire. Indispensable for debugging.
- Preview — Grasshopper geometry shows in the Rhino viewport in red (selected) or green (unselected) until you Bake it into real Rhino objects.
Build your first definition — a parametric tower in six components
You can do this in ten minutes. It teaches the whole mental model.
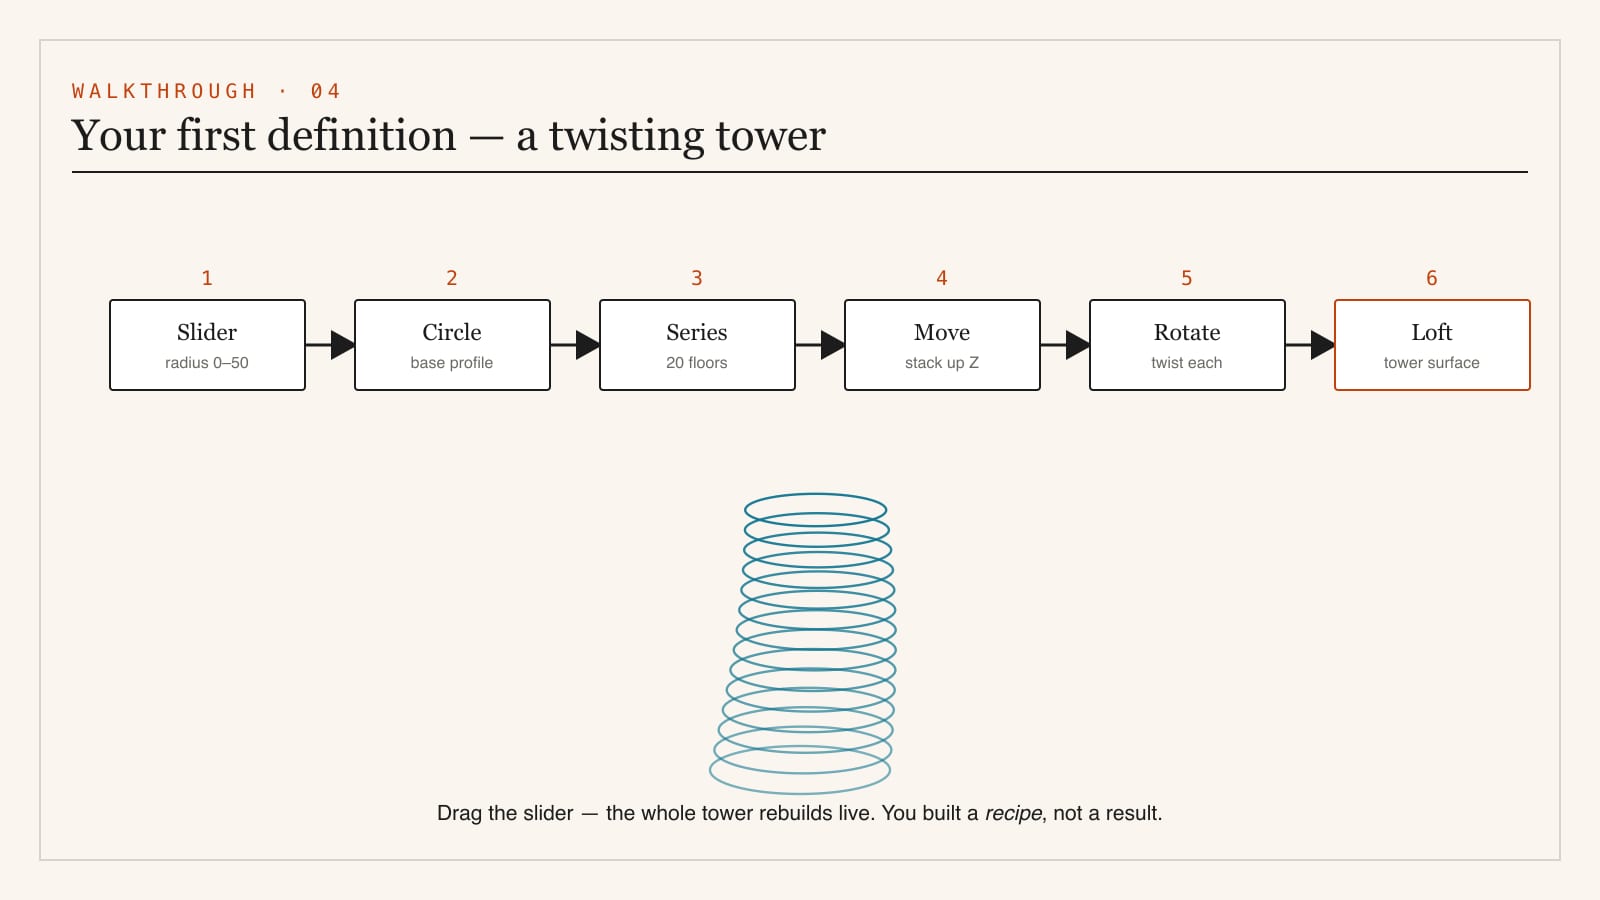
1. Number Slider → set range 0–50, value 10. This will be the tower radius.
2. Circle component (Curve tab). Wire the slider into its Radius input. A circle previews in Rhino.
3. Series component (Sets tab) → makes a list of numbers, e.g. 0, 3, 6, 9… for floor heights. Set Count to 20, Step to 3.
4. Move component (Transform). Feed the circle into Geometry and a vertical vector (built from the Series via a Unit Z component) into Motion. You now have 20 stacked circles.
5. Rotate each circle a little more than the last (feed the Series into a Rotate component's angle, scaled down) — this is what makes the tower twist.
6. Loft (Surface tab) → wire all the circles in. A smooth twisting tower surface appears.
Now drag the radius slider, or change the twist multiplier, and the entire tower rebuilds in real time. You have just made your first parametric model — and you understand, viscerally, why this is different from drawing twenty circles by hand.
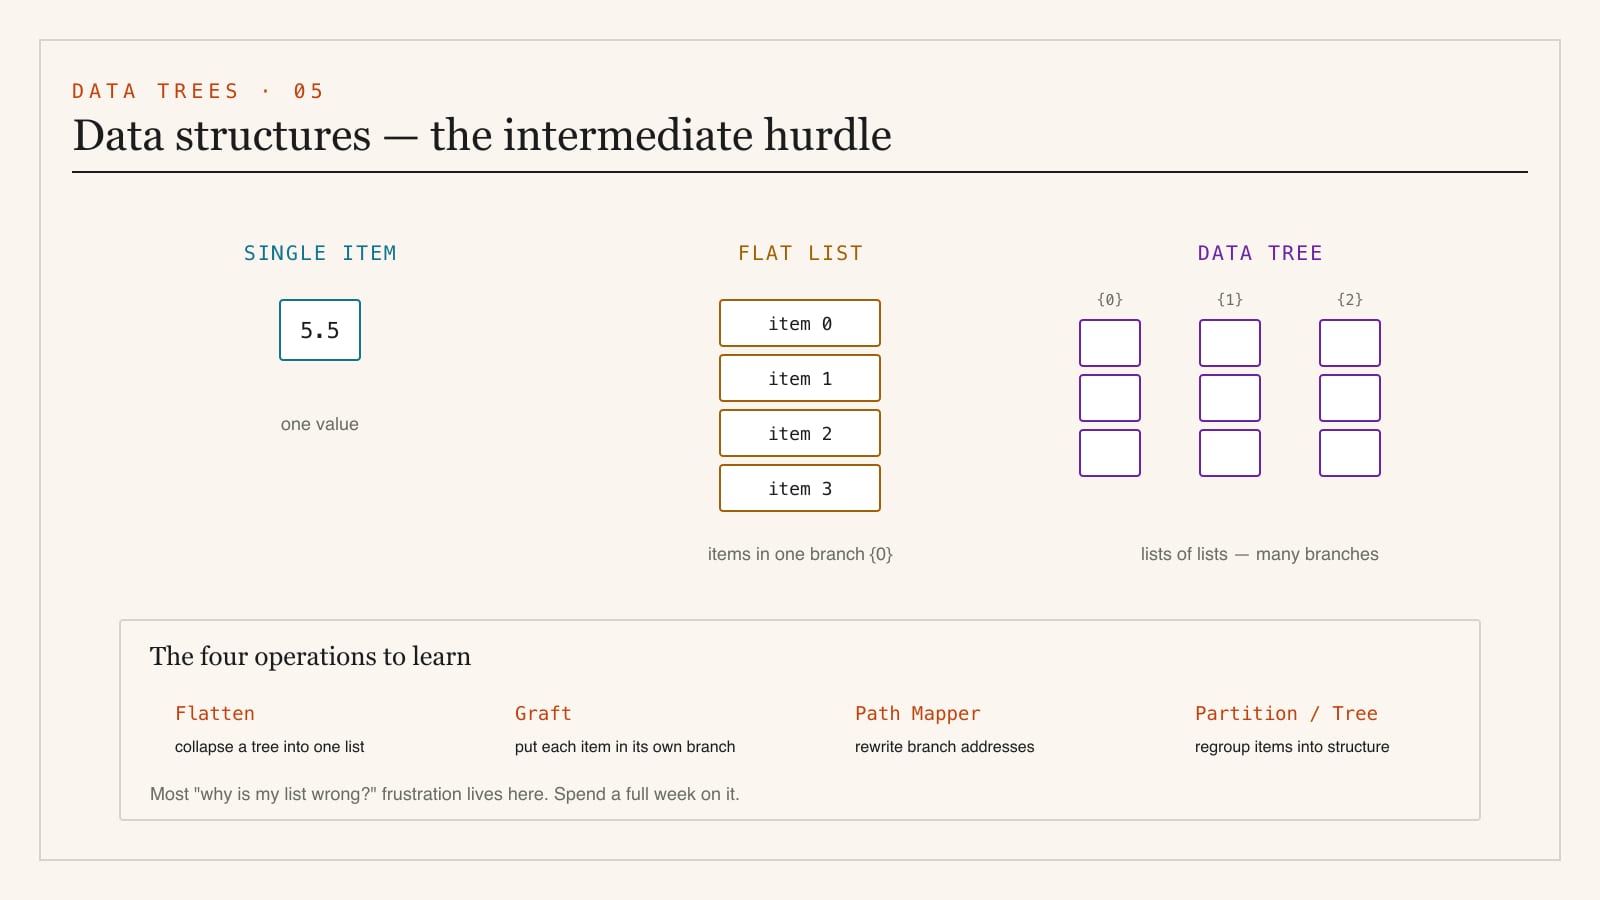
Data trees — the concept that trips everyone up
The moment your definitions get ambitious, you meet data trees. Grasshopper does not just pass single values; it passes lists (e.g. all 20 circles) and trees (lists of lists — e.g. the points on each of 20 circles, kept in separate branches). Mastering Flatten, Graft, Path Mapper and the Tree components is the genuine intermediate hurdle. Do not rush it — spend a full week on data structure once basics click.
The plugin ecosystem — what to add, and when
Vanilla Grasshopper is powerful; plugins make it extraordinary. Install via Rhino's Package Manager ('PackageManager' command) or food4Rhino, McNeel's free plugin library. Add plugins only when a project needs them — a canvas cluttered with unused libraries slows you down.
| Plugin | What it adds | When to learn it |
|---|---|---|
| Pufferfish / WeaverBird | Tweening, morphing, mesh smoothing | Once basic geometry is comfortable |
| Kangaroo 2 | Live physics — form-finding, relaxation, tensile shapes | Intermediate; great for shell/membrane studies |
| Ladybug + Honeybee | Climate, daylight, sun-path, energy analysis | When your design needs environmental evidence |
| Karamba3D | Structural analysis inside Grasshopper | For structure-driven form |
| LunchBox | Panelling, structural grids, simple ML | Facade and surface panelling |
| Hops / ShapeDiver | Cloud compute, web apps from definitions | Advanced; sharing and automation |
For the deeper map of this ecosystem and how Indian practices deploy it, see Parametric Architecture in India.
Licensing and pricing in India — the honest picture
This matters because the wrong choice here is the most common beginner mistake.
- Rhino is commercial software with a one-time perpetual licence — there is no monthly subscription, which makes it cheaper over time than most Autodesk products. As of 2026 the commercial licence is roughly US $995 and the student/education licence is around US $195 (verify current pricing and the rupee equivalent on the official Rhino store and authorised Indian resellers).
- The student licence is fully featured and legitimate — same Rhino, same Grasshopper, just proof of enrolment required. Use your college email / bonafide certificate. It is not time-limited the way trials are.
- Grasshopper is free and included — you never pay separately for it.
- A free 90-day evaluation of full Rhino is available to try before buying.
- Do not use cracked Rhino. Beyond the legal and ethical issue, cracked builds break plugins, corrupt files, and — critically — produce work you cannot legitimately show a hiring studio. The student licence costs less than a single semester's printing budget. (The cracked-software trap is covered in the Software Learning Path.)
Hardware — what you actually need
Rhino and Grasshopper are more CPU- and single-thread-sensitive than GPU-hungry (heavy rendering aside). A realistic 2026 student machine:
| Tier | Spec | Rough budget |
|---|---|---|
| Minimum | Intel i5 / Ryzen 5, 16 GB RAM, entry dedicated GPU (GTX 1650 / RTX 3050), SSD | ₹55,000–70,000 |
| Comfortable | i7 / Ryzen 7, 32 GB RAM, RTX 4060, fast SSD | ₹95,000–1,30,000 |
| Heavy (large defs, rendering) | i7/i9 / Ryzen 9, 32–64 GB RAM, RTX 4070+ | ₹1,50,000+ |
32 GB RAM is the single best upgrade for big Grasshopper definitions. A native macOS version of Rhino exists and runs well, though a handful of Windows-only plugins (some structural/fabrication tools) do not have Mac builds — check before relying on one.
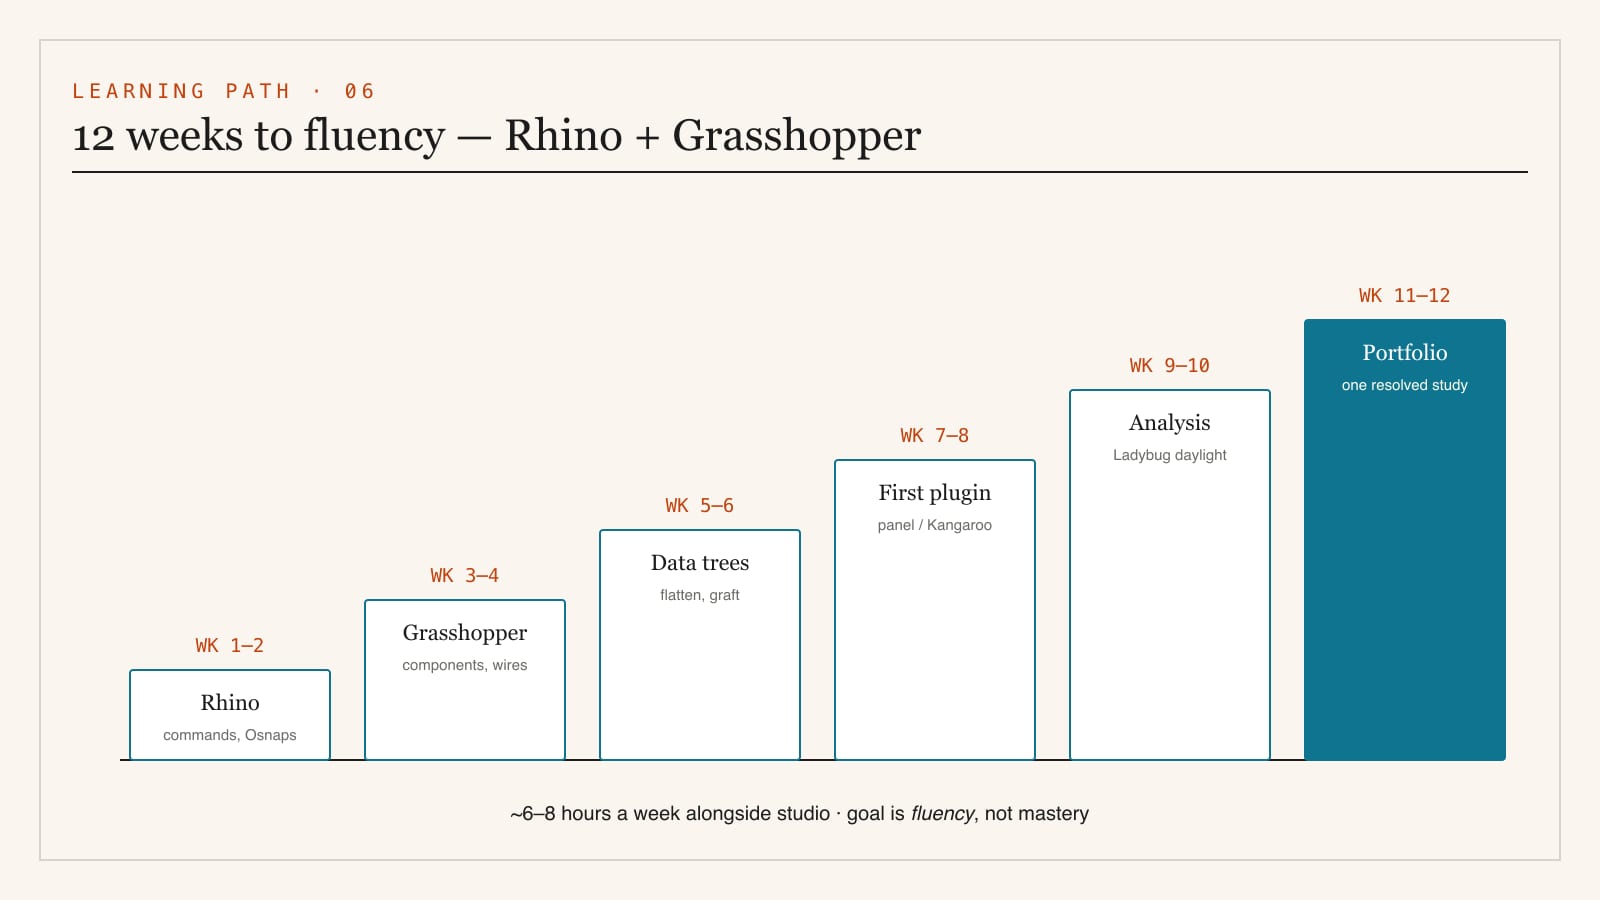
A realistic 12-week path to fluency
Treat this as roughly 6–8 hours a week alongside studio. The goal at the end is not mastery — it is fluency: the ability to model what you imagine and read someone else's definition.
| Weeks | Focus | You should be able to… |
|---|---|---|
| 1–2 | Rhino fundamentals — command line, Osnaps, layers, the ten core commands, NURBS vs mesh | Model a small building shell by hand, organised on layers |
| 3–4 | Grasshopper basics — components, wires, sliders, the twisting-tower exercise | Build a parametric form and explain data flow |
| 5–6 | Lists and data trees — Flatten, Graft, Path Mapper, point grids | Panel a surface and control structured data |
| 7–8 | First plugin — Lunchbox panelling or Kangaroo relaxation | Produce a facade panel system or a relaxed shell |
| 9–10 | Analysis — Ladybug sun-path and daylight on a real site | Back a design decision with environmental evidence |
| 11–12 | A small portfolio piece — one resolved parametric study, baked, rendered, documented | Show a complete parametric workflow start to finish |
Where to learn — free and reliable
- Rhino's own Learn portal and the Grasshopper primer — the canonical starting point, free.
- food4Rhino tutorials and the McNeel Discourse forum (discourse.mcneel.com) — where real problems get solved.
- YouTube — established teachers cover the twisting-tower and panelling exercises in detail; pick one series and finish it rather than hopping.
- Practise on a real studio brief as early as week 5 — applying Grasshopper to your own design is worth ten abstract tutorials.
Common beginner mistakes
1. Modelling without Osnaps — geometry that looks connected but isn't.
2. Ignoring the command line — hunting through toolbars instead of typing.
3. One giant messy canvas — group and label components; use Scribble notes.
4. Rushing past data trees — the single biggest source of "why is my list wrong" frustration.
5. Installing every plugin — bloat and conflicts; add only what a project needs.
6. Baking too early — keep work parametric until the design is settled.
7. Cracked software — breaks plugins, voids legitimacy, costs more in lost time than the student licence saved.
Where Rhino + Grasshopper fits in your bigger toolkit
- For the design theory and Indian practitioners → Parametric Architecture in India
- For the full five-tier software roadmap → Architecture Software Learning Path
- For BIM and documentation (Revit) → Revit for Architecture Students
- For turning models into images → Architectural Visualization in India
- For building the portfolio that shows this work → Building Your Architecture Portfolio
Rhino teaches you to model anything; Grasshopper teaches you to design the rules behind the form. Together they are the most transferable skill set in computational architecture — and twelve focused weeks is genuinely enough to cross from intimidated to fluent.
Export this guide
Related Guides — Deep-dive reading
The Software Stack — A Working Learning Path
Module 2 of the Student Foundations Track — AutoCAD to Revit to Rhino to V-Ray, the Five-Tier Learning Path, Indian Licensing Discipline, Hardware Requirements, File-Format Ecosystem, Generative-AI Architecture Tools in 2026, and the Pitfalls Every B.Arch and B.Des Student Must Avoid
Student FoundationsRevit for Architecture Students — A Beginner's Tutorial (India)
Why BIM differs from AutoCAD, the interface, the Category→Family→Type→Instance hierarchy, levels & grids, your first model, schedules & sheets, the free education licence & a 12-week path
Student FoundationsParametric Architecture in India — A Student's Working Reference
Rhino + Grasshopper, the Plugin Ecosystem, Indian Practitioners, a 12-Month Learning Path & Six Thesis Workflows
Student FoundationsRelated Tools — Try Free
Cross-Ventilation Analyzer
Estimate airflow and air changes per hour (ACH) from room size, window areas, layout, and local wind — with NBC 2016 Part 8 compliance check.
Ventilation CalculatorBefore & After Studio
Generate AI before-and-after renders to preview how your redesign could look.
DesignAIBrise-Soleil Visualizer
Interactive horizontal-louvre cut-off angle calculator — sun altitude, louvre depth, and spacing inputs with a live shadow preview. Computes θ = arctan(spacing/depth) for façade shading, ECBC envelope compliance, hospital daylight design, and tropical sun-control detailing.
Sun Shading Tool