
How to Plan a Functional House Layout
A Workflow Guide — From Brief to Construction Drawings
There is a particular sequence by which a practising architect takes a client's brief — a list of rooms, a budget, a plot, a handful of half-formed wishes — and turns it into a house plan. It is not a linear sequence, and it is not the sequence taught in the first year of architecture school. The plan emerges through an iterative dance between the brief, the site, and the constraints of structure, regulation, and cost, with each iteration exposing what the previous one missed.
This guide is an attempt to make that sequence explicit. It is written for the practising architect who has internalised the process but wants a reference framework to teach, and for the junior architect or intern learning to move from sketch to buildable plan. It is not a theoretical guide — it is an operational one, derived from the practice of planning hundreds of Indian homes across apartment, villa, and custom-plot contexts.
The companion Space Planning Principles for Indian Homes guide covers the theoretical foundations of adjacency, zoning, and circulation. This guide covers the how: the process that takes a brief through to construction-ready drawings, and the decisions, checks, and iterations that constitute good architectural practice.
"Design is a plan for arranging elements in such a way as best to accomplish a particular purpose." — Charles Eames (1907–1978)
1. The Six Stages of Plan Development
A residential house plan develops through six stages, each with its own deliverables, tools, and verification criteria. The stages are not strictly sequential — findings in any later stage can and do send the architect back to earlier ones — but their order is important because each stage assumes the work of the previous one.

The Six-Stage Framework
| Stage | Name | Deliverable | Time in practice |
|---|---|---|---|
| 1 | Brief | Written programme, priorities, constraints | 1–2 weeks |
| 2 | Site analysis | Sun path, wind rose, context plan, bylaw summary | 3–5 days |
| 3 | Bubble diagram | Adjacency sketches, zoning overlay | 1–2 days (many sketches) |
| 4 | Block plan | Structural grid, block layout at 1:100 | 1–2 weeks |
| 5 | Refined plan | Walls, doors, windows, furniture at 1:50 | 2–4 weeks |
| 6 | Construction drawings | 1:50 plans, 1:20 details, specifications | 4–8 weeks |
Most residential plans under-fail at Stage 3. A Stage-4 block plan drawn without a prior Stage-3 bubble diagram typically locks in bad adjacencies because the drawing process itself biases the architect towards formal (rectilinear, grid-aligned) arrangements over functional ones. The discipline of the bubble diagram is that it rejects geometric resolution until the adjacencies are correct (Lawson, 2005; Ching, 2015).
2. Stage 1 — Reading the Brief
The brief is where every plan succeeds or fails. A brief that lists "3BHK, 1200 sq ft, traditional" is insufficient; a brief that captures the family's actual life is the difference between a house that fits them and a house that doesn't.

What Every Residential Brief Must Capture
| Category | Specific questions to ask |
|---|---|
| Household composition | Who lives here? Multi-generational? Children's ages and trajectory? Domestic help (live-in, day)? Elderly parents now or future? |
| Daily rhythm | Wake time, work pattern, cooking pattern, meal locations, bedtime. When is each room used? |
| Social pattern | Frequency of guests? Extended family staying over? Festivals and rituals? Formal vs informal entertaining? |
| Style of cooking | Indian wet cooking (splashing, steam, aroma)? Tandoor or barbecue? Dry-pantry space needed? Servant-prep space? |
| Religious practice | Puja room required? Daily or occasional use? Specific directional requirements (NE preferred)? Shared or private? |
| Work-from-home | Dedicated study? Shared desk in bedroom? Client visits ever (requires separate access)? |
| Storage intensity | Clothes (bulk sari, sherwani storage)? Kitchen (staples, festival utensils)? Books? Seasonal (winter bedding, AC)? |
| Outdoor connection | Terrace? Balcony? Garden? Level of outdoor use — daily, seasonal, special occasions? |
| Vastu alignment | Strict compliance required? Advisory only? Non-negotiables (e.g., entrance direction)? |
| Future trajectory | Children growing up and leaving? Elderly parents joining? Renovation vs right-first-time? |
| Budget | Total construction budget? Phased construction plan? Cost-sensitivities? |
The brief captured at this stage becomes a contract: not a legal contract with the client, but an internal one with the plan. When a design choice arises in Stage 5 that contradicts a Stage-1 priority, the Stage-1 priority wins — or the brief is formally revised with the client's agreement. Without this discipline, plans drift and clients end up with homes that were never quite what they asked for.
Priority Ranking
Ask the client to rank their top five priorities. Typical possibilities:
- Large open kitchen where the family gathers
- Private master suite as a sanctuary
- Daylit, airy living room for entertaining
- Study / home office space
- Outdoor terrace for morning tea
- Grandparents' bedroom on ground floor / ground level
- Puja room as focal space
- Flexible room that converts (guest / home office / study)
- Formal separate dining for festivals
- Abundant storage
Having the client rank forces specificity. "Everything" is not a brief; "these five, in this order" is a design foundation.
"The brief is not a static document. It is a living conversation — and every good plan is a response to that conversation." — Rahul Mehrotra (b. 1959), RMA Architects
3. Stage 2 — Site Analysis
A plan designed without site analysis is a plan divorced from place. For a residential project, four site parameters must be captured before the first bubble is drawn:
Site Analysis Checklist
| Item | How to capture | Design implication |
|---|---|---|
| Solar path | Sun-path diagram for the latitude; document east, west, and south exposures | Orientation of habitable rooms; shading strategy; chajja depths |
| Prevailing wind | IMD wind rose for the city; check seasonal variation | Orientation of openings; cross-ventilation axes |
| Context & obstructions | Survey adjacent buildings, trees, roads, utility lines | Impact on daylight, privacy, acoustic exposure |
| Plot bylaws | FSI, setbacks, height, ground coverage, bye-law restrictions | Buildable envelope and massing |
| Access & services | Road frontage, drainage direction, utility connections | Location of entry, service access, sewage disposal |
| Vastu orientation | North identification; plot shape assessment | Entrance direction, kitchen and puja placement if required |
| Soil and level | Soil bearing capacity, water table, level variation | Foundation type and depth; split-level opportunities |
The free Sun Path Analyzer, Cross-Ventilation Analyzer, and Plot Evaluation Toolkit tools on Studio Matrx accelerate this work — and produce documentation that can feed directly into later stages.
Mapping the Envelope

The combined output of site analysis is the buildable envelope: the three-dimensional shape within which the house can be placed, bounded by setbacks, height limits, and ground-coverage restrictions. Every subsequent design decision happens inside this envelope. The FAR / FSI Calculator and Bylaw Checker compute the envelope for 12 Indian cities directly.
A common mistake among junior designers is to draw the house and then check the bylaw — this wastes the client's fee and the architect's time. The envelope comes first; the house is planned within it.
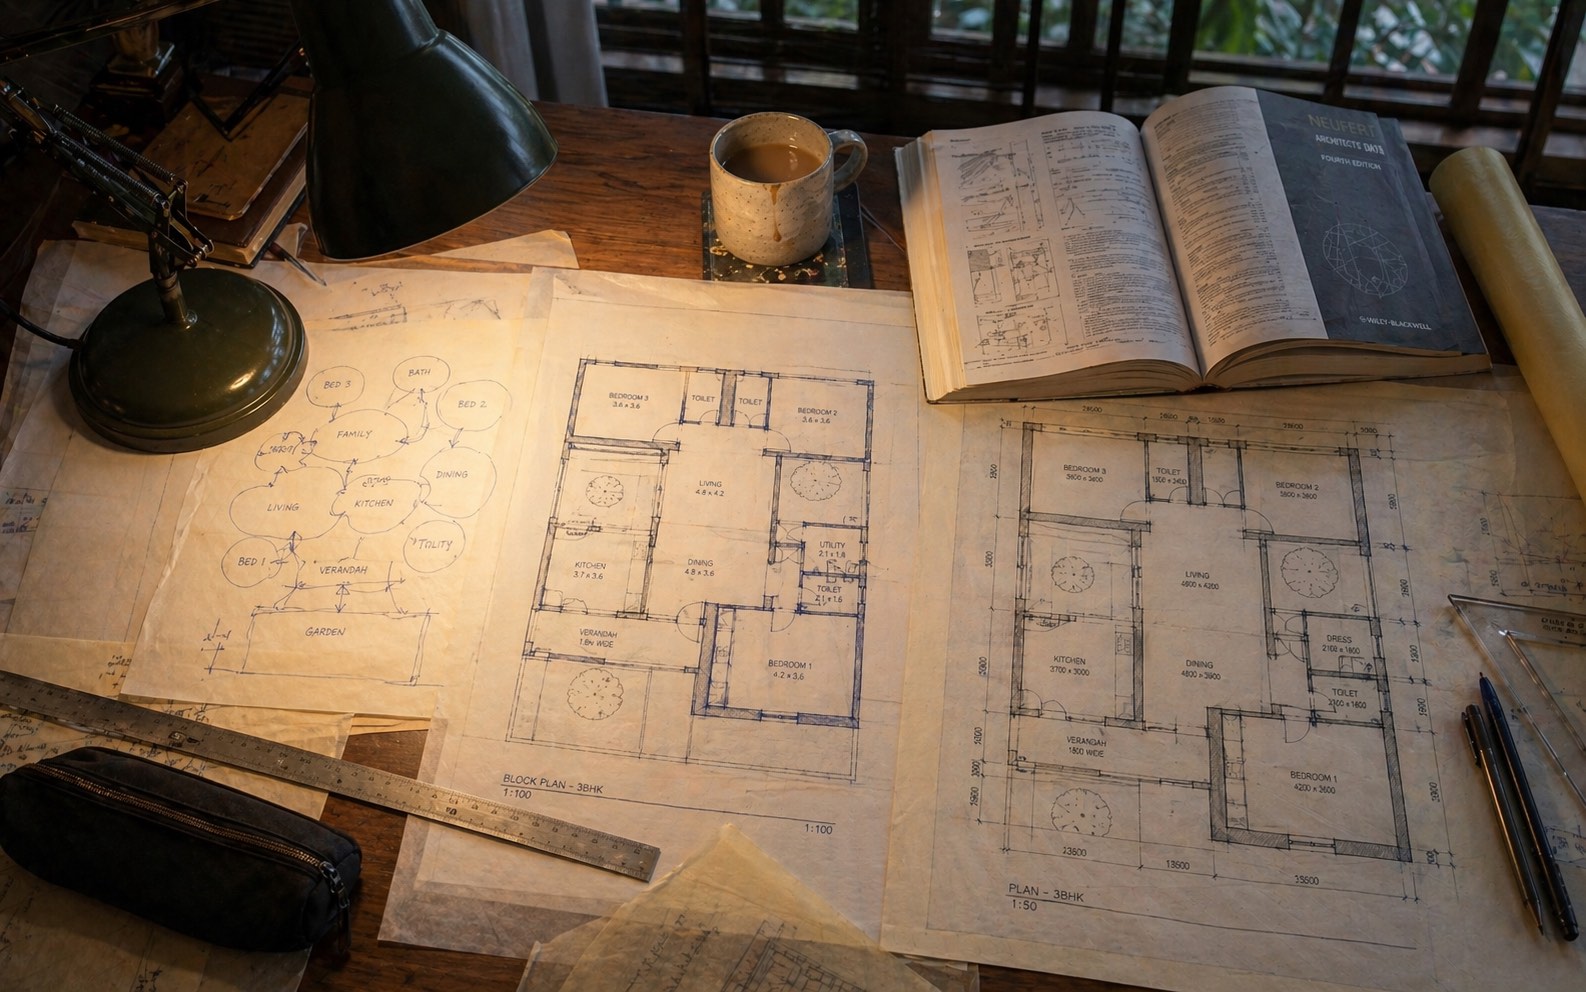
4. Stage 3 — The Bubble Diagram
The bubble diagram is deceptively simple and powerfully corrective. Each room becomes a bubble sized roughly in proportion to its area; bubbles that must be adjacent are drawn touching; bubbles that must not be adjacent are drawn far apart.

How to Draw a Bubble Diagram
1. Write the brief's room list in order of approximate area (largest first).
2. Represent each room as a rough bubble — a circle or amoeba-shape — sized in proportion to area.
3. Draw connecting lines for required adjacencies (living → dining → kitchen; master bed → master bath; puja → NE of plan).
4. Pull apart forbidden adjacencies (toilet ↔ kitchen; servant quarters ↔ master bed; bed ↔ bed shared wall with acoustic issue).
5. Overlay the zoning — public, semi-public, private, service (Section 5 below, and the Space Zoning guide for depth).
6. Overlay the orientation — which bubbles should face N, S, E, W, or open-to-sky.
7. Redraw at least five times. The first bubble diagram is almost always wrong.
Adjacency Matrix

The adjacency matrix above translates the bubble-diagram logic into a systematic check. For any pair of rooms, the matrix cell specifies:
- Green (adjacent) — rooms must share a wall or direct connection
- Yellow (near) — rooms should be in the same zone, short walk apart
- Grey (neutral) — no strong requirement either way
- Red (separate) — rooms must be acoustically, visually, or olfactorily separated
The strongest design signals are the reds and the greens. A plan that violates three or more red cells typically has irreducible functional problems; one that violates multiple greens has irreducible convenience problems.
What Not to Do at Stage 3
1. Don't draw rectangular blocks. The whole point of bubble diagrams is to keep the adjacency conversation going before geometric constraints take over.
2. Don't commit to dimensions. A bubble is proportional, not measured. If the kitchen bubble is roughly a third of the living bubble, that's enough for now.
3. Don't lay out furniture. Furniture belongs in Stage 5, not Stage 3. Clients who ask where the sofa goes at Stage 3 are signalling they need a conversation, not an answer.
4. Don't skip the bubble diagram because you "can visualise the plan already." Experienced architects who skip it usually regret it; the bubble diagram catches adjacency errors that the rectangular plan hides.
5. Stage 4 — Block Planning and the Grid
The block plan translates the bubble diagram into rectangular blocks on a structural grid. This is where dimensional reality enters: rooms acquire width × depth, walls take up thickness, and the plan starts to resemble a building.
The Structural Grid
Residential buildings in India typically use one of two structural systems:
| System | Typical grid | Clear spans | Best for |
|---|---|---|---|
| Load-bearing masonry | 3.0–4.5 m | 3.0–4.5 m | Small to medium houses; single- and double-storey plot construction |
| RCC framed (column + beam) | 3.5–6.0 m (modular) | Up to 7.5 m with T-beams | Multi-storey homes; apartment construction; irregular plans |
The grid imposes a disciplinary logic: rooms that align with grid lines are cheap to build; rooms that cut across grid lines require local beams, larger columns, or non-standard slab depths. A plan that ignores the grid produces a house that costs 15–25 per cent more to build than it needs to.
Indian Residential Room Minimums — NBC 2016 + SP 41

| Room | NBC 2016 minimum (m²) | NBC 2016 min dimension (m) | Comfortable practice (m²) |
|---|---|---|---|
| Habitable room — single | 9.5 | 2.4 | 12.0 |
| Habitable room — general | 12.0 | 2.8 | 14–18 |
| Master bedroom | 14 (recommended) | 3.0 | 14–18 |
| Kitchen — independent | 5.0 | 1.8 | 7–10 |
| Kitchen + store | 5.5 | 2.4 | 9–12 |
| Bath + WC combined | 2.8 | 1.2 | 3.5–4.5 |
| Separate WC | 1.1 | 0.9 | 1.2 |
| Separate bath | 1.8 | 1.2 | 2.5 |
| Staircase mid-landing | — | 0.9 | 1.0 m width |
| Corridor | — | 0.75 | 1.0–1.2 m width |
| Entrance lobby | — | 1.2 | 2.5 m² |
These are compliance minima. Comfortable Indian practice for middle-income housing uses 20–30 per cent more than the NBC minimum; premium housing uses substantially more.
The Block-Plan Process
1. Superimpose a structural grid on the bubble diagram (3.0 m, 3.5 m, 4.0 m common modules).
2. Convert each bubble to a rectangle aligned with the grid, sized to the room area.
3. Adjust rectangle proportions to rational room shapes (1:1 to 1:1.8 is ideal; over 1:2 starts to feel like a corridor).
4. Verify NBC minima on each rectangle.
5. Check circulation — is there a clear route from entrance to every room without passing through another room?
6. Verify structural continuity — are columns and load-bearing walls continuous floor-to-floor and column-to-column?
7. Document the plan at 1:100 scale, with grid lines shown.
The Structural-Rationality Test

A good block plan passes the structural-rationality test: you can draw the columns and beams without any of them cutting through a functional room. If an RCC beam has to cross a dining room because two load-bearing walls are offset, the block plan needs revision. This is best caught at Stage 4 — after it goes into Stage 5 construction drawings, the fix is expensive.
"Structure is the discipline that makes the plan buildable. A plan that fights its structure fights its own construction." — B. V. Doshi (1927–2023), paraphrased from Doshi (2011)
6. Stage 5 — Refinement: Walls, Doors, Windows, Furniture
The refined plan introduces the details that the block plan abstracted away: wall thickness, door and window positions and sizes, built-in furniture, plumbing fixtures, and electrical provisions.
Wall Thickness Conventions
| Wall type | Thickness (mm) | Use |
|---|---|---|
| External (brick) | 230 | Envelope; structural in load-bearing |
| External (AAC block) | 200 | Envelope; lightweight construction |
| Internal partition | 115 | Between rooms; non-load-bearing |
| Internal partition (acoustic) | 150 | Between bedrooms or bedroom-to-living |
| Dry partition (gypsum) | 75–100 | Light internal division; renovation-friendly |
| RCC column typical | 230 × 300 | Structural; dictates usable room dimensions |
Wall thickness seems a trivial detail but its cumulative effect on plans is substantial. A 3.5 m structural grid with 230 mm walls on each side gives a 3.04 m internal dimension; with 115 mm walls it gives 3.27 m. Over a plan, wall-thickness accumulation can eat 5–8 per cent of the gross built-up area.
Door and Window Sizing
| Opening | Typical size (W × H mm) | Notes |
|---|---|---|
| Main entrance door | 1000 × 2100 (double panel) or 900 × 2100 (single) | Vastu preference: heavier, taller, auspicious height |
| Internal door (bedroom) | 800 × 2100 | Check for furniture passage (wardrobe, king bed) |
| Bathroom door | 700 × 2100 | Smaller acceptable; accessibility needs 900 mm |
| Kitchen sliding door | 900 × 2100 | Acoustic + smoke separation |
| French door (balcony / garden) | 1500 × 2100 | Single or double panel |
| Window — living | 1800–2100 × 1500 | Head at 2100 mm; sill 900 mm for seated view |
| Window — bedroom | 1200 × 1200 or 1500 × 1200 | Higher sill (900–1200 mm) for bed privacy |
| Window — kitchen | 900 × 900 | Above countertop (sill 1100 mm) |
| Window — bath | 600 × 600 | High sill (1800 mm); opaque or louvered |
Doors and windows are not decorative — they are circulation and light tools. Door placement in particular governs how a room is used: a door on the long wall of a bedroom admits furniture flexibility; a door in the corner forces the bed to one specific wall.
Furniture Layout
At Stage 5, furniture is drawn to scale on the plan. This catches dozens of problems the block plan cannot:
- A master bedroom of 14 m² that can't accommodate a king-size bed with bedside clearances
- A living room where the sofa doesn't fit the wall it was placed against
- A kitchen with no clear 1.2 m work triangle after the refrigerator is placed
- A dining table that blocks access to the balcony door
- A study desk positioned with a window glare on the laptop screen
Standard Indian furniture dimensions:
| Item | Typical size (mm) |
|---|---|
| King bed | 1830 × 1980 (6'0" × 6'6") |
| Queen bed | 1520 × 1980 |
| Single bed | 920 × 1980 |
| Wardrobe (single person) | 1200 × 600 × 2400 |
| Wardrobe (couple) | 2400–3000 × 600 × 2400 |
| 6-seater dining | 1800 × 900 |
| 4-seater dining | 1200 × 750 |
| 3-seater sofa | 2100 × 900 |
| Study desk | 1200 × 600 |
| Bookshelf | 900 × 300 × 2100 |
See the Furniture Size Chart for the full Indian residential furniture library.
Clearance Rules
Furniture layouts fail most commonly on clearances, not on area. Standard clearance requirements (SP 41; Neufert and Neufert, 2012):
| Between | Minimum clearance (mm) |
|---|---|
| Bed side and wall | 600 |
| Bed foot and wall | 800 |
| Two beds (twin room) | 500 |
| Sofa front and coffee table | 450 |
| Coffee table and opposite seating | 600 |
| Kitchen counter and opposite counter | 900 (preferred 1200) |
| Dining chair (pulled back) to wall | 750 |
| Wardrobe door (fully open) | 600 |
| Toilet centre-line to side wall | 450 |
| Shower cubicle internal | 900 × 900 |
7. Circulation — The Organising Logic
Circulation — the route you take through the house — is the organising logic of the plan. Good plans have clear, short, efficient circulation; bad plans have hallways that double back, rooms used as passages, and service circulation crossing social circulation.
Circulation Typologies
| Typology | Description | Efficiency | Privacy |
|---|---|---|---|
| Linear | Rooms strung along a corridor | Moderate | Good |
| Radial | Rooms around a central hall | Very good | Moderate |
| Courtyard | Rooms around a central open space | Very good | Very good (zones by position) |
| Split-level | Short flights between zoned floors | Good | Very good (by level) |
| Through-room | One room serves as passage to another | Poor | Poor |
Through-room circulation ("the bedroom you have to cross to reach the bathroom", "the kitchen you have to walk through to get to the dining") is the single most common residential plan failure. SP 41 explicitly advises against it for reasons of privacy and functional interference.
Corridor Widths
| Use | Minimum (mm) | Comfortable (mm) |
|---|---|---|
| Private corridor (bedroom access) | 900 | 1050 |
| Main corridor (public access) | 1050 | 1200 |
| Service corridor | 750 | 900 |
| Staircase (min tread per NBC) | 900 | 1050 |
Corridor length is also important: a corridor > 12 m that receives no daylight becomes oppressive. Traditional Indian plans addressed this with transverse windows, jalis, or opening onto the courtyard at intervals.
The Dead-End Test
Walk through the plan in your mind: start at the main entrance, and visit every room. At each room, note whether you had to go "out" through another functional room. If yes, the plan has a circulation failure. An exception: the kitchen-dining-living open plan is deliberately permeable and is not counted as failure.
8. Verification — Daylight, Ventilation, Sound
At the end of Stage 5, the refined plan must be verified against three physical performance criteria: daylight, ventilation, and acoustic privacy. The Studio Matrx tools automate this verification:
| Criterion | Test | Tool |
|---|---|---|
| Daylight | Daylight Factor per room vs IS 2440 | Daylight Factor Calculator |
| Ventilation | ACH per room vs IS 3362 / ASHRAE 62.1 | Cross-Ventilation Analyzer |
| NBC opening area | WFR check per NBC 2016 Part 8 | Both tools report this |
| Solar orientation | Sun exposure by hour and month | Sun Path Analyzer |
| Cross-flow | Opening alignment for prevailing wind | Cross-Ventilation Analyzer |
Acoustic Privacy Check
Sound privacy is often missed until after construction. The rough test:
1. Walk the plan. For each pair of rooms separated by a single 115 mm partition, estimate Sound Transmission Class (STC):
- 115 mm brick: STC ≈ 42 (conversation audible but unintelligible)
- 150 mm brick: STC ≈ 47
- 230 mm brick: STC ≈ 52 (conversation essentially inaudible)
- 75 mm gypsum: STC ≈ 32 (conversation clearly audible)
2. For bedroom-to-bedroom walls, target STC ≥ 47. Upgrade wall thickness or add a second leaf where this requires.
3. For bedroom-to-living walls, target STC ≥ 52. This usually requires 150 mm masonry + air gap or 230 mm single-leaf.
Future-Proofing
The final verification check asks: how does this plan age?
- Children's bedrooms — will the child still fit at 16? Is there a work area?
- Master bedroom — can an attached bath support grab-bars in twenty years?
- Guest bedroom — can it double as a WFH office? As a caregiver's room?
- Kitchen — are circulation clearances wheelchair-accessible? Is pantry reachable from a seated position?
- Staircase — is there room alongside for a future stair-lift? Is it at right-angles rather than spiral (which cannot take a lift)?
- Service ducts — are MEP risers accessible from outside living areas for repair?
A plan that passes the future-proofing check is one the client can grow old in. A plan that doesn't is one they will renovate expensively or leave.
"The first question of architecture is not 'what will it look like?' but 'what will it be like to live in?'" — Rahul Mehrotra
9. Stage 6 — Construction Drawings
The final stage converts the refined plan into buildable construction documents: dimensioned plans at 1:50, key-plan at 1:100, details at 1:20, MEP coordination drawings, and a specification booklet.
Minimum Drawing Set for Residential Construction
| Drawing | Scale | Purpose |
|---|---|---|
| Site plan | 1:200 | Plot, building footprint, contours, services, boundary treatment |
| Ground/first/terrace floor plans | 1:50 | Dimensions, room labels, door schedule, window schedule |
| Sections (2 minimum: long + short) | 1:50 | Vertical relationships, ceiling heights, level changes |
| Elevations (all four) | 1:50 | External surface treatment, openings, massing |
| Structural plan | 1:100 | Column layout, beam lines, slab level, staircase structure |
| MEP drawings | 1:50 | Plumbing, electrical, HVAC coordination |
| Detail drawings | 1:5 to 1:20 | Window details, staircase, balcony, ledges, copings |
| Door & window schedule | table | Every opening: size, material, hardware, glass type |
| Finishes schedule | table | Floor, wall, ceiling, skirting by room |
| Specification | text | Materials, brands, quantities, quality standards |
For a 3BHK home, a complete construction drawing set is typically 25–40 sheets. Junior architects tend to produce fewer drawings than required and discover gaps in the contractor's queries; experienced practice produces more drawings than strictly required so the contractor has no ambiguity to exploit.
The Brand Dropdowns
Specifications must name brands, grades, and quantities for every material. Generic specifications ("good quality tiles") result in the cheapest material being supplied. Specific specifications ("Kajaria Eternity Series 600×1200 mm, Nano Polish, ₹95/sq ft") produce predictable outcomes. The BOQ Calculator and Contract-Ready BOQ with Brand Dropdowns tools structure specifications at this level of detail.
10. Decision Heuristics — When Rules Conflict
In practice, many plan decisions are trade-offs between competing goals. A few heuristics resolve the most common conflicts:
Area vs Number of Rooms
When the brief wants 4 bedrooms but the plot only supports 3 spaciously, the answer depends on:
- Family phase — if children are 10+ years old, cramp is imminent; 3 + study that converts is better
- Flexibility — a study-with-daybed converts for guests; a small 4th bedroom doesn't
- Future value — larger bedrooms resell better than more small bedrooms in most Indian cities post-2020
Open Plan vs Compartmented
The modern Indian home lives between these two traditions:
- Open plan (Western-origin) — one continuous living-dining-kitchen
- Compartmented (traditional Indian) — separate rooms with solid doors
The honest Indian resolution is a hybrid: open living-dining, compartmented kitchen (closable for cooking with sliding screen), compartmented bedrooms. The kitchen is the hinge — open to family room, closed when cooking.
Orientation vs Views
When the plot's best view is west (afternoon sun) and the best orientation is south:
- Living rooms prioritise view (west); shade aggressively with deep chajjas or vertical fins
- Bedrooms prioritise orientation (south or east); accept modest view
- Study / puja rooms prioritise orientation (north for study, NE for puja); view secondary
Kitchen vs Dining Priority
When kitchen and dining overlap in the programme:
- If cooking is the family centre of gravity (Gujarati, Tamil, Bengali kitchens): kitchen larger, dining adjacent
- If entertaining is the centre: separate formal dining, kitchen functional
- Modern default: open-kitchen-to-dining, breakfast island in kitchen, formal dining separate or combined with living
Vastu vs Orientation
When Vastu and solar orientation conflict (e.g., Vastu wants entrance NE but NE receives harsh morning summer sun):
- Accept the Vastu orientation but add a generous porch/vestibule that shades
- Or negotiate: many modern Vastu practitioners accept alternates within ±15° of ideal
- Or offer the client a trade-off table showing the practical cost of each orientation
The architect's job in these moments is not to decide for the client but to frame the trade-off with data so the client decides well.
11. Common Plan Failures — and How to Avoid Them
A small number of failures recur across residential plans in India. Learning to spot them at Stage 3 saves months of rework at Stage 6.
| Failure | Symptom | Fix |
|---|---|---|
| Bathroom adjoining kitchen wall | Plumbing clash; hygiene issue | Move bathroom; or add acoustic/smell barrier wall between |
| Kitchen opens directly to entrance | Guest sees cooking mess; smells reach foyer | Add foyer / intermediate space; or rotate kitchen |
| Bedroom doors facing each other across corridor | Acoustic + privacy issue | Offset doors; use bent corridor |
| Master bed wall shared with common living | Noise from TV / guests disturbs sleep | Buffer with wardrobe cavity; upgrade wall to 230 mm |
| Staircase in dead-zone with no daylight | Dark and oppressive | Top-light with skylight or clerestory; or move to external wall |
| Service entry cuts through social zone | Servant circulation crosses family zone | Add independent service corridor / staircase |
| Toilet directly visible from dining | Functional embarrassment | Rotate toilet; add screening |
| Windows onto neighbour's balcony | Privacy loss | Upgrade to frosted glass; or relocate window |
| Low ceilings throughout | Constrained spatial experience | Selective double-height in public zones |
| Uniform wall finish everywhere | No spatial hierarchy | Differentiate treatment by zone (textured public, calm private) |
| No puja room and client wanted one | Late discovery of oversight | Revisit brief; integrate into layout or convert small space |
| Grandparent bedroom on upper floor | Accessibility fail as they age | Always place elder rooms on entry level if possible |
The discipline that prevents these failures is simple: run the plan through the adjacency matrix, the sightline test, the acoustic test, and the future-proofing test before finalising. Each test takes 20 minutes; skipping them costs months.
12. Workflow Summary — The Architect's Sequence
To synthesise: the full workflow for planning a functional residential layout is:
The Complete Sequence
1. Capture the brief — structured interview, priority ranking, written programme.
2. Analyse the site — solar path, wind, context, bylaws; define buildable envelope.
3. Draw the bubble diagram — multiple iterations; zone with privacy gradient overlay.
4. Check against adjacency matrix — flag reds and missing greens.
5. Overlay structural grid — 3.0–4.5 m typical; align bubbles to grid.
6. Block-plan — convert bubbles to dimensional rectangles; verify NBC minima.
7. Verify circulation — short, direct, non-crossing; dead-end test.
8. Refine — walls, doors, windows, furniture; check all clearances.
9. Verify performance — daylight (DF ≥ benchmark), ventilation (ACH ≥ target), acoustic (STC ≥ target).
10. Future-proof — accessibility, adaptability, ageing-in-place.
11. Produce construction drawings — 1:50 plans, details, MEP coordination, specification.
12. Issue for construction — with BOQ, specification, and a disciplined variation protocol.
Tools That Accelerate the Workflow
Studio Matrx tools that plug directly into this workflow:
- Sun Path Analyzer — Stage 2 solar study
- Plot Evaluation Toolkit — Stage 2 land check
- Bylaw Checker — Stage 2 envelope
- FAR / FSI Calculator — Stage 2 buildable area
- Vastu Compass — Stage 2 and Stage 4 orientation
- Cross-Ventilation Analyzer — Stage 8 verification
- Daylight Factor Calculator — Stage 8 verification
- Setback Visualizer — Stage 2 envelope
- Seismic Zone Checker — Stage 4 structural input
- Staircase Calculator — Stage 5 refinement
- BOQ Calculator — Stage 6 specifications
Together, these cover roughly 60 per cent of the quantitative tasks in planning a residential layout — leaving the architect's creative and judgement work to focus on what tools cannot automate.
"The great architect is the one who simplifies — who takes a programme full of lists and turns it into a house that feels inevitable." — Geoffrey Bawa (1919–2003)
References
- Alexander, C. (1979) The Timeless Way of Building. New York: Oxford University Press.
- Alexander, C., Ishikawa, S. and Silverstein, M. (1977) A Pattern Language: Towns, Buildings, Construction. New York: Oxford University Press.
- Bureau of Indian Standards (1987) SP 41 (S&T):1987 — Handbook on Functional Requirements of Buildings (other than Industrial Buildings). New Delhi: BIS.
- Bureau of Indian Standards (2016) SP 7:2016 — National Building Code of India 2016. New Delhi: BIS.
- Bureau of Energy Efficiency (2018) Eco-Niwas Samhita 2018: Energy Conservation Building Code for Residential Buildings. New Delhi: BEE.
- Ching, F.D.K. (2015) Architecture: Form, Space, and Order. 4th edn. Hoboken: John Wiley & Sons.
- Ching, F.D.K. (2020) Building Construction Illustrated. 6th edn. Hoboken: John Wiley & Sons.
- Correa, C. (1985) The New Landscape: Urbanisation in the Third World. Mumbai: Book Society of India.
- Cooper Marcus, C. (1995) House as a Mirror of Self: Exploring the Deeper Meaning of Home. Berkeley: Conari Press.
- Doshi, B.V. (2011) Paths Uncharted. Ahmedabad: Vastu Shilpa Foundation.
- Eames, C. (1976) Design Q&A. Interview by Madame L'Amic, for the Louvre exhibition What is Design?.
- Hall, E.T. (1966) The Hidden Dimension. New York: Doubleday.
- Indraganti, M. (2010) 'Thermal comfort in naturally ventilated apartments in summer: findings from a field study in Hyderabad, India', Applied Energy, 87(3), pp. 866–883.
- Kahn, L.I. (1991) Writings, Lectures, Interviews. Edited by A. Latour. New York: Rizzoli.
- Krishan, A., Baker, N., Yannas, S. and Szokolay, S. (Eds.) (2001) Climate Responsive Architecture: A Design Handbook for Energy Efficient Buildings. New Delhi: Tata McGraw-Hill.
- Lawson, B. (2005) How Designers Think: The Design Process Demystified. 4th edn. Oxford: Architectural Press.
- Mehrotra, R. (2011) Architecture in India Since 1990. Ahmedabad: Pictor Publishing.
- Neufert, E. and Neufert, P. (2012) Architects' Data. 4th edn. Oxford: Wiley-Blackwell.
- Pile, J. (2005) A History of Interior Design. 3rd edn. Hoboken: John Wiley & Sons.
- Rapoport, A. (1969) House Form and Culture. Englewood Cliffs: Prentice-Hall.
- Rybczynski, W. (1986) Home: A Short History of an Idea. New York: Viking Penguin.
- Zeisel, J. (2006) Inquiry by Design: Environment/Behavior/Neuroscience in Architecture, Interiors, Landscape, and Planning. Revised edn. New York: W. W. Norton.
Author's Note: This guide describes the workflow followed in professional practice. It is not prescriptive — different offices use variations on these stages, and complex projects may require additional stages (client pitch, design review, value engineering). The sequence and the discipline of staging work are what distinguish plans that succeed from plans that drift. Every stage is a checkpoint, and every checkpoint is an opportunity to catch an error early.
Disclaimer: This article is for informational and educational purposes only. It does not constitute professional architectural advice. Residential layout design must be undertaken by qualified architects in accordance with the Indian Standards, National Building Code, and local bye-laws cited. Studio Matrx, its authors, and its contributors accept no liability for decisions made on the basis of the information contained in this guide.
Export this guide
Related Guides — Deep-dive reading
Designing Adaptable & Universal-Design Homes
Accessibility, Aging-in-Place, and the Multi-Stage Family — Code, Anthropometrics, and Plan-Stage Discipline for Indian Residential Architects
Room PlanningHow to Plan a Home for Multi-Generational Living
Designing for grandparents, parents and children under one roof — privacy, accessibility and harmony
Home PlanningSpace Zoning in Indian Homes — Public vs Private Areas
Privacy Gradients, Sightlines, and the Cultural Logic of Indian Domestic Space
Room PlanningRelated Tools — Try Free
Brise-Soleil Visualizer
Interactive horizontal-louvre cut-off angle calculator — sun altitude, louvre depth, and spacing inputs with a live shadow preview. Computes θ = arctan(spacing/depth) for façade shading, ECBC envelope compliance, hospital daylight design, and tropical sun-control detailing.
Sun Shading ToolCross-Ventilation Analyzer
Estimate airflow and air changes per hour (ACH) from room size, window areas, layout, and local wind — with NBC 2016 Part 8 compliance check.
Ventilation CalculatorAcoustic Privacy (STC) Visualizer
Indian healthcare acoustic visualizer — compare wall assemblies and noise sources, see received SPL after STC attenuation, and check FGI 2018 / IS 1950 / NABH speech-privacy compliance with live dual-canvas waveform.
Acoustic Tool