
Floor Expansion Joints in India: Why Tiled and Stone Floors Tent, Arch and Pop
A specifier-grade guide to movement and expansion joints in Indian tiled and stone floors — why large vitrified floors buckle without them, where joints go, how wide, which fillers to use, and how to retrofit.
A 1,500 sq ft drawing room tiled wall-to-wall with 800x1600 mm vitrified slabs looks flawless on handover day. Eight weeks later, after the first proper summer, two rows of tiles in the middle of the floor lift clean off the bed with a loud crack and stand up like a tent. Nothing was wrong with the tiles, the adhesive or the mason's hand. The floor had nowhere to grow, so it grew upwards. This guide explains the one detail almost every Indian tiling job skips: the expansion joint.
Why floors move at all
Every floor finish is a slab of relatively rigid material bonded or laid over a concrete base. Both layers change size with temperature and moisture, and they do not move in step. When the finish wants to expand but is locked in on all sides by walls and by the friction of the bed beneath it, the only place left to go is out of plane. That is when you get tenting (tiles rising into a peak), arching, or popping (a tile shooting loose with a bang).
Three drivers cause this movement in Indian conditions:
- Thermal movement. Surface temperatures swing hugely across a Delhi or Ahmedabad year, and a sun-struck terrace or a south-facing room can move 30-40 degrees C between a winter morning and a summer afternoon. Ceramics, porcelain and stone all expand when heated. A long, uninterrupted run accumulates that expansion until something gives.
- Moisture movement. Fresh concrete and cement-sand screeds keep shrinking for months as they dry, and they swell again if they get wet. The finish above and the base below move differently, building shear stress at the bond line.
- Structural and substrate movement. Buildings settle, slabs deflect under load, and large RCC pours have their own construction and expansion joints that keep working for the life of the building.
Large-format vitrified tiles are the worst offenders in India today. The bigger the single piece and the longer the unbroken field, the more total movement accumulates with nothing to absorb it. A field of 300x300 ceramic with generous cement-grout joints is fairly forgiving; a sea of 1200x1200 PGVT with 2 mm rectified joints over a stiff adhesive bed has almost no built-in give. Skip the movement joints on that floor and tenting is not a risk, it is a schedule.
What an expansion joint actually is
A movement joint is a deliberate, full-depth gap that runs right through the finish and the bedding down to the substrate, then is filled with something that can compress and stretch instead of cracking. It is not a grout line. Grout, even good grout, is rigid and bonds both tiles together; it transmits stress rather than absorbing it. A true movement joint breaks the continuity of the rigid field so each panel can breathe independently.
Indian practice and IS 15622 (the standard for pressed ceramic and vitrified tiles) both recognise three families of joint that every floor needs:
- Perimeter joints at every point the floor meets a fixed vertical: walls, columns, kerbs, kitchen platforms, staircase strings.
- Intermediate (field) joints that subdivide a large continuous floor into smaller panels.
- Structural joints that must be carried up through the finish wherever a building expansion or construction joint passes below.
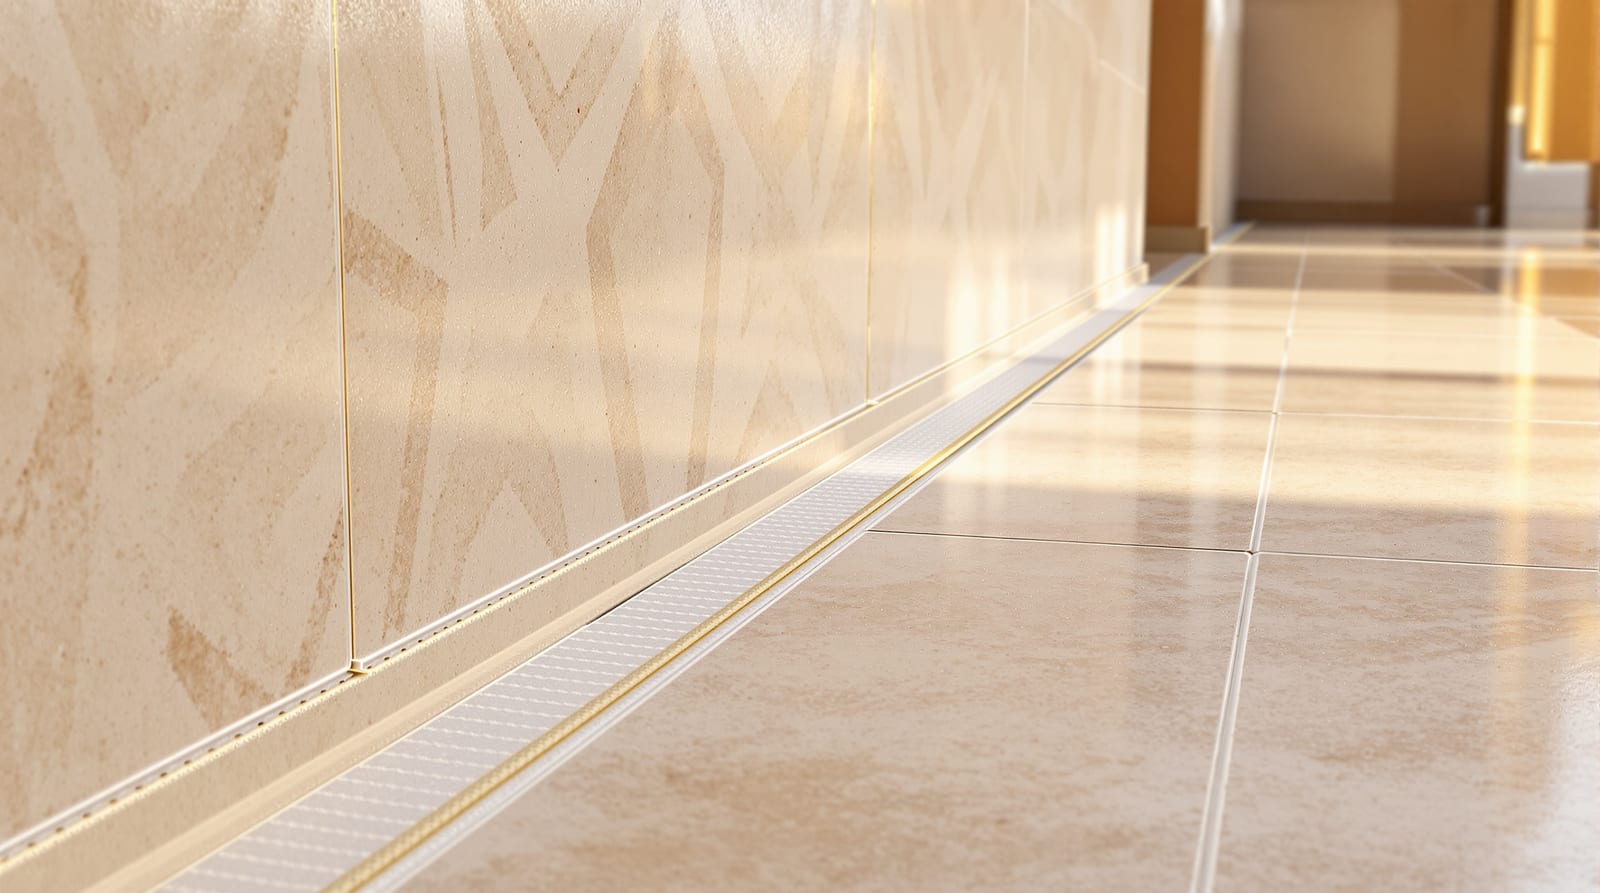
Inline detail: perimeter and field joints
The key idea the section shows: the joint goes all the way through, the perimeter joint is simply hidden behind the skirting, and the filler is something soft, never grout.
Where joints go, and how far apart
The spacing rules below follow tile-council practice and the spirit of IS 15622. Treat them as upper limits to tighten, not targets to relax: smaller tiles, cooler interiors and forgiving cement-grout joints let you space joints generously; large-format vitrified, sun exposure, underfloor heating and rigid epoxy grout all pull the numbers in.
| Joint type | Where it goes | Typical spacing | Gap width |
|---|---|---|---|
| Perimeter | Every wall, column, kerb, platform, staircase | Continuous, around the whole floor | 8-10 mm |
| Intermediate (interior) | Subdividing large floors | Every 8-10 m run, or every 20-25 sq m panel | 6-10 mm |
| Intermediate (exterior / terrace / sun-exposed) | Subdividing outdoor or heated floors | Every 3-4 m, or every 9-12 sq m panel | 8-12 mm |
| Doorway / threshold | At every door opening and change of room | At the threshold line | 6-8 mm |
| Structural / building | Directly over every structural or construction joint below | Wherever the base joint runs | Match the base joint width |
| Over change of substrate | Where slab meets screed, or two pours meet | At the interface | 6-8 mm |
A few practical refinements for Indian floors:
- Always interrupt at doorways. A door opening is a natural break and a stress concentration. Carrying one continuous tile field from a bedroom through the door into a passage is a classic tenting trigger.
- Respect the structural joint, always. If the building has an expansion joint in the slab, the finish joint must sit exactly over it and be at least as wide. Tiling across a live structural joint guarantees a crack.
- Halve the spacing in the sun. Balconies, terraces, sit-outs and large south or west glazed rooms see far bigger thermal swings, so they need joints far more often than an air-conditioned interior.
- Light-coloured floors are kinder. Dark tiles absorb more heat and move more; if a large dark floor is unavoidable in a hot-dry city, tighten the joint spacing.
For the actual panel layout and joint count on your specific room, the Studio Matrx expansion joint calculator will work out spacing and the number of joints from your floor dimensions and tile size.
What to fill the joint with
The filler has to do two opposite jobs: stay flush and trafficable on top, while compressing and stretching underneath. Three approaches dominate Indian sites.
| Filler | How it works | Best for | Notes |
|---|---|---|---|
| Flexible sealant (polyurethane or silicone) | Soft cured bead bonds to both tile edges, flexes with movement | Most interior and perimeter joints | Colour-matched PU sealant is the workhorse; back the joint with a closed-cell backer rod so the sealant is the right depth and does not bond at the base. |
| Aluminium or brass movement-joint profile | A metal frame with a compressible rubber/EPDM insert set into the tile line | Heavy-traffic, commercial, wide field joints, terraces | Most durable and cleanest looking; the insert absorbs movement while the metal takes the wear. |
| Compressible backing + sealant cap | Backer rod or foam fills the depth, sealant tops it | Standard detail for perimeter joints under skirting | Cheapest reliable method; the skirting hides it entirely. |
What must never go in a movement joint: cement grout, epoxy grout, tile adhesive, or mortar. All of them are rigid, bond the two panels back together, and defeat the joint completely. If a joint is grouted by mistake, it is not a joint, it is a future crack line.
A note on sealant geometry: a sealant bead works best at roughly a 2:1 width-to-depth ratio (for a 10 mm joint, about 5-6 mm of sealant over a backer rod). Too deep a bead is stiff and tears; the backer rod sets the depth and stops three-sided adhesion.
Retrofitting joints into a floor that has none
Most tenting calls come from finished floors that never had joints. You cannot un-lay the tiles, but you can cut joints in.
1. Find the lines. Put intermediate joints on the natural grid: along grout lines roughly every 8-10 m, at doorways, and over any known structural joint. If the floor is already tenting, the failure line tells you where the stress is.
2. Cut the joint. Use an angle grinder with a dry diamond blade to cut down through the grout line, through the tile thickness and the adhesive bed, to the slab. Cut the full depth; a shallow cut does nothing. Run the cut continuously across the room and around the perimeter.
3. Clean and prep. Vacuum the slot, blow it out, and prime the tile edges if the sealant maker requires it.
4. Insert backer rod to set depth, then gun in flexible PU sealant and tool it flush. For a high-traffic line, drop in a surface-mounted or recessed metal movement profile instead.
5. Release the perimeter. If tiles run hard against the wall with no gap, rake out the edge joint, cut a relief gap, and seal it; the skirting will hide it.
Retrofit relief almost always stops active tenting because it finally gives the field somewhere to expand. It is far cheaper than re-laying: expect roughly the cost of cutting plus sealant, against a full re-tiling job.
How this fits the rest of the floor build-up
Expansion joints are one layer of a correctly built floor, not a standalone trick. They work alongside the right bed and the right laying discipline. If you are still at the laying stage, get the joints designed in before the first tile goes down — see how to lay floor tiles in India for the full sequence, and review common flooring installation mistakes in India, where skipped movement joints sit near the top of the list. Because large-format vitrified is the highest-risk product, the material-specific cautions in the vitrified tile flooring guide are worth reading before you commit to oversized slabs on a long run.
Frequently asked questions
Will I really see the expansion joints in my finished floor?
Perimeter joints disappear entirely behind the skirting, so they are invisible. Intermediate field joints are visible as a slightly wider line, but a colour-matched PU sealant or a slim brass profile reads as a deliberate design line rather than a fault. On large floors many designers place the joints on a planned grid so they look intentional.
Can I just leave a wider grout line instead of a real joint?
No. Grout, however wide, is rigid and bonds both tiles, so it transmits stress instead of absorbing it. A wider grout line gives you a wider crack, not a movement joint. The joint must be a full-depth break filled with something compressible.
My existing floor is already tenting — do I have to re-lay it?
Usually not. Cutting in retrofit movement joints (and a perimeter relief gap) gives the trapped field room to expand and typically halts active tenting. Only tiles that have already debonded or cracked need replacing — keep your spare dye-lot box for that. See cracked tile replacement guidance for matching the batch.
How often do interior floors really need joints in India?
For an air-conditioned interior with medium tiles, every 8-10 m run or 20-25 sq m panel plus continuous perimeter and doorway joints is the working rule. For sun-exposed rooms, terraces and balconies, halve those distances. Large dark vitrified slabs and underfloor heating both push the spacing tighter still.
Who decides the joint layout — the architect or the mason?
On any large or premium floor it should be specified by the designer or specifier and marked on the tile-setting-out drawing, not left to the mason on site. Movement-joint design is the single most overlooked line item in Indian flooring specs, which is exactly why tenting is so common.
Export this guide
Related Guides — Deep-dive reading
Porcelain, Ceramic & Sintered-Stone Facade Cladding in India: A Practical Guide
Thin large-format porcelain and sintered-stone slabs can clad a building with the look of marble, concrete or weathered steel at a fraction of stone's weight — but on a facade, the fixing system is a life-safety decision, not a finish choice.
Building FacadesCracked Tile Replacement in India: Swap One Tile Without Redoing the Floor
How to remove and replace a single cracked or hollow tile cleanly — and when a crack is warning you of a bigger problem.
Flooring & SurfacesHow to Measure a Door India: Opening, Leaf, Frame and Hand the Right Way
A homeowner's measuring guide for India — measure the structural opening, work out leaf versus frame size, find the door hand and swing, allow for floor finish, and order without the classic too-tight or wrong-hand mistakes.
Home Doors & EntrancesRelated Tools — Try Free
Home Building & Interior Cost Calculator — 20 Cities
Construction + interior costs for 20 Indian cities across kitchen, wardrobes, flooring, painting, ceiling.
Cost CalculatorGrout Quantity Calculator
Estimate grout in kg and cost by tile size, joint width and thickness — cement or epoxy grout.
Flooring CalculatorExpansion Joint Calculator
Plan floor expansion and movement joints — field-joint spacing, linear metres and perimeter gap by room size and exposure.
Flooring Tool