
Tile Leveling System and Spacers in India: Dead-Flat Floors, Even Joints, No Lippage
How tile spacers set even 2-3 mm joints and a tile leveling system (clips plus wedges or caps) kills lippage on large-format and vitrified floors.
Run your palm across a freshly tiled floor and you can feel a bad job before you can see it: one tile sits a hair proud of the next, a sharp edge catches your skin, light skims across the surface and throws ugly shadows. That tiny step is called lippage, and on big modern tiles it is the single most common complaint Indian homeowners raise after handover. Two cheap tools fix it — tile spacers for even joints, and a tile leveling system for a dead-flat surface — yet most contractors still skip them. This guide shows what they are, which sizes to use, and how to get a floor that is flat, even, and lippage-free.
What lippage is, and why it has got worse
Lippage is the height difference between the edges of two neighbouring tiles. A small step you can barely see — under about 0.5 mm — is normal and acceptable. Anything you can feel with a fingernail or that catches light is a defect. It is caused by tiles that are not perfectly flat (every tile has a slight warp, called bow), by uneven adhesive thickness under the tiles, and by tiles shifting as the adhesive starts to grab.
The problem has grown because tiles have grown. A decade ago most floors used 600x600 mm ceramic or vitrified tiles. Today Indian homes routinely lay 800x800 mm, 600x1200 mm, and 800x1600 mm large-format PGVT from Morbi and imported lines. The bigger the tile, the more its natural bow shows up as lippage, and the harder it is to nudge flat by hand. Large-format tile is exactly where a tile leveling system stops being optional.
Tile spacers: setting an even joint
Spacers do one job — they hold a consistent gap between tiles so the grout lines run straight and equal. They do not control height. The classic cross-shaped spacer drops into the corner where four tiles meet; T-shaped and wedge spacers suit brick-bond and offset patterns.
Joint width is not a free choice. It depends on the tile edge:
- Rectified tiles (most large-format PGVT and double-charged vitrified) have edges that are mechanically ground dead-straight and square after firing. They can take a tight 2 mm joint and look near-seamless. Going below 2 mm is risky — it leaves no room for normal size variation and for thermal movement.
- Non-rectified ceramic and pressed tiles have a slightly rounded, less precise edge. They need a wider 3 mm (often up to 5 mm) joint so the slight size differences between tiles, called calibration, average out and the grout line stays straight.
A joint is not wasted space. It absorbs tiny dimensional differences between tiles, gives thermal movement somewhere to go, and is far easier to keep clean than a hairline gap. Tile-industry practice and IS 15622 both expect a real grout joint, not a butt-jointed floor.
| Tile type / size | Edge | Recommended spacer / joint | Notes |
|---|---|---|---|
| Rectified PGVT / double-charged, 600x600 to 800x1600 | Ground, square | 2 mm | Tightest sensible joint; pair with a leveling system |
| Glazed vitrified (GVT), non-rectified | Pressed | 2-3 mm | 3 mm safer if calibration varies |
| Ceramic floor tile | Pressed, rounded | 3-4 mm | Wider joint hides edge variation |
| Ceramic / GVT wall tile | Pressed | 1.5-3 mm | Per pattern and look |
| Outdoor / terrace vitrified | Any | 3-5 mm | Wider for greater thermal swing |
| Wood-look plank tile (offset/brick bond) | Often rectified | 3 mm + use T-spacers | Stagger joints max 30 percent of length to limit lippage |
A practical reason to widen the joint on wood-look planks and brick-bond layouts: when you offset long tiles, the highest point of one tile's bow lands near the middle of its neighbour, so lippage spikes. Limit the offset to about a third of the tile length and you keep that step small.
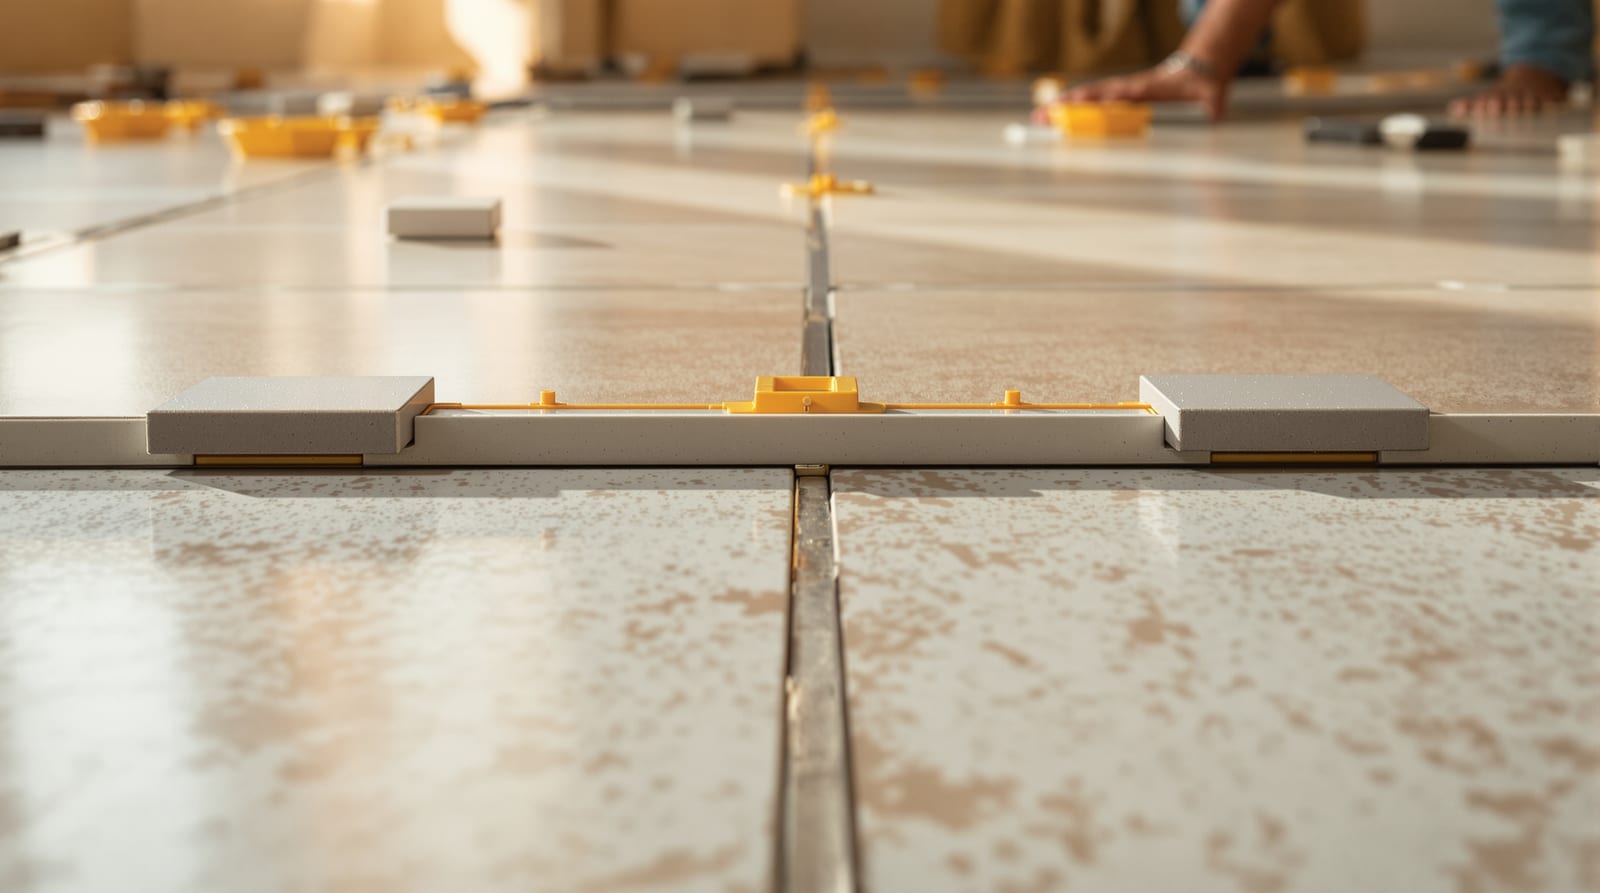
The tile leveling system: clips plus wedges or caps
A tile leveling system controls the thing spacers cannot — height. It clamps the edges of two adjacent tiles flush while the adhesive cures, forcing their surfaces into the same plane and squeezing out the bow.
There are two common families. In the clip-and-wedge type, a flat clip is slid under the edge of each tile so its thin stem stands up in the joint; a reusable wedge is then pushed into the clip and tightened with hand pressure or special pliers, pulling the two tile edges level. In the clip-and-cap (threaded) type, a screw-stemmed base goes under the tiles and a reusable cap is twisted down to apply the same clamping force. Both do the same job; clip-and-wedge is the most widely sold and cheapest in India.
Here is how a clip and wedge sit across two tiles in section:
The clip's thin base also doubles as your spacer, so on most systems you do not need separate cross spacers in the same joint — the clip sets both gap and height. Clips come in joint sizes (commonly 1, 1.5, 2 and 3 mm), so buy the size that matches your chosen joint width.
Why large-format and vitrified floors especially need it
Three things stack up on big vitrified tiles. First, they are heavy and rigid, so you cannot tap them flat the way you can a small ceramic. Second, their bow, though within IS tolerance, translates into a visible step over an 800 mm or 1200 mm edge. Third, PGVT and double-charged tiles must be laid on thin-set adhesive with near-full coverage (back-butter them, aim for 80 percent plus contact) to avoid hollow, drummy spots — and that thin bed gives you no room to bury height differences in mortar. A leveling system is what holds the two surfaces co-planar while a fast-grabbing C2 flexible adhesive sets. Skip it on large-format and lippage is almost guaranteed.
Step by step with clips and wedges
1. Prep and plan. Lay over a flat, fully cured screed (see floor screed and mortar bed). Snap your centre lines and do a dry layout first. Decide the joint width from the table above.
2. Spread adhesive. Comb out C2 flexible adhesive with the correct notched trowel and back-butter large tiles for full coverage.
3. Set the first tile, then place clips. Slide clip bases under the adjoining edges — typically two to four clips per long edge of a large tile, spaced 200-300 mm apart, more for bigger tiles.
4. Lay the neighbouring tile onto the same clips so the stems sit in the joint.
5. Insert and tighten wedges into each clip until the wedge is firm and the tile edges are pulled flush. Check the surface with a straightedge or your hand.
6. Clean the joints of squeezed-out adhesive before it sets.
7. Let it cure undisturbed — do not walk on it. The clamping only works if nothing moves the tiles.
Removing clips after the adhesive has cured
This is the step contractors rush — do not. Leave the leveling system in place until the adhesive has properly cured, which usually means waiting at least 24 hours (longer in cold or humid weather, or per the adhesive bag instructions). Removing clips too early lets the bow spring back and the lippage returns.
To remove, knock the clip stem sideways with a rubber mallet or your foot, parallel to the grout line — the clip is designed to snap off cleanly at its weak point right at the tile base, below the surface. Never pull straight up; that can lift the tile. Recover and reuse the wedges or caps. Then sweep the joints clean of clip debris before grouting, which you do after the adhesive has set, typically 24 hours on, leaving foot traffic off for 24-48 hours and heavy loads off for about a week.
Planning the grout gap
The joint you set with spacers or clips is the gap you will grout, so plan it as part of the look and the budget. A 2 mm rectified joint looks crisp and modern but is unforgiving — it demands a very flat base and a leveling system. A 3 mm joint is more practical and hides minor tile variation. In kitchens and bathrooms, choose epoxy grout for those joints; it is stain-proof and waterproof, unlike cement grout that yellows. To size your grout order, the joint width, tile size and floor area drive the quantity — our grout quantity calculator works it out for you. For the finishing and sealing of those joints, see the tile grouting guide.
| Joint width | Look | Forgiveness | Best for |
|---|---|---|---|
| 2 mm | Near-seamless, contemporary | Low — needs flat base + leveling | Rectified PGVT, living rooms |
| 3 mm | Clean, balanced | Medium | Most ceramic and GVT floors |
| 4-5 mm | Defined grout lines | High | Ceramic, outdoor, rustic looks |
What it costs in India
Tile leveling clips are inexpensive — roughly ₹1.5-4 per clip, with reusable wedges around ₹3-8 each, sold in bags of 100-250; the wedges and pliers are bought once and reused across jobs. For an 800x800 tile you might use four to six clips, so the consumable cost works out to a few rupees per square foot — trivial against the cost of re-laying a lippage-ridden floor. Brands to look for include MYK Laticrete, Roff (Pidilite) and several Morbi-based tiling-tool suppliers; prices are indicative and vary by city and vendor.
How this fits the rest of the job
Leveling and spacers are one stage in a bigger sequence. Get the base right first, lay correctly, then grout. For the full laying walkthrough see how to lay floor tiles, for the joint finishing see the tile grouting guide, and to avoid the classic errors — skipped expansion joints, hollow tiles, laying on damp concrete — read flooring installation mistakes.
Frequently asked questions
Do I still need spacers if I use a tile leveling system?
Usually not separately, because the leveling clip's base sets the joint width as well as the height. Buy clips in the joint size you want (1, 2 or 3 mm). You may still use a few cross spacers at corners on small tiles, but on large-format the clips do both jobs.
What spacer size should I use for rectified tiles?
A 2 mm joint is the standard for rectified PGVT and double-charged vitrified tiles, because their ground, square edges allow it. Non-rectified ceramic needs 3 mm or more so slight size differences average out. Avoid going below 2 mm — tiles need a real joint for movement and cleaning.
When can I remove the leveling clips?
Only after the adhesive has cured, generally at least 24 hours, and longer in cold or humid conditions. Removing them early lets the tiles spring back and the lippage returns. Knock the stem sideways along the joint line with a mallet so it snaps off below the surface; never pull it up.
Why do large vitrified tiles get lippage so easily?
Big tiles have a slight built-in bow that becomes a visible step over an 800 mm or 1200 mm edge, they are too rigid to tap flat by hand, and they sit on a thin adhesive bed that cannot absorb height differences. A leveling system holds adjacent edges flush while the adhesive sets, which is why large-format floors really need one.
Can a leveling system fix an uneven base?
No. It only makes adjacent tiles flush with each other; it cannot correct a base that slopes or dips. If the screed is out, the whole floor will follow it. Level the base first with screed or self-leveling compound, then use the leveling system for a perfect tile-to-tile finish.
Export this guide
Related Guides — Deep-dive reading
How to Lay Floor Tiles in India: Complete Step-by-Step Guide
A practical, mason-grade walkthrough for tiling an Indian home floor — base check, dry layout, adhesive vs mortar bed, leveling, lippage and grouting.
Flooring & SurfacesTile Grouting Guide India: Cement vs Epoxy Grout, Joint Width, Mixing, Curing and Sealing
How to grout tile floors properly in Indian homes: choosing cement versus stain-proof epoxy grout, getting timing and joint width right, floating it in, clearing haze, curing and sealing.
Flooring & SurfacesFlooring Installation Mistakes in India: The Costly Errors That Make Floors Tent, Drum and Lift
The ten most expensive flooring-installation mistakes Indian homeowners pay for twice — skipped expansion joints, hollow tiles, lippage, laying on green concrete and more — with the fix for each.
Flooring & SurfacesRelated Tools — Try Free
Grout Quantity Calculator
Estimate grout in kg and cost by tile size, joint width and thickness — cement or epoxy grout.
Flooring CalculatorFlooring Cost Calculator
Estimate the all-in cost of a floor — material, laying, wastage, skirting and GST — by area and material.
Flooring CalculatorTile Adhesive Calculator
Estimate tile adhesive bags and cost by area and bed thickness, for floor or wall tiling jobs.
Flooring Calculator