
Tile Laying Methods in India: Mortar Bed vs Tile Adhesive Compared
The two ways tiles are laid in India — traditional thick cement-sand mortar bed versus modern thin-set tile adhesive — compared head to head on thickness, base, cost, speed, hollowness risk and suitability.
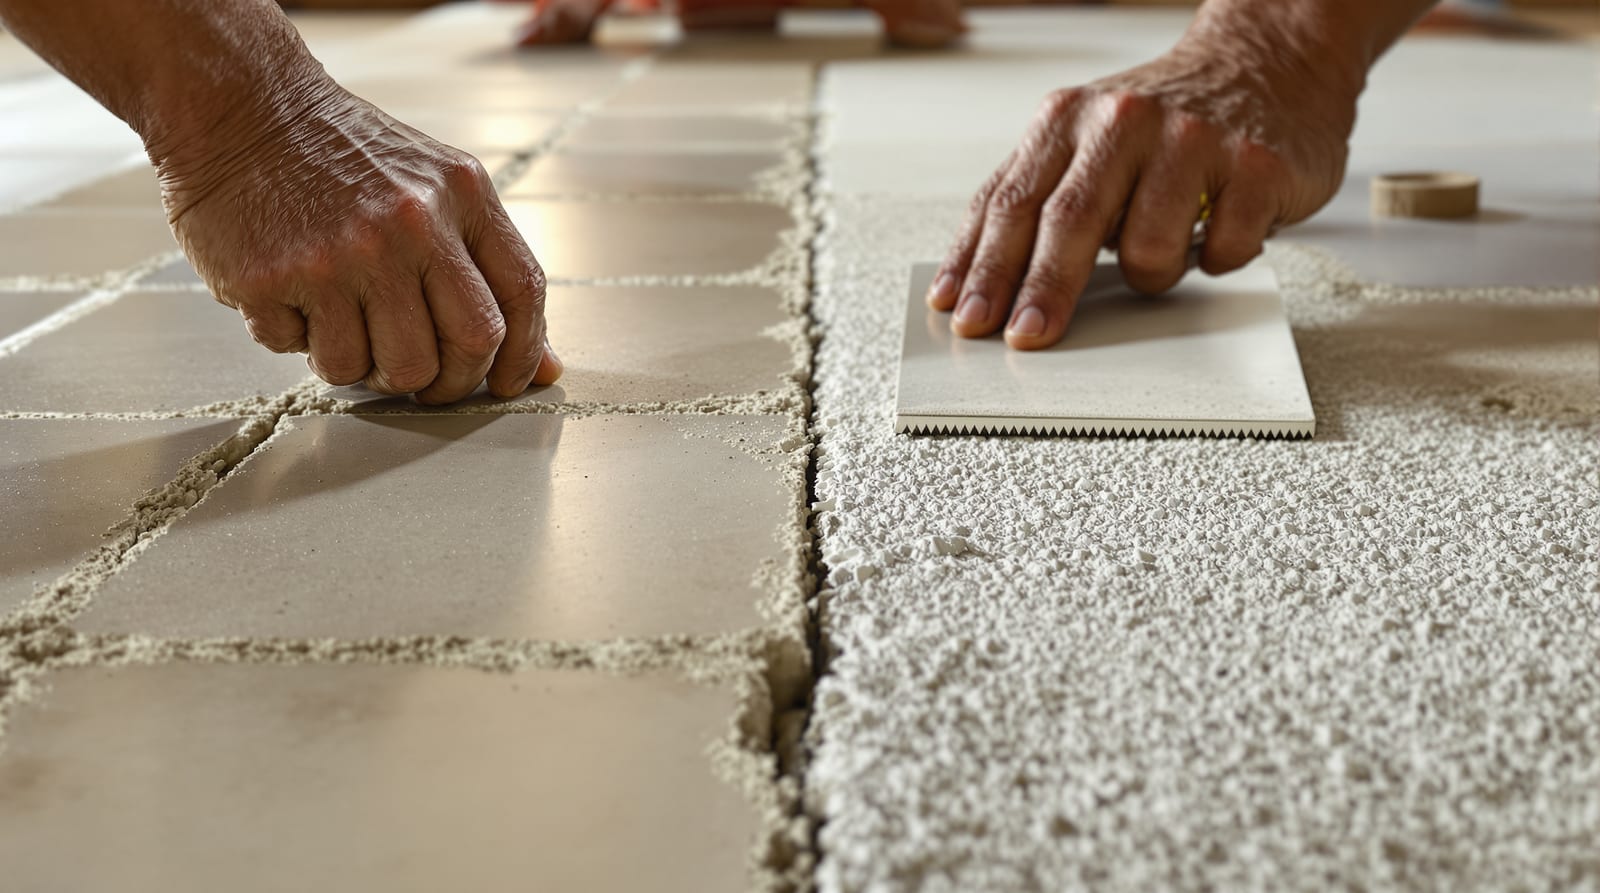
Walk onto any Indian construction site and you will see one of two arguments playing out under the tiler's knees. One mason swears by the way it has always been done — a generous bed of wet cement and sand, the tile tapped into it with a wooden mallet. The next site uses a toothed trowel and a bag of grey powder mixed with water, sticking tiles down in a layer barely thicker than a coin. These are the two tile laying methods that dominate Indian flooring, and choosing the wrong one for your tile is the single biggest cause of hollow, cracked and "tented" floors. This guide puts them head to head.
The two methods, in one breath
The traditional thick-bed (cement-sand mortar bed) method lays each tile on a fresh 25-50 mm bed of cement and sand mixed roughly 1:4 to 1:6. The bed is thick enough to absorb dips and humps in the rough slab, so the mason levels the floor and lays the tile in the same pass. It is forgiving, cheap on materials, and the method most Indian masons learned first.
The modern thin-set (tile adhesive) method is completely different in principle. The slab is first made dead-flat and level using a cement-sand screed or a self-leveling compound. Only then is the tile stuck down using just 3-5 mm of polymer-modified tile adhesive, spread with a notched trowel. The adhesive does not level anything — it only bonds. The flatness has to already be there.
Knowing which job each layer is doing is the whole point. In the thick-bed method the mortar both levels and bonds. In the thin-set method those two jobs are split: the screed levels, the adhesive bonds. That single difference drives every other trade-off below.
Head to head: mortar bed vs tile adhesive
| Factor | Thick cement-sand mortar bed | Thin-set tile adhesive |
|---|---|---|
| Layer thickness | 25-50 mm wet bed | 3-5 mm over a flat base |
| Base needed | Rough slab; bed itself corrects level | Pre-leveled screed or sound old floor (flat) |
| Levels the floor? | Yes — does it in the same pass | No — base must already be flat |
| Material cost | Low (cement + sand) | Higher (₹350-700 per 20 kg bag adhesive) |
| Labour cost | ₹25-60 per sq ft | ₹15-35 per sq ft + adhesive + any screed |
| Speed | Slower; one tile at a time, bed mixed wet | Faster on a flat base; large areas quickly |
| Hollowness / drummy risk | Higher if bed not fully packed | Low if 80%+ coverage and back-buttered |
| Bond strength to tile | Mechanical/suction; weaker on low-porosity tile | Chemical polymer bond; strong on dense tile |
| Large-format & PGVT | Risky — prone to hollows and lippage | Mandatory; the only safe method |
| Forgiving on uneven base | Very | Not at all |
| Over old tiles / smooth surfaces | Poor adhesion | Good with C2 flexible adhesive |
| Tile wastage / dye-lot control | Higher handling | Cleaner, controlled |
Note the cost line carefully. The mortar bed looks cheaper because the material is just cement and sand. But once you add the cost of a separate leveling screed under the thin-set method, the two are often closer than people assume — and for large tiles the adhesive route is not optional, so cost stops being the deciding question.
Why thickness matters: the section, side by side
The clearest way to understand the two systems is to look at what sits under one tile in each case. The diagram below shows both build-ups at the same scale.
The hollowness problem — why large tiles changed everything
Tap an Indian floor with a coin. A solid ring means the tile is fully bedded; a hollow "drummy" knock means there is an air void underneath. Voids let tiles crack under point loads, pop loose, or sound terrible. This is where the two methods diverge sharply.
With a thick mortar bed, voids form when the mason does not fully pack mortar into every corner, especially under the centre of a big tile. With small ceramic tiles this rarely matters. But India switched to large-format vitrified tiles — 600x600 mm, 800x800 mm, 600x1200 mm and bigger — and the larger the tile, the bigger the void a careless bed leaves. Worse, dense PGVT and double-charged vitrified tiles have almost no porosity (water absorption under 0.5% per IS 15622), so a plain cement-sand bed has nothing to grip. The result is hollow, lifting tiles.
Thin-set adhesive solves both problems, but only if used correctly. The rule is at least 80% adhesive coverage on the back of the tile. For large format you must back-butter — spread adhesive on the slab with a notched trowel AND skim a thin coat on the tile back — and use a tile leveling clip-and-wedge system to kill lippage. Done this way, a large vitrified or PGVT tile bonds completely with no voids. This is why adhesive is no longer a luxury for big tiles; it is mandatory.
Adhesive grades: C1 vs C2
Tile adhesive is not one product. Indian brands such as Roff, MYK Laticrete, Pidilite and Fevicol sell it in grades that broadly follow the international C1/C2 system:
| Grade | What it means | Use it for |
|---|---|---|
| C1 | Standard cementitious adhesive | Normal ceramic and small vitrified tiles on a flat cement screed, interior dry areas |
| C2 | High-polymer, flexible, stronger bond | Large-format tiles, PGVT/double-charged, exterior and wet areas, tile-over-old-tile, façades, areas with movement |
The practical takeaway: if your tile is large, dense (PGVT), going outdoors, going over an existing floor, or going on a wall, specify a C2 adhesive. Do not let a contractor substitute a cheaper C1 to save a few rupees a bag — on a large dense tile that is exactly where bonds fail. Coverage runs about 30-40 sq ft per 20 kg bag at 3-4 mm thickness, so adhesive cost is real but modest against the cost of a floor that has to be ripped out.
When each method wins
Choose the thick cement-sand mortar bed when:
- The base slab is rough or significantly uneven and you want to level and lay in one pass without a separate screed.
- You are laying small to medium ceramic tiles, Kota stone, or traditional natural stone slabs of variable thickness that need bedding to a level.
- Budget is tight, the tiles are porous enough to grip, and the mason is genuinely skilled at packing a full bed.
- You are matching an existing traditional floor or working in older construction.
Choose thin-set tile adhesive when:
- You are laying large-format tiles (600x600 mm and up), PGVT, double-charged or any low-porosity vitrified tile — here it is mandatory, not optional.
- The base is already flat, or you are tiling over a sound old floor or smooth concrete (use C2).
- You want speed across large areas, minimal hollowness, and strong long-term bond.
- The floor is exterior, wet-area or subject to temperature movement (C2 flexible).
A common, sensible Indian compromise: level a rough slab with a cement-sand screed or self-leveling compound first, then lay tiles with thin-set adhesive on top. You get the forgiving leveling of the old way and the reliable bond of the new way. For deeper detail on building that flat base, see our companion guide on the floor screed and mortar bed and on subfloor preparation.
A note on expansion and curing — whichever method you pick
Neither method is complete without movement allowance. Big vitrified-tile floors will arch and "tent" if you skip expansion joints — leave an 8-10 mm gap at the perimeter (hidden under skirting) and provide movement joints at doorways and across large runs. And resist walking on a fresh floor: grout 24 hours after laying, keep foot traffic off for 24-48 hours, and avoid heavy loads for about a week. This applies equally to both methods.
Costs in context
To plan a real budget, combine labour with materials. Mortar-bed labour runs ₹25-60 per sq ft (it is slower and more skilled per tile); thin-set labour runs ₹15-35 per sq ft, plus the adhesive (₹350-700 per 20 kg bag covering 30-40 sq ft) and any separate screed. Add 18% GST and treat all figures as indicative, varying by city and vendor. To estimate exactly how many bags of adhesive your floor needs, use the tile adhesive calculator. For the full step-by-step laying process once you have chosen a method, follow our how to lay floor tiles guide, and for finishing the joints see the tile grouting guide.
Frequently asked questions
Is tile adhesive really better than cement for laying tiles?
For modern large-format and low-porosity vitrified or PGVT tiles, yes — thin-set adhesive gives a stronger, void-free bond and is effectively mandatory. For small porous ceramic tiles or stone of varying thickness on a rough slab, a well-packed cement-sand mortar bed is still perfectly sound and cheaper. The right answer depends on the tile and the base, not on which is newer.
Why do my tiles sound hollow?
A hollow or drummy knock means there is an air void under the tile — usually from a mortar bed that was not fully packed, or thin-set adhesive applied with under 80% coverage and no back-buttering on a large tile. Voids let tiles crack or pop loose later. The fix is to lift and re-lay the affected tiles with full coverage.
What is the difference between C1 and C2 tile adhesive?
C1 is a standard cementitious adhesive suitable for normal ceramic and small vitrified tiles in dry interior areas. C2 is a high-polymer, flexible adhesive with a stronger bond, used for large-format and dense PGVT tiles, exterior and wet areas, tiling over old floors, and walls. When in doubt with big or dense tiles, specify C2.
Can I lay large vitrified tiles on a traditional cement-sand bed?
It is risky and best avoided. Large, dense vitrified and PGVT tiles have almost no porosity, so a plain cement bed has little to grip, and the bigger the tile the bigger any void left underneath. These tiles should be laid with C2 thin-set adhesive, back-buttered, on a flat base, using leveling clips to prevent lippage.
Which method is faster?
Thin-set adhesive is generally faster across large flat areas, because the leveling is done once as a screed and tiles then go down quickly. The mortar-bed method is slower per tile since the mason mixes a wet bed and levels each tile as it is laid — but it can save a step on a rough slab by levelling and laying together.
Export this guide
Related Guides — Deep-dive reading
How to Lay Floor Tiles in India: Complete Step-by-Step Guide
A practical, mason-grade walkthrough for tiling an Indian home floor — base check, dry layout, adhesive vs mortar bed, leveling, lippage and grouting.
Flooring & SurfacesTile Grouting Guide India: Cement vs Epoxy Grout, Joint Width, Mixing, Curing and Sealing
How to grout tile floors properly in Indian homes: choosing cement versus stain-proof epoxy grout, getting timing and joint width right, floating it in, clearing haze, curing and sealing.
Flooring & SurfacesVitrified Tile Flooring in India: Types, Sizes, Cost & Buying Guide (2026)
India's most popular floor decoded — what vitrified really means, the four main types, sizes and finishes, ₹/sq ft costs, laying methods and how it stacks up against ceramic and stone.
Flooring & SurfacesRelated Tools — Try Free
Tile Adhesive Calculator
Estimate tile adhesive bags and cost by area and bed thickness, for floor or wall tiling jobs.
Flooring CalculatorHome Building & Interior Cost Calculator — 20 Cities
Construction + interior costs for 20 Indian cities across kitchen, wardrobes, flooring, painting, ceiling.
Cost CalculatorGrout Quantity Calculator
Estimate grout in kg and cost by tile size, joint width and thickness — cement or epoxy grout.
Flooring Calculator