
Rainwater Recharge Pit for Indian Homes: How It Works, Sizing, Filter Media, Distances and Maintenance
The soak-pit that puts rain back into the ground — how a rainwater recharge pit works, how to size it against your roof area and soil percolation, the boulder-gravel-sand filter media, the desilting chamber ahead of it, safe distances from foundation, borewell and septic, why it fails in clay, and how to keep it from choking.
Not all harvested rain needs a tank. On many Indian plots the smarter move is to let clean rooftop runoff soak back into the ground and top up the groundwater your borewell depends on. A rainwater recharge pit is the simplest structure that does this — a filtered soak-pit that catches roof rain, strains out the dirt, and lets it percolate down instead of running off into the drain.
This guide sits inside the Studio Matrx Plumbing Knowledge Hub. It is a recharge guide, not a storage one: here we are putting water back into the aquifer rather than holding it for use. For the full picture of collecting rain — both storing it and recharging it — start at the pillar rainwater harvesting guide.
A recharge pit is not a rubbish soak-away. It only works if the water reaching it is filtered and the ground beneath it can actually drink — sandy or gravelly soil. Get either wrong and you have built a mosquito pond.
How a recharge pit works
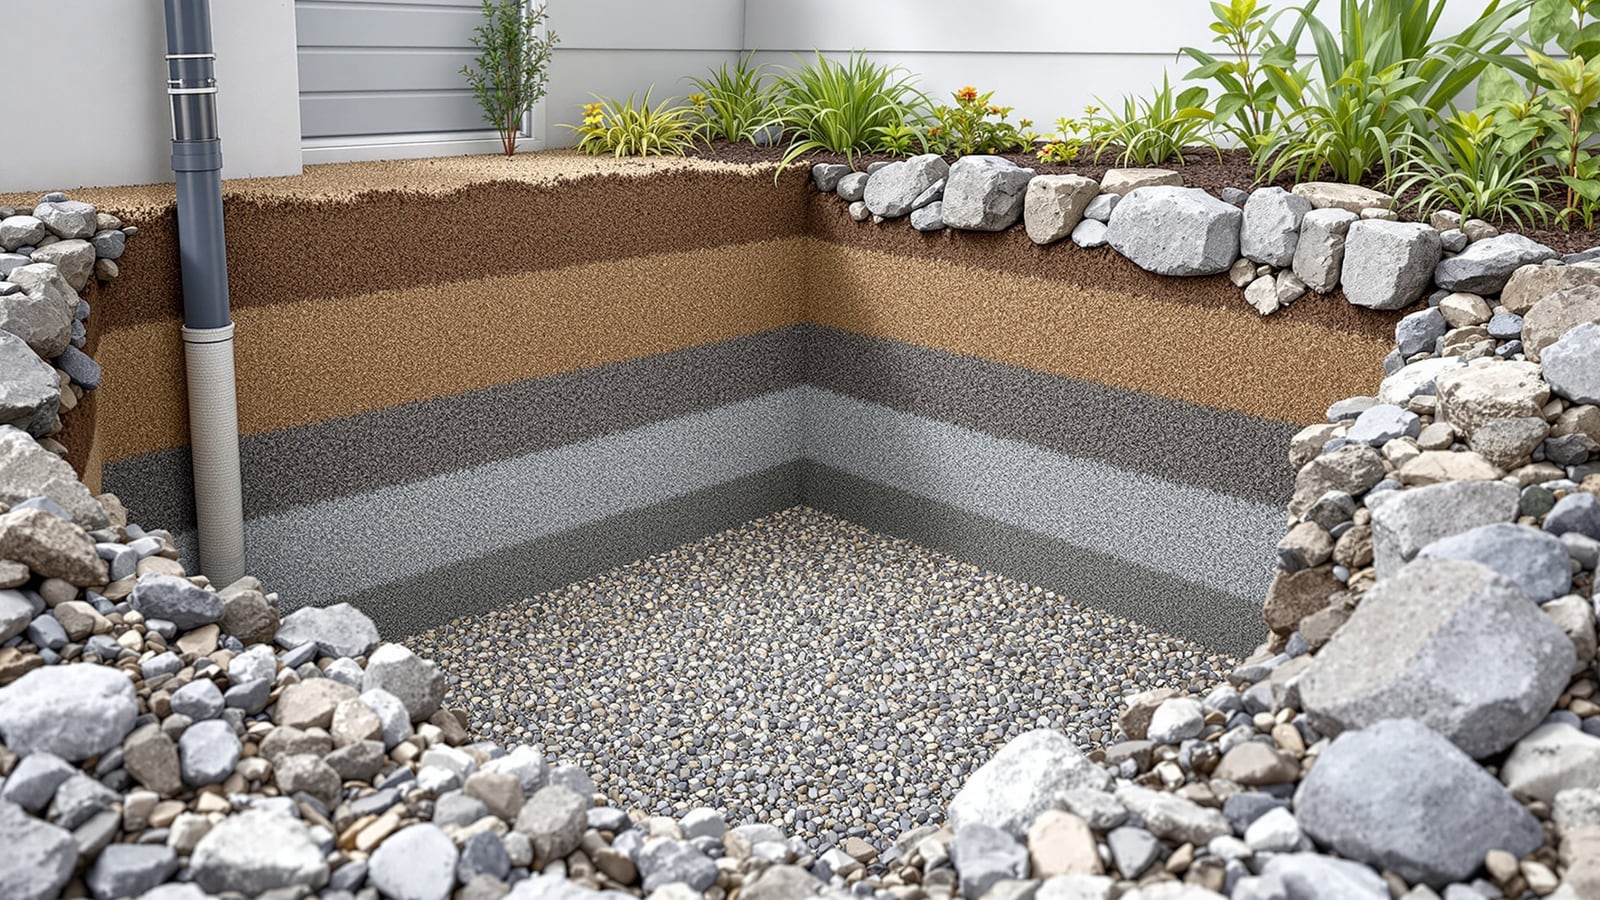
A recharge pit is a shallow excavation — typically 1 to 2 m across and 2 to 3 m deep — backfilled with graded stone that acts as a filter and a temporary reservoir. Rain falling on your roof is guided down the downpipes, passes through a desilting chamber that drops out leaves and grit, then enters the pit. Inside, the water trickles down through layers of boulders, gravel and coarse sand, and finally soaks out through the pit walls and floor into the surrounding soil, moving down towards the water table.
Four ideas explain the whole thing:
- The catchment is your roof — the area that collects rain. Bigger roof, more runoff, bigger pit.
- The desilting chamber is a small settling tank ahead of the pit. It catches the heavy silt and debris that would otherwise clog the filter media, and it is the part you clean.
- The filter media are the graded stone layers inside the pit. They strain the water and slow it so suspended dirt drops out before it reaches the soil.
- The percolation is the soaking-out itself. How fast the pit empties into the ground depends entirely on your soil — this is what decides whether a pit will work at all.
The key mental model: a recharge pit does not store water for you, it lends it back to the aquifer. A "good" pit is one whose soil drains fast enough that the pit empties between showers, ready for the next burst of rain.
Sizing the pit — roof area meets soil
Sizing is a balance between how much rain your roof throws at the pit and how fast your soil can drink it. The runoff you must handle in a storm is, roughly, roof area x rainfall intensity x runoff coefficient — a tiled or RCC roof runs off around 0.85, so most of what lands is delivered to the pit. The pit then needs enough void volume in its stone (about 30-40% of the pit is empty space between the stones) plus a soaking rate that clears it between showers.
The numbers below are indicative starting points for a single recharge pit on typical permeable soil — always confirm against a local percolation test and your municipal bye-law. For anything beyond rough sizing, use the rainwater tank sizer rather than a hand calculation.
| Roof catchment area | Suggested pit (indicative) | Notes |
|---|---|---|
| Up to 100 sq m | 1.0 m x 1.0 m x 2.0 m deep | One pit; single downpipe |
| 100-200 sq m | 1.5 m x 1.5 m x 2.5 m deep | Split across 2 downpipes if possible |
| 200-300 sq m | 1.5 m x 2.0 m x 3.0 m deep, or 2 pits | Multiple pits ease de-choking |
| Above 300 sq m | Multiple pits, or a recharge well | Well recharges deeper, faster |
The other half of sizing is your soil's percolation rate — how fast water actually soaks away. Dig a test hole, fill it, and time how far the level drops. Fast-draining sand may need only a small pit; slow silty ground needs a much larger footprint or a different structure entirely.
| Soil type | Indicative percolation | Recharge pit suitability |
|---|---|---|
| Sandy / gravelly | Fast (drops quickly) | Excellent — ideal for pits |
| Sandy loam | Moderate | Good — size generously |
| Silty loam | Slow | Marginal — enlarge or use a well |
| Clay / black-cotton | Very slow / nil | Unsuitable — see below |
The filter media — boulders, gravel, coarse sand
The stone inside the pit is what turns muddy runoff into water clean enough to enter the ground. It is packed in graded layers, coarsest at the bottom, so water speeds up as it descends and does not clog:
- Boulders (75-150 mm) at the base — the bottom 400-600 mm. These hold open the largest voids, store the incoming surge and let water spread across the pit floor.
- Gravel / aggregate (20-40 mm) in the middle layer — around 300-450 mm. This is the working filter that catches finer suspended matter.
- Coarse sand (river sand, well washed) as the top layer — 150-300 mm. This is the polishing layer; it takes the finest silt and is the layer you rake or replace when the pit slows.
Never use fine builder's sand or unwashed sand — it packs down and blinds the pit within one monsoon. The whole media stack must sit below the incoming water, and the top of the pit is usually capped with a removable perforated slab so you can get at the sand to clean it.
For the science of first-flush diversion and the different filter types you can fit ahead of a pit, see the dedicated rainwater filtration guide.
The desilting chamber comes first
Every recharge pit should have a desilting (settling) chamber between the downpipe and the pit. It is a small masonry or plastic tank — often with a first-flush arrangement — where the heavy silt, leaves and grit settle out and the initial dirty flush of a storm is diverted. Only the cleaner water above the silt passes on to the pit.
This is the single most important thing you can do to keep a pit alive. Silt that reaches the filter media clogs it permanently; silt that drops in the desilting chamber is scooped out in five minutes. Size the chamber so it is easy to reach, and clean it before and during every monsoon.
Distances — keep the pit away from these
A recharge pit deliberately soaks water into the ground, so where you put it matters as much as how you build it. Keep it clear of anything that water could damage or contaminate:
- From the building foundation: keep the pit at least 2-3 m away (more for deep or weak footings) so infiltrating water does not soften the soil under your house or reach the plinth.
- From a borewell: a gap of a few metres is fine and even helpful — the pit recharges the same aquifer — but do not build it right against the wellhead where surface muck could track in.
- From a septic tank or soak-pit: keep a clear separation, ideally several metres and downhill of the recharge pit, so sewage-contaminated ground never seeps toward the water you are recharging.
- From the compound wall / neighbour: leave room to open the cover and desilt, and so soaking water is not your neighbour's problem.
These are indicative minimums; site conditions and local bye-laws may demand more, especially on tight urban plots.
When a pit will not work — use a recharge well
A recharge pit relies on the water soaking sideways and down through the soil around it. In clay or black-cotton soil, that soil is nearly impermeable — the pit simply fills up and stays full, breeding mosquitoes and doing nothing for the groundwater. It also swells and shrinks with moisture, which can crack the structure.
On such ground, a shallow pit is the wrong tool. A recharge well — a bored or dug shaft that carries filtered water past the impermeable top layer down to a permeable stratum below — is the right answer. If your percolation test shows the ground barely drains, switch to the rainwater recharge well guide. For large open plots and layouts, a shared surface structure such as a percolation tank may suit better still.
Overflow and maintenance
Even a well-sized pit will occasionally be overwhelmed by a cloudburst. Fit an overflow near the top of the pit that leads the excess safely to a storm drain or a second pit — never let it pond against the foundation. Where you are discarding rather than capturing rain, that path is ordinary stormwater drainage.
Keeping a recharge pit working is mostly about stopping it choking:
- Before every monsoon: clean the desilting chamber, clear the roof and gutters, and check the mesh over the downpipe.
- Mid-monsoon: desilt the chamber again after the first heavy storms — that is when most silt arrives.
- When the pit slows: lift the top slab, rake or wash the coarse sand layer, and replace it if it stays clogged. Every few years, dig out and re-wash or renew the media stack.
- Watch for standing water: a pit that stays full for days is either choked or in the wrong soil — investigate before it becomes a breeding ground.
The mandatory-RWH reality
Rainwater harvesting — including recharge — is legally required for many buildings across India. States and cities such as Tamil Nadu (which pioneered mandatory RWH), Karnataka, Delhi and Maharashtra fold RWH into their building bye-laws, usually triggered above a certain plot or built-up area and checked at plan-sanction or occupancy. Some water boards rebate compliant systems and penalise non-compliance.
The exact trigger area, required recharge capacity and incentives vary by state and change over time, so do not rely on a number quoted online. Confirm the current requirement with your local municipal corporation or water board before you finalise the design. In much of urban India a proper recharge pit is not just good practice — it is the law.
References
- Central Ground Water Board (CGWB) — guidance on artificial recharge and rooftop rainwater harvesting.
- CPHEEO (Ministry of Housing and Urban Affairs) — manuals on water supply and stormwater management.
- Relevant Bureau of Indian Standards codes on rainwater harvesting and roof drainage (verify the current IS number locally).
- Your state / municipal building bye-laws and water board — for the mandatory-RWH trigger and rebates that apply to you.
Export this guide
Related Guides — Deep-dive reading
Percolation Tanks & Ponds in India: Recharging Groundwater at Plot, Farm and Watershed Scale
A professional guide to percolation tanks — impounding monsoon runoff in a shallow surface basin so it slowly infiltrates and recharges the aquifer. How they work, where they suit, siting, indicative sizing, silt management and how they relate to check dams.
PlumbingRainwater Harvesting Guide for India: Catchment, Storage, Recharge & Bye-laws
The section pillar for rainwater harvesting — why it matters for water security and groundwater, the full catchment-to-store-or-recharge chain, the two paths of using rain versus recharging aquifers, indicative yield and sizing, first-flush and filtration, maintenance, and the mandatory-RWH reality in Indian cities.
PlumbingRainwater Harvesting Rules in India: When RWH Is Mandatory & How to Comply
A plain-English guide to India's mandatory rainwater-harvesting rules for homeowners — why so many states and cities require RWH for buildings above a certain size, how it becomes a condition for plan sanction and completion certificate, and why the exact trigger, structure and rebate always come from your own local bye-laws.
PlumbingRelated Tools — Try Free
Rainwater Tank Sizer
How big should your rainwater tank be? Computes annual harvest, recommended tank capacity in litres, water-bill savings, and payback — for 10 Indian cities.
RWH CalculatorRainwater Harvesting Calculator
Estimate how much rainwater a roof can harvest in a year from its area, your annual rainfall and a collection coefficient.
Plumbing CalculatorRainwater Harvesting Calculator
How much rainwater your rooftop can harvest in a year, in litres and kilolitres, from the roof area, your city's rainfall and roof type — with a suggested storage-tank size.
Roofing