
Site prep, foundation & plinth
The cheapest fixes and the costliest mistakes both live below the floor you'll never see again.
You'll never see the foundation again. That's exactly why it gets cheated.
Once the floor is cast, the footings, the anti-termite layer and the damp-proof course vanish under tile and earth forever. A weak column shows in a crack you can patch. A skimped foundation shows in a settling house ten years on, with no patch that helps. This is the one stage where the only protection is watching it being built — because nobody can inspect it afterwards.
From bare ground to plinth: clear, dig, found, fill, cap
Clear, set out, excavate to firm soil — then put the load on the right footing
Work starts above the ground and goes down. The contractor clears and levels the plot, then sets out the building — marking column and wall lines from the structural drawing with string and lime. Get this checked against the sanctioned plan and your setbacks before a spade goes in; a building set out 300mm off its line is a nightmare to unwind.
Then comes excavation — digging to firm, load-bearing soil. How deep depends on your soil-bearing capacity (your soil test from Module 1), but for a typical 2-storey house on decent soil it's roughly 1.2-1.8m.
The footing type follows the soil and loads:
- Isolated footings — separate pads under each column. The common, economical choice on good soil. - Combined / strip footings — when columns are close or loads are high. - Raft (mat) foundation — one thick slab under the whole house, used on weak or black-cotton soil. Costs more, but spreads load so the house settles evenly. - Pile foundation — deep columns to hard strata; needed on very poor soil or high water tables.
The structural engineer specifies which. Don't let a contractor downgrade a raft to isolated footings to save money — that's a decision only the engineer makes, in writing.
Everything above ground rests on a decision made below it. Get the engineer, not the mason, to make it.
Anti-termite, plinth beam and DPC — the three layers that keep damp and termites out
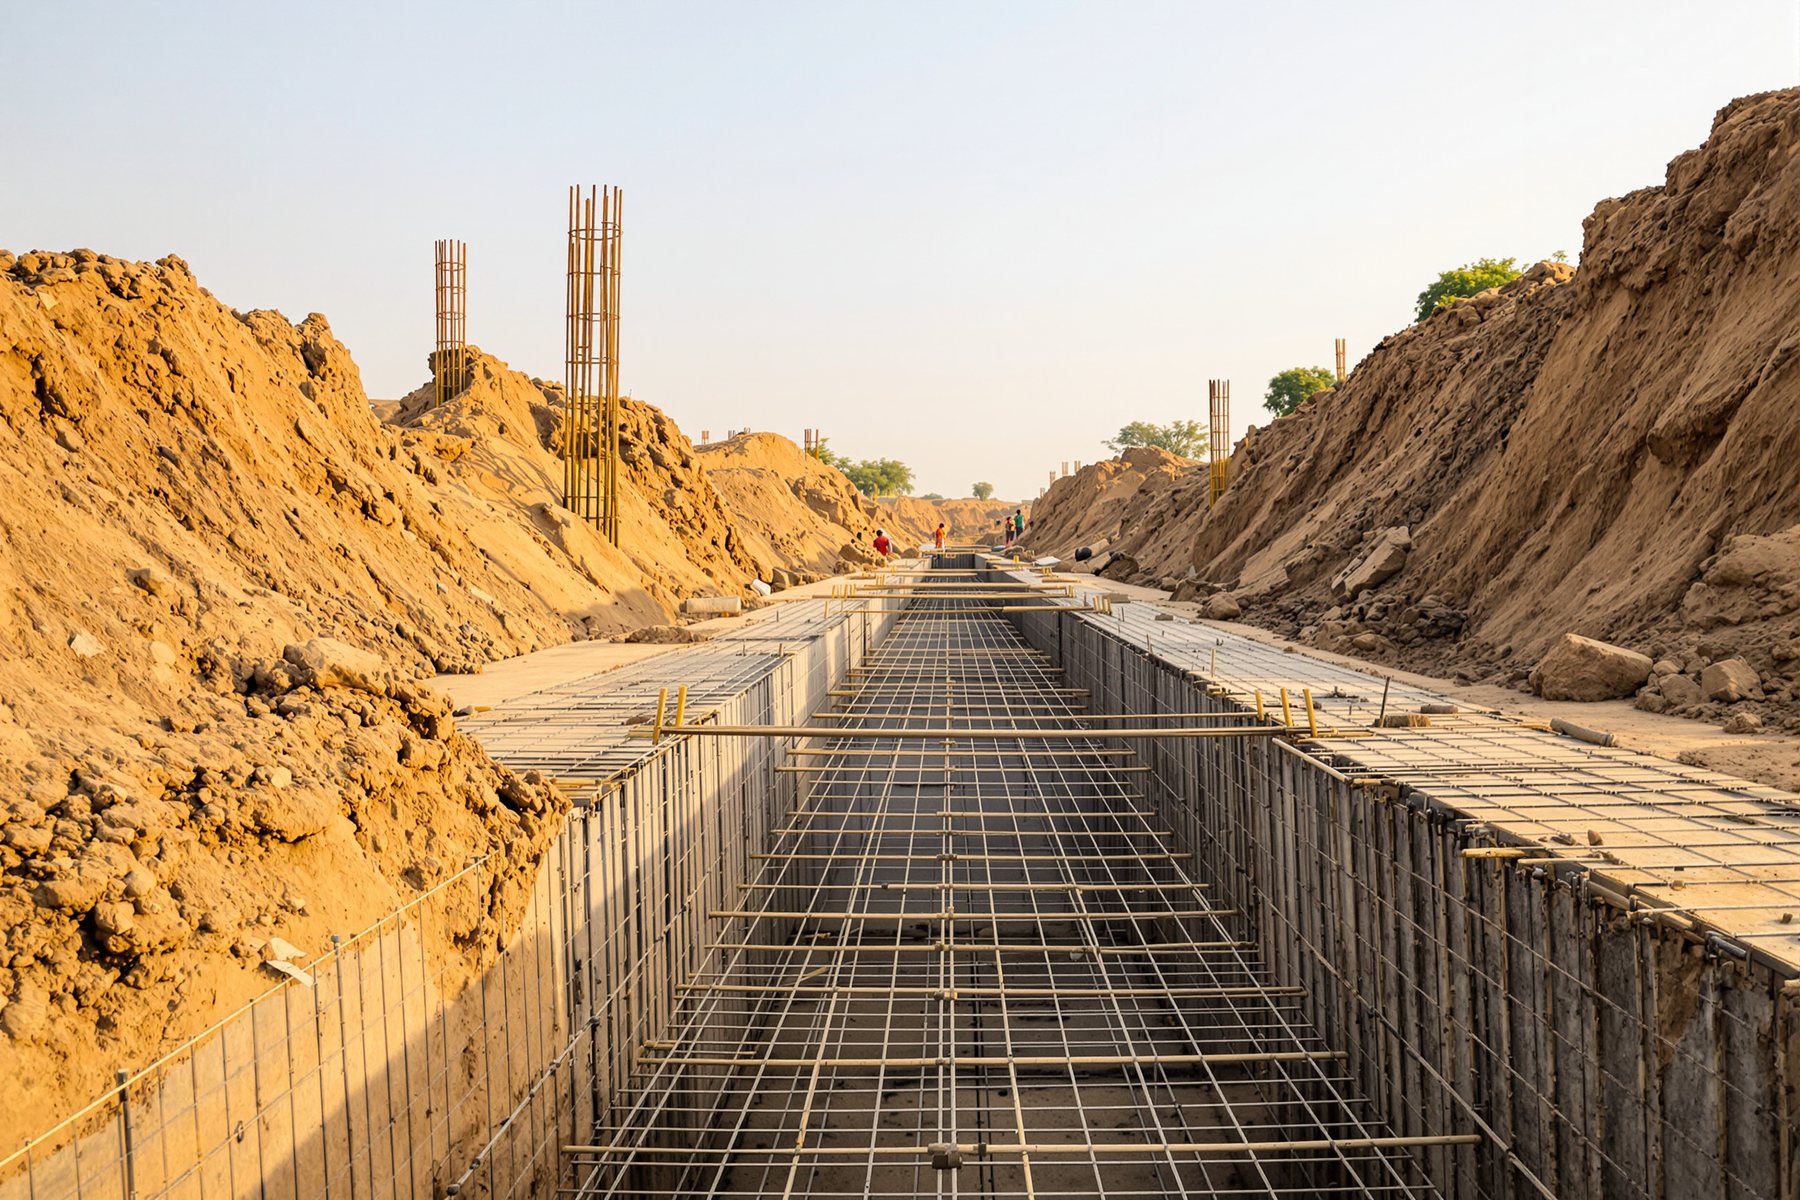
Once footings are cast and columns rise to ground level, three protective layers go in before the floor.
Anti-termite treatment — chemical (or physical) barrier sprayed into the foundation trench and under the plinth filling, so termites can't tunnel up into your woodwork. Cheap to do now, near-impossible later. Insist you see it done.
Plinth beam — a continuous RCC beam tying all the columns together at plinth level (the raised base, typically 450-600mm above ground so monsoon water and street runoff stay out). It binds the structure and carries the ground-floor walls.
Damp-proof course (DPC) — a waterproof layer (waterproofing compound in the concrete, or a membrane) at plinth level that stops ground moisture rising up the walls and ruining your plaster and paint. Skip it and you get the classic rising-damp tide-mark a metre up every wall.
Then the plinth is filled and compacted in layers (not one dumped heap — that settles and cracks your floor) and capped with a plinth-level slab, ready for the structure above.
This is the stage to be on site, camera in hand. Photograph the excavation depth, the steel in the footings before concrete hides it, the anti-termite spray, and the DPC layer. You're not second-guessing the engineer — you're creating a record, and your presence alone keeps standards up. If you can only attend a few site visits in the whole build, spend them here and at each slab pour.
Get the soil report and bearing capacity reflected in the footing schedule, and have the structural engineer issue a foundation-level certificate before backfilling. Check setting-out against the sanctioned plan and setbacks at peg stage — corrections cost nothing on paper and a fortune in concrete. Specify anti-termite as per IS 6313 and DPC detailing explicitly in the BOQ so it isn't 'value-engineered' out on site.
Foundations are where structures meet soil mechanics — the same superstructure needs a different foundation on black-cotton soil than on murram. Understand why a raft spreads load to reduce differential settlement, why footing depth ties to safe bearing capacity, and why the plinth beam exists structurally (lateral tie) and functionally (DPC datum, flood line). The plinth level is a design decision, not a default.
“The foundation is just digging and concrete — any experienced mason can decide how deep and what type.”
Footing type and depth depend on soil-bearing capacity and the loads above, and are the structural engineer's call, certified in writing. A mason's rule of thumb that works on firm soil can fail badly on black-cotton or filled-up soil. The foundation is the one element you cannot inspect or fix after the house is built.
Lock down the below-ground stage before it's buried:
- 01Get your soil-bearing capacity and the engineer's footing schedule in hand, and confirm the footing type on site matches it — no field substitutions.
- 02Be present for, and photograph, three things you can never see again: footing steel before the pour, the anti-termite treatment, and the DPC layer.
- 03Verify setting-out against the sanctioned plan and your setbacks at the string-line stage, before excavation begins.
The foundation and plinth are the only major stage you genuinely cannot inspect once they're done. There's no opening up footings or re-spraying anti-termite under a finished floor. So the discipline here isn't checking the result — it's witnessing the process, photo by photo, and refusing any change the engineer hasn't signed. Get this right and everything above it has something honest to stand on.
Build down then up: clear, set out, excavate to firm soil (~1.2-1.8m typical), and found on the engineer-specified footing (isolated, raft on weak soil, or piles). Then add the three buried protective layers — anti-termite, plinth beam and DPC — before filling the plinth (raised 450-600mm) in compacted layers. Witness and photograph everything before it's covered.
How deep should a house foundation be in India?
It depends on soil-bearing capacity and the building's loads, decided by the structural engineer, not a fixed rule. For a typical 2-storey house on firm soil it's often around 1.2-1.8m to reach load-bearing strata. Weak or black-cotton soil may need a raft or piles instead of conventional footings.
What is a damp-proof course (DPC) and do I need one?
A DPC is a waterproof layer at plinth level that stops ground moisture rising up your walls. Yes, you need it — skipping it causes rising damp, peeling paint and a tide-mark about a metre up every wall. It's cheap to add during construction and very hard to retrofit afterwards.
Is anti-termite treatment necessary when building a house?
Strongly recommended. Pre-construction anti-termite treatment (as per IS 6313) creates a chemical barrier in the foundation and under the plinth so termites can't reach your woodwork and doors. It's inexpensive at this stage and nearly impossible to do properly once the house is built, so insist you see it applied.
With the house standing on sound ground, the next stage is the skeleton itself — the columns, beams and slabs that turn a foundation into a frame.