Drawing the Kitchen
Draw the contents before you detail the container. The cabinet is the last decision, not the first.
'More storage' is one of the most common requests in a kitchen brief. It sounds reasonable. Kitchens accumulate cookware, ingredients, appliances, containers and serving pieces, so more cabinets should make the room easier to use. But storage measured only by volume can be deceptive. A kitchen can have cabinets on every available wall and still make the things used every morning difficult to reach.
The better starting point is not how much storage can fit. It is what needs to be stored, how often it is used, and where it is needed. A pressure cooker used almost every day has a different relationship with the kitchen than a large serving vessel brought out during festivals. Cooking oil relates differently to the hob than spare dinnerware; a mixer used every morning should not occupy the same kind of storage as an appliance used once a month. When all these objects are treated simply as things requiring cabinet space, storage becomes an exercise in fitting boxes into a room rather than designing around behaviour.
This is why frequency matters. The easiest storage positions — the places reached without stretching, bending deeply, moving other objects or climbing onto a stool — are valuable, and they should be occupied by things that earn that convenience through frequent use. Everyday cookware, frequently used ingredients, plates and preparation tools belong close to the activities they support. Less frequently used equipment can tolerate a less immediate position; rarely used objects can be stored higher or further away without affecting everyday work.
But frequency alone is not enough. Storage should also follow the point of use. A drawer of ladles and spatulas that sits across the kitchen from the hob may be beautifully organised and still poorly located. If everyday plates are stored where somebody must cross the active cooking zone every time the table is set, the cabinet works as storage but creates unnecessary movement. A well-planned kitchen therefore does not have one abstract storage zone. It has many small relationships between object, activity and reach.
Reach is where the drawing begins to matter. A cabinet shown neatly in elevation may appear perfectly usable until a person is placed beside it. Upper storage can extend almost to the ceiling, but that does not make every shelf equally accessible; a very deep base cabinet may provide considerable volume while making objects at the back inconvenient to retrieve; a corner may technically contain storage but require removing several things before you reach the object you need. Capacity on a drawing is not the same as accessibility in use.
For a student, this changes how kitchen storage should be designed. Instead of beginning with a wall and dividing it into attractive cabinet modules, begin with the household. List what the kitchen needs to contain. Identify what is used every day, what appears occasionally, and what is genuinely rare. Then ask where each object is used and how easily it needs to be reached. Only after those relationships are understood should the cabinet begin to take shape — because the goal of kitchen storage is not to make every empty surface hold something. It is to make the right things easy to reach, in the right place, at the right frequency.
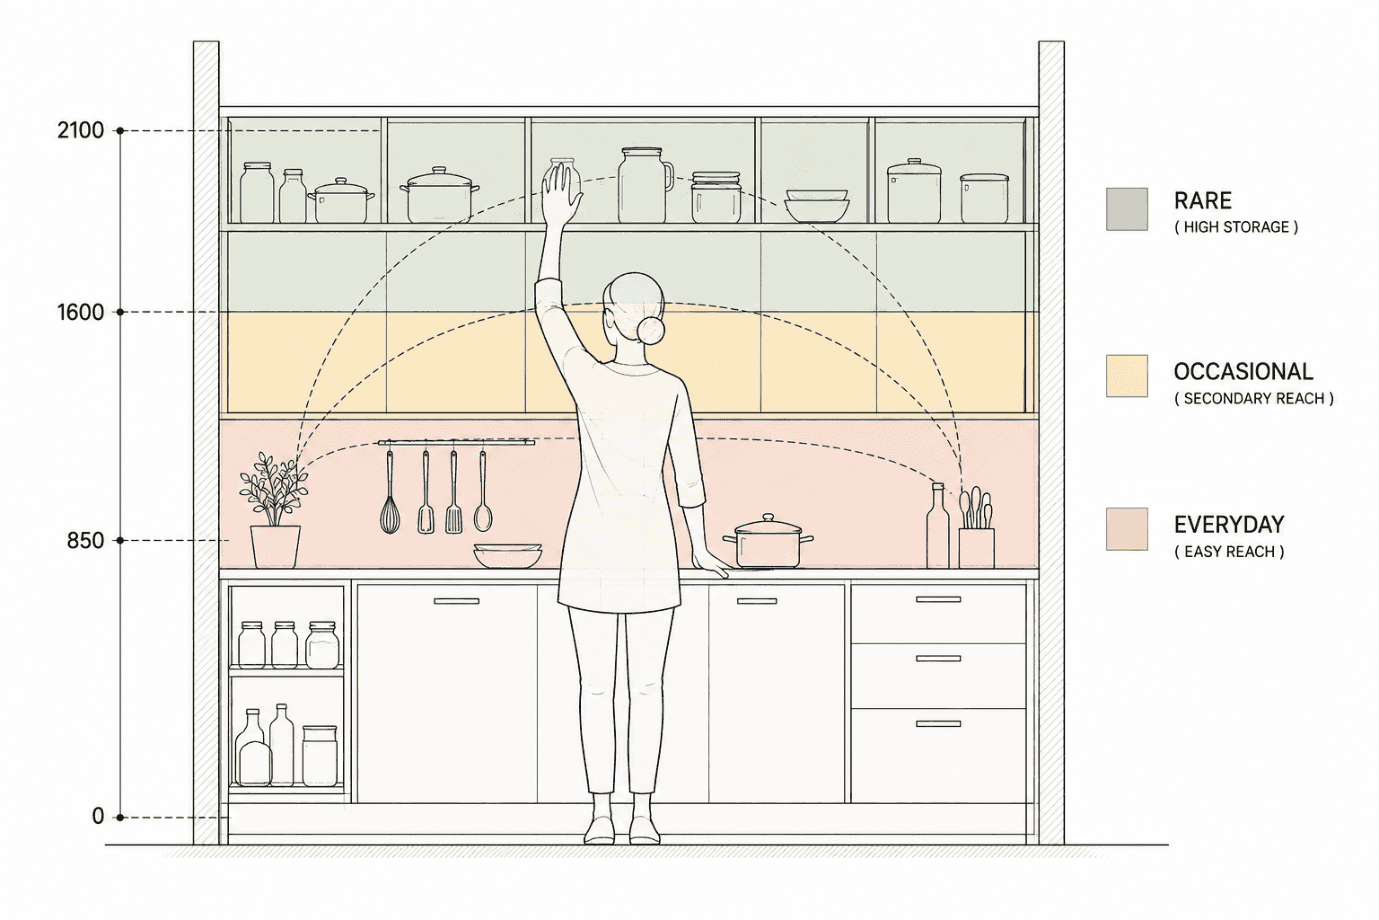
So the first storage drawing does not run wall to cabinet to 'what can we put here?'. It runs the other way: object, then frequency, then activity, then reach, then location — and only then the cabinet. Everyday items get easy reach and minimal movement, closest to the point of use; occasional items get secondary reach, accessible without occupying prime storage; rare items go to high or remote storage, where they can justify the inconvenience.
Draw What Has to Fit
Kitchen storage is usually designed from the outside in. A wall is divided into 450 mm, 600 mm or 900 mm modules; shutters and drawers are arranged; only then does someone ask what will go inside. For storage that works, reverse the sequence. Start with the object.
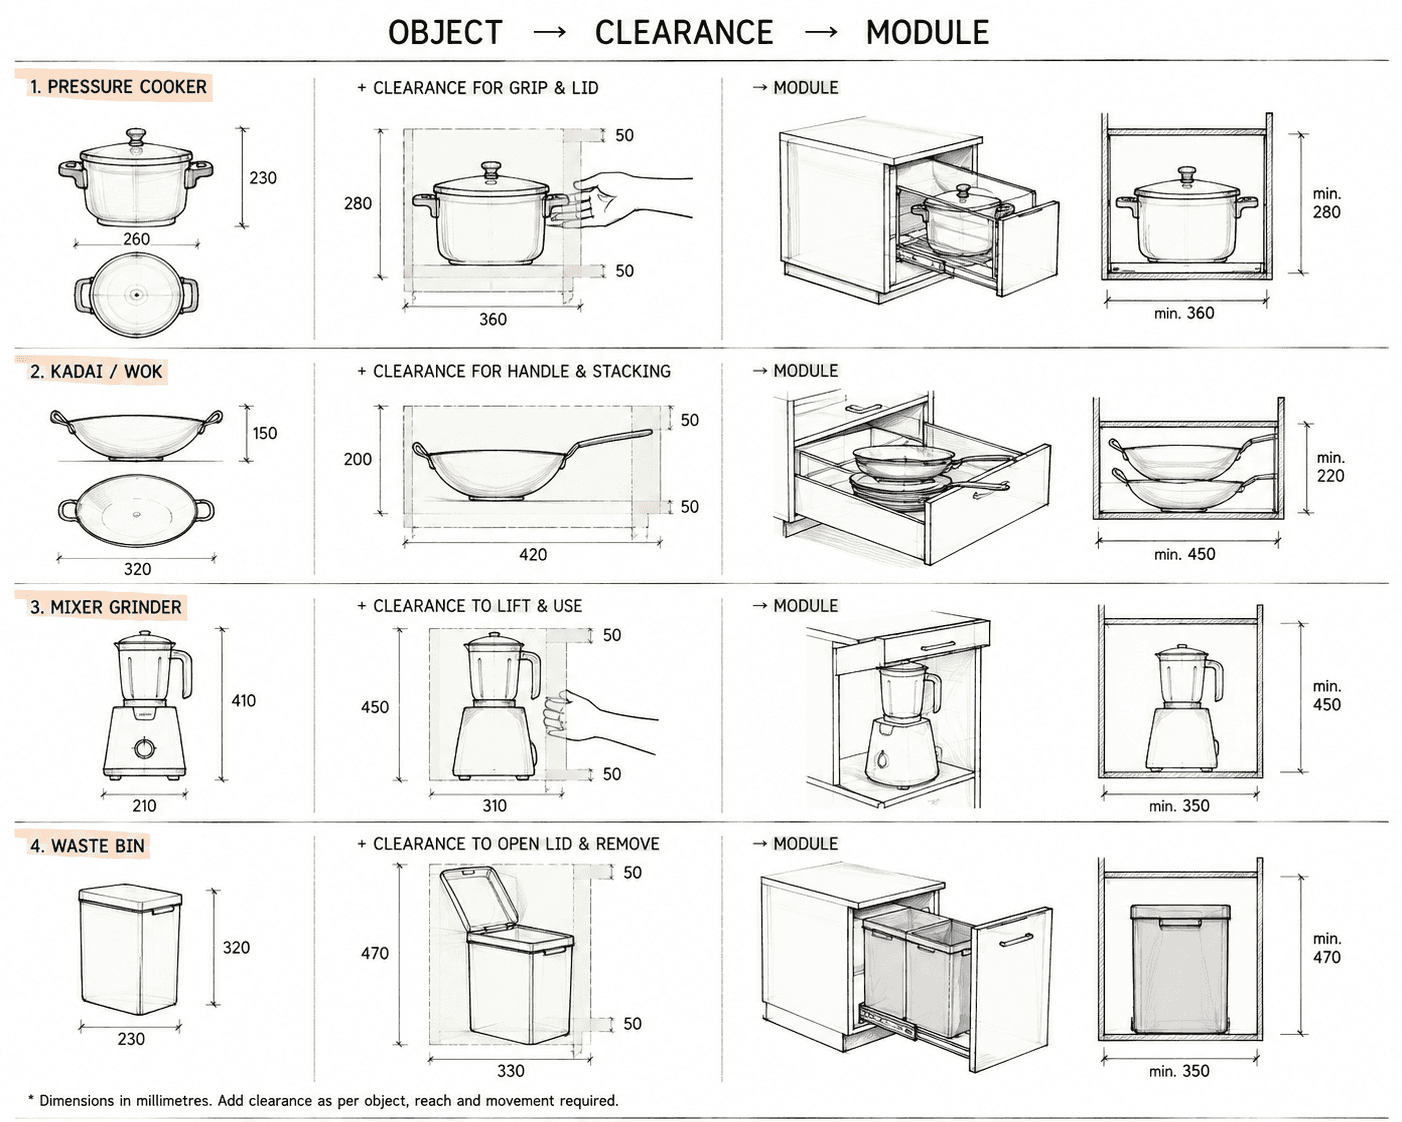
Take something as ordinary as a pressure cooker. It has a diameter and a height, but those measurements alone do not define the storage it needs. The handles project beyond the body. The lid may be stored attached or separately. The cooker must pass through the cabinet opening, and someone needs enough space around it to grip and lift it out. A cabinet matching the cooker's dimensions exactly would be dimensionally correct but practically useless.
The same principle becomes clearer with kadais and frying pans. Their bodies may stack efficiently, while their handles require width or depth that the vessel itself does not. Mixer-grinders introduce another condition: the appliance may fit comfortably on a shelf but become inconvenient if it has to be lifted from a deep base cabinet every morning. Plates benefit from completely different proportions. Waste bins need not only space to sit but room to open, remove the liner and clear adjacent plumbing or shutters. Objects do not occupy storage as rectangles; they occupy it through the way people put them in and take them out.
This is where clearance comes in. Once you have measured the object, add the space needed to use the storage comfortably. Can your hand reach around it? Can a lid be lifted? Can a drawer close without a handle catching? Can the appliance be removed without tilting it awkwardly? Can two stacked vessels be separated without emptying the whole cabinet? The useful dimension is rarely just the dimension of the object. It is the object plus the movement required to retrieve it.
Only after that should the module be determined. Sometimes this confirms a familiar cabinet width. Sometimes it reveals that two shallow drawers will work better than one deep cupboard. Sometimes a supposedly useful narrow pull-out cannot accommodate the objects the household actually owns. And sometimes it reveals something architects and students need to become comfortable admitting: the standard module you began with is the wrong module for this particular kitchen.
Drawing this way also keeps storage from becoming abstract. Instead of a plan filled with anonymous rectangles labelled CABINET, the designer begins to understand why each rectangle has its particular width, depth and position. The cabinet beneath the hob is no longer merely a 900 mm module; it may be where the household's kadais and cooking vessels need to be reached while standing at the cooking zone. A drawer beside it may exist because ladles, spatulas and smaller tools need to be available without the cook leaving that position.
For students, there is a useful discipline here: draw the contents before detailing the container. Even rough outlines of real objects at approximate scale immediately expose whether a storage idea is plausible. The drawing stops being only a representation of cabinetry and starts becoming a simulation of use.
Tall, High and Deep
Once everyday storage is resolved, kitchens often expand in three directions: upward into lofts, vertically into tall units, and backward into deeper cabinets. All three increase capacity significantly. But capacity alone does not measure good storage. The real question is whether the items placed there can still be reached, recognised and retrieved without disrupting everyday use.
A tall unit is useful because it concentrates a large amount of storage into a small footprint, holding pantry supplies, appliances, crockery or combinations depending on its design. But a tall cabinet should not be treated as one continuous volume. Its most accessible shelves are valuable; shelves within comfortable standing reach can hold frequently used pantry items, while the lowest and highest portions suit items used less often. The same cabinet can carry several levels of accessibility.
Lofts operate differently. They use the space above normal wall cabinets and are especially useful in Indian homes, where large vessels, additional serving sets, festival cookware or bulk household items need to be stored without occupying everyday storage. But a loft should be understood as high-capacity, low-access storage. If an item requires a stool every time it is needed, it should not be part of the daily cooking sequence. The loft works when the frequency of use matches the inconvenience of reaching it.
Depth creates a less visible problem. A deep cabinet appears generous because its entire footprint counts as storage. In use, however, front objects can conceal those at the back, and reaching something at the rear may mean removing everything in front first. The problem worsens near floor level, where the user must bend and reach at the same time. A cabinet can gain volume while losing usable accessibility.
Drawers and pull-out systems can change that relationship, because they bring the contents towards the user rather than requiring the user to reach into the cabinet. But that does not mean every deep space needs expensive hardware. The decision depends on what is stored, how frequently it is retrieved, its weight, and whether a simpler shelf or drawer already solves the problem. Hardware earns its place when it improves access to something that genuinely needs frequent access — not simply because a catalogue offers a mechanism for the available space.
The Accessibility Test
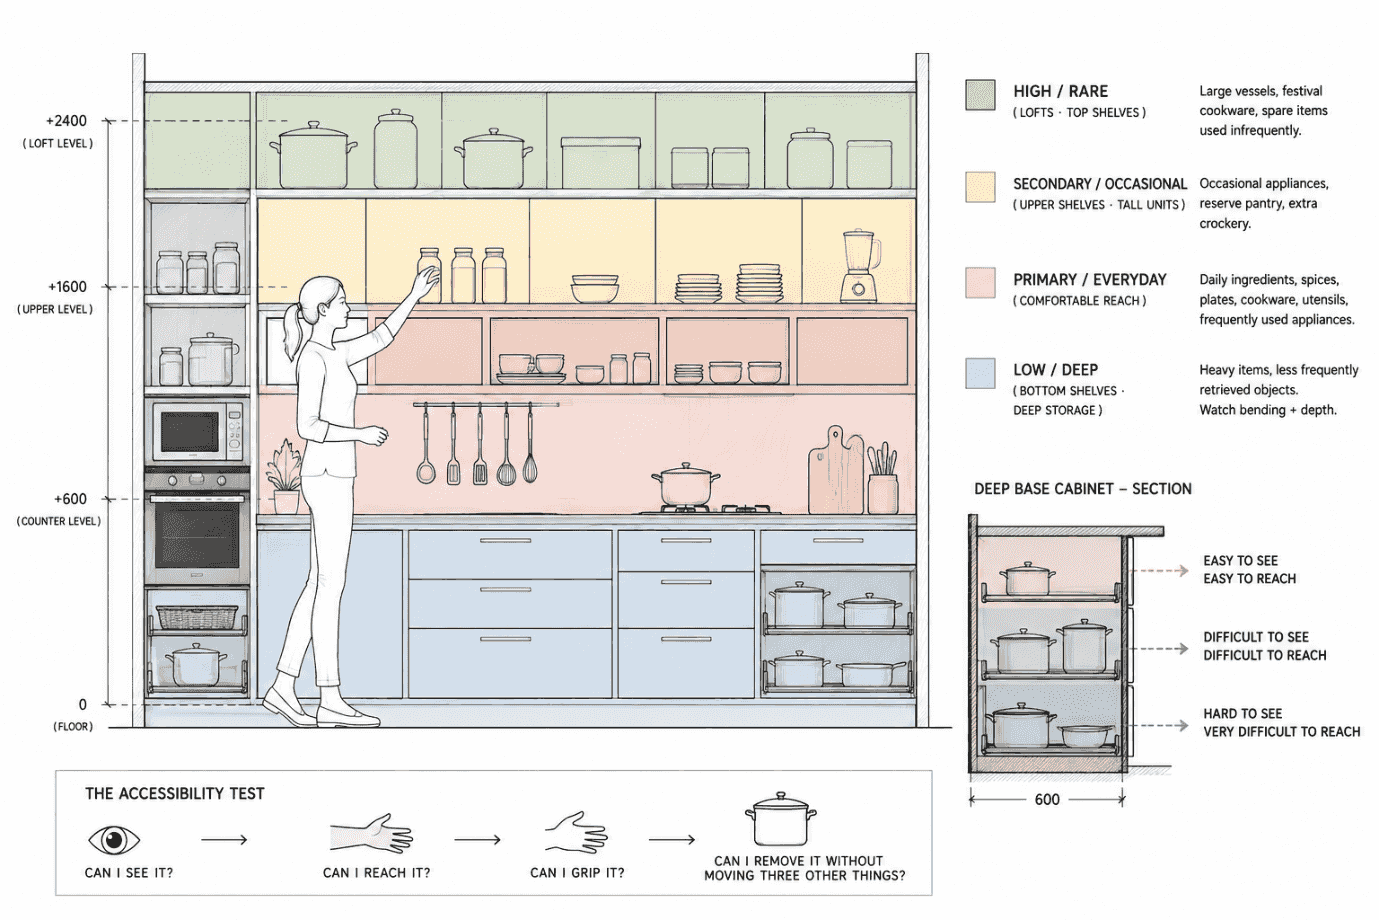
For students, the important lesson is to stop reading an elevation as a flat composition of shutters. Place a person beside it. Draw their comfortable reach and their extended reach. Then look at what remains above and below. Suddenly the elevation explains itself: daily objects migrate toward the body's easiest working range; occasional objects move further away; rare objects occupy the extremes.
Read that way, a kitchen elevation carries an invisible gradient of effort. High and rare storage — lofts and top shelves — takes large serving vessels, festival cookware and spare containers, and demands a deliberate reach or assistance. Secondary, occasional storage — upper shelves and the lower portions of tall units — holds occasional appliances, reserve pantry and additional crockery: accessible, but not prime territory. Primary, everyday storage — comfortable standing reach and immediately accessible drawers — carries daily ingredients, plates, cookware, utensils and frequently used appliances at the lowest retrieval effort. Low and deep storage — bottom shelves and deep base cabinets — suits heavy or less frequently retrieved objects, where you must watch the bending and the reach depth.
This also prevents a common mistake: placing the least accessible object in the most accessible storage simply because it fits beautifully in the drawing. Storage hierarchy should follow use before symmetry. The more frequently an object is needed, the less effort the kitchen should demand to retrieve it.
So for every storage space, run the test in order: Can I see it? Can I reach it? Can I grip it? Can I remove it without moving three other things? If the answer deteriorates as the cabinet gets taller or deeper, its usable capacity is smaller than its drawn capacity. Storage volume tells you how much a cabinet can hold; accessibility tells you how much of it will actually work.
Measure what you actually need to store; add the space needed to grip, lift, pull out, open or remove it; then design the drawer, shelf or cabinet around those requirements. Dimension storage around the object in motion, never around an empty box.
The accessibility test, asked of every storage space. If the answer deteriorates as the cabinet gets taller or deeper, its usable capacity is smaller than its drawn capacity.
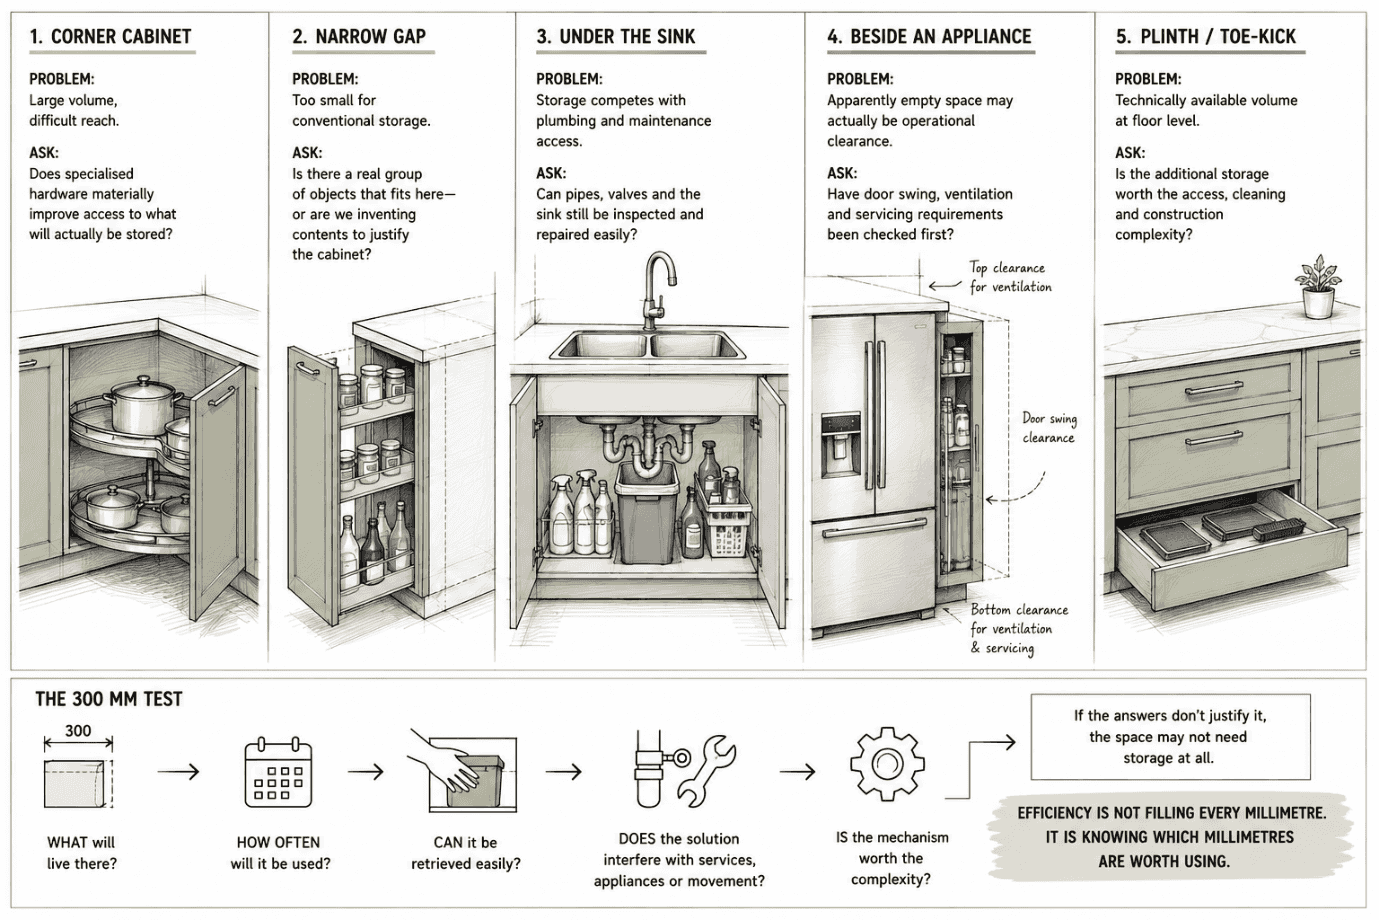
The 300 mm test for an awkward leftover space. If these five questions do not produce a convincing answer, the space may not need storage at all — the objective is no space badly used, not no space wasted.
The Difficult 300 Millimetres
Once the major cabinets are planned, kitchen design often reaches an awkward stage where small pieces of space remain: a narrow strip beside an appliance, the inaccessible depth of a corner, the cabinet below the sink, a few centimetres beside a tall unit, or the plinth beneath the base cabinets. Because kitchens are expensive and storage is valuable, there is a strong temptation to make every millimetre useful. That instinct can produce some of the least useful storage in the kitchen.
Consider a narrow gap. It may be possible to fit a slim pull-out, and specialised hardware can make it look efficient. But the correct question is not whether a pull-out can fit. It is whether the household owns objects that genuinely need that width, depth and location. If the answer is yes — perhaps bottles or frequently used ingredients beside the cooking zone — the narrow module may earn its place. If the contents have to be invented after the cabinet is designed, the storage is solving the drawing rather than the kitchen.
Corners create the opposite problem: plenty of volume but poor access. In an L- or U-shaped kitchen, two cabinet runs meet and create storage that extends beyond the easy reach of either shutter. Carousel systems, swing trays and specialised corner hardware try to bring that hidden volume closer, and they can be useful — but they also consume internal space and add mechanisms that must carry weight and keep working over time. Sometimes the better decision is to accept that part of the corner is difficult storage and give the most accessible neighbouring space to large, infrequently used objects. Recovering every cubic centimetre is not automatically the same as improving the kitchen.
The under-sink cabinet has another constraint: it is not an empty box. The sink bowl occupies the space above; waste and water pipes pass through it; valves may need future access; and moisture or leakage must be considered. Trying to fill every remaining gap with fixed shelves can make basic maintenance difficult. If waste bins or cleaning products are stored here, plan them together with the plumbing, not as if the services did not exist.
The space beside appliances deserves the same discipline. Refrigerator doors need to open enough for drawers and shelves to be accessed; ovens and other appliances may have manufacturer-specific ventilation and installation requirements. A narrow cabinet inserted simply because a gap appears in elevation should never compromise the clearance, access or servicing the appliance beside it requires. Here the correct dimension comes from the appliance specification first and the storage opportunity second.
Even the plinth — the strip beneath the base cabinets — can tempt you to maximise storage. Special drawers can sometimes use this zone, but the plinth also does a basic architectural job: it sets the cabinets back from the floor, separates cabinetry from it, and contributes to comfortable standing at the counter. Turning every toe-kick into storage makes sense only when the added capacity is worth the complexity and the detail stays practical to clean and maintain.
These difficult spaces teach an important lesson, because they force the designer to choose between capacity and usefulness. The mature response to an empty 150, 200 or 300 millimetres is not automatically another cabinet. Sometimes it is clearance. Sometimes access. Sometimes it lets an appliance function properly. And sometimes the space should simply remain empty. Before designing a mechanism for an awkward leftover, ask what will live there, how often it will be used, whether it can be retrieved easily, whether the solution interferes with services, appliances or movement, and whether the mechanism is worth the complexity. If those questions do not produce a convincing answer, the space may not need storage at all. Efficiency is not filling every millimetre. It is knowing which millimetres are worth using.
Draw Before You Buy
By the time storage reaches a catalogue, it can look as though the difficult decisions have already been solved. Hardware exists for corners, tall units, bottles, plates, waste bins, pantry storage and narrow spaces, and each mechanism arrives with its own dimensions and promises a particular convenience. For a student — or a homeowner planning a kitchen — it is easy to begin choosing these systems before asking the more important question: what problem is this hardware supposed to solve?
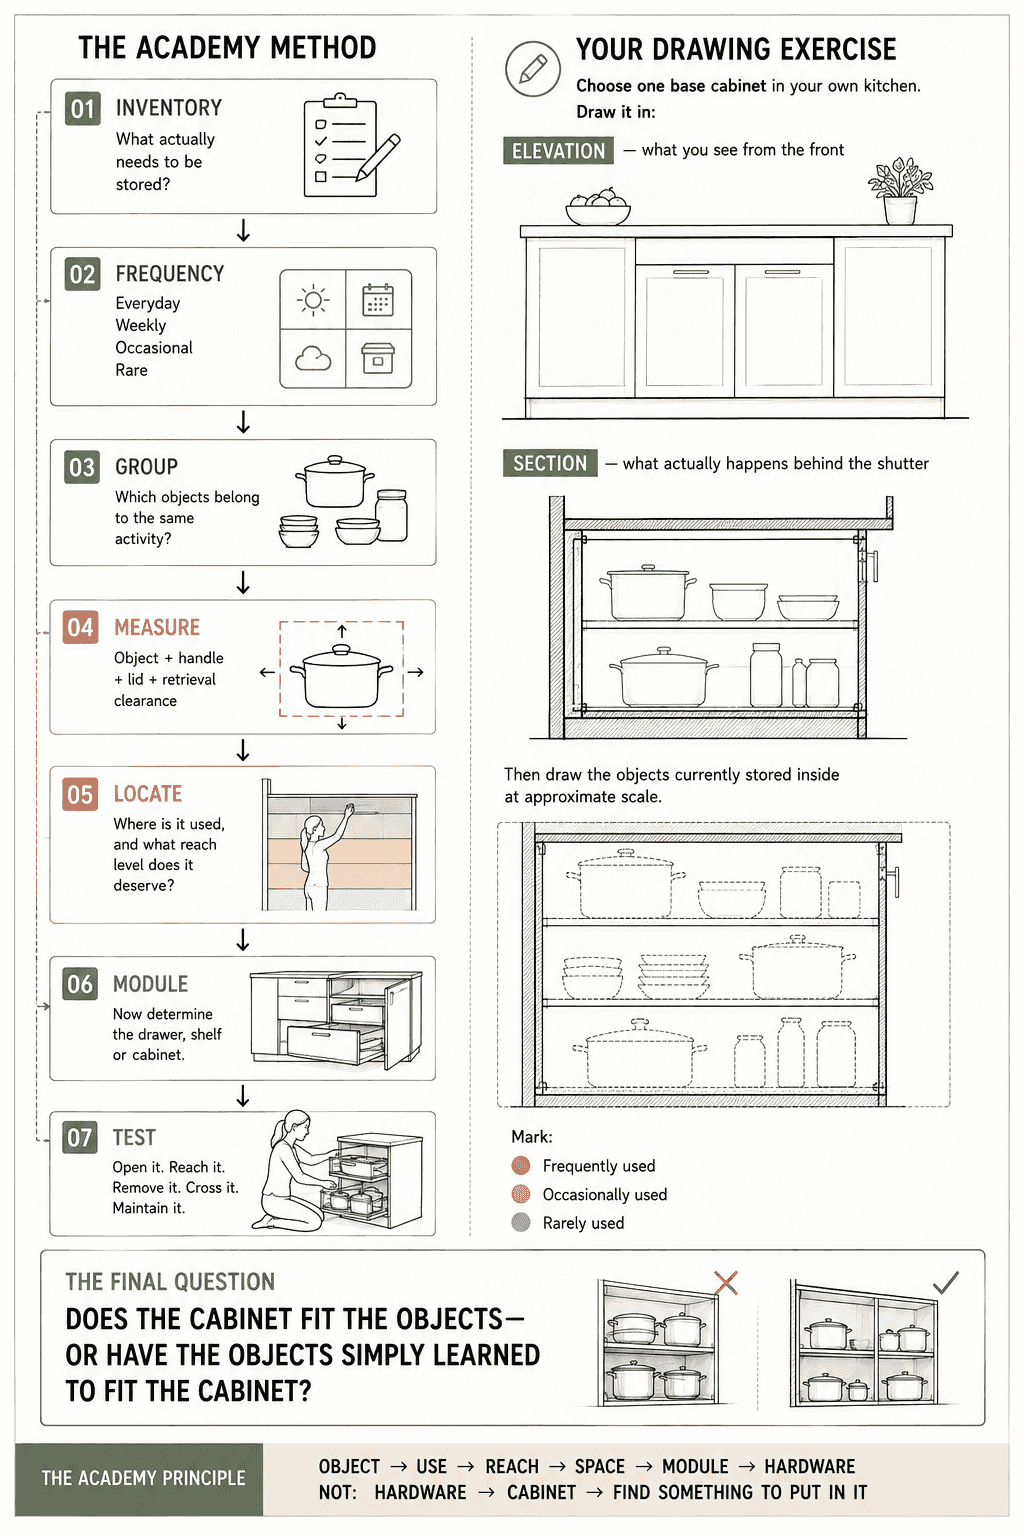
The answer should come from the kitchen, not the catalogue. Start by making an inventory. It need not record every teaspoon in the house, but it should identify the objects that materially affect storage: everyday cookware, large vessels, plates and bowls, pantry containers, small appliances, cleaning supplies, waste bins, and the occasional objects that still need somewhere to live. This turns the brief from an abstract request for 'lots of storage' into something you can actually draw.
Next, add frequency. Mark what is used every day, every week, occasionally and rarely. Then add location. A pressure cooker may need generous storage, but its useful position is also shaped by where cooking happens; plates may be stored near the point from which they are served; cleaning products may belong near the sink but must be near the plumbing. Once these relationships are drawn, the kitchen begins to organise itself around use rather than empty volume.
Only then should dimensions enter the process. Measure representative objects, allow for handles, lids and retrieval, and test them in plan, elevation and section. A plan tells you how much floor and cabinet depth you have. An elevation reveals the reach hierarchy. A section exposes what a front view often hides: shelf depth, plumbing conflicts, countertop relationships, and whether the object at the back of a cabinet can be reached.
Now the module can be chosen — and only after the module has a clear purpose should specialised hardware be considered. A pull-out, carousel or lift-up system is useful when it makes an identified object, or group of objects, easier to access. Hardware should improve a storage decision; it should not be the reason the storage decision exists.
The final step is to test the drawing as though the kitchen were already built. Open the refrigerator. Pull out the widest drawer. Open two adjacent shutters. Stand at the sink while someone passes behind you. Remove the pressure cooker from its shelf. Imagine replacing a waste-bin liner or reaching a plumbing valve. These small simulations expose conflicts that a perfectly composed elevation can conceal. That is why storage design is less about finding clever places to put things and more about making deliberate decisions: when the inventory, frequency, point of use, reach and movement are resolved first, the cabinetry becomes the consequence of the kitchen rather than its starting point.
- 01A cabinet earns its place when the object inside it is easier to use because the cabinet is there.
- 02Dimension storage around the object in motion — the object plus the movement to retrieve it — not around an empty module.
- 03Read the elevation by access: everyday objects to the easiest reach, occasional further out, rare to the extremes. Volume tells you how much a cabinet holds; accessibility tells you how much will actually work.
- 04The mature response to a difficult 150, 200 or 300 mm is not automatically another cabinet. The objective is no space badly used, not no space wasted.
- 05Draw the kitchen before you buy the hardware: inventory, frequency, point of use, reach and movement first — the cabinetry, and the mechanism, come last.
This is one lesson from The Shape of Space — Interior Design Foundations, a free, hands-on course that teaches the foundations of interior design grounded in Indian homes: how people move, how they reach, and how a room is drawn in plan, elevation and section before a single cabinet is bought. It is the reason this magazine can show you the working, not just the finished kitchen.
In detail
Drawings & diagrams