What You Don't See
The modular kitchen begins long before the shutters go on.
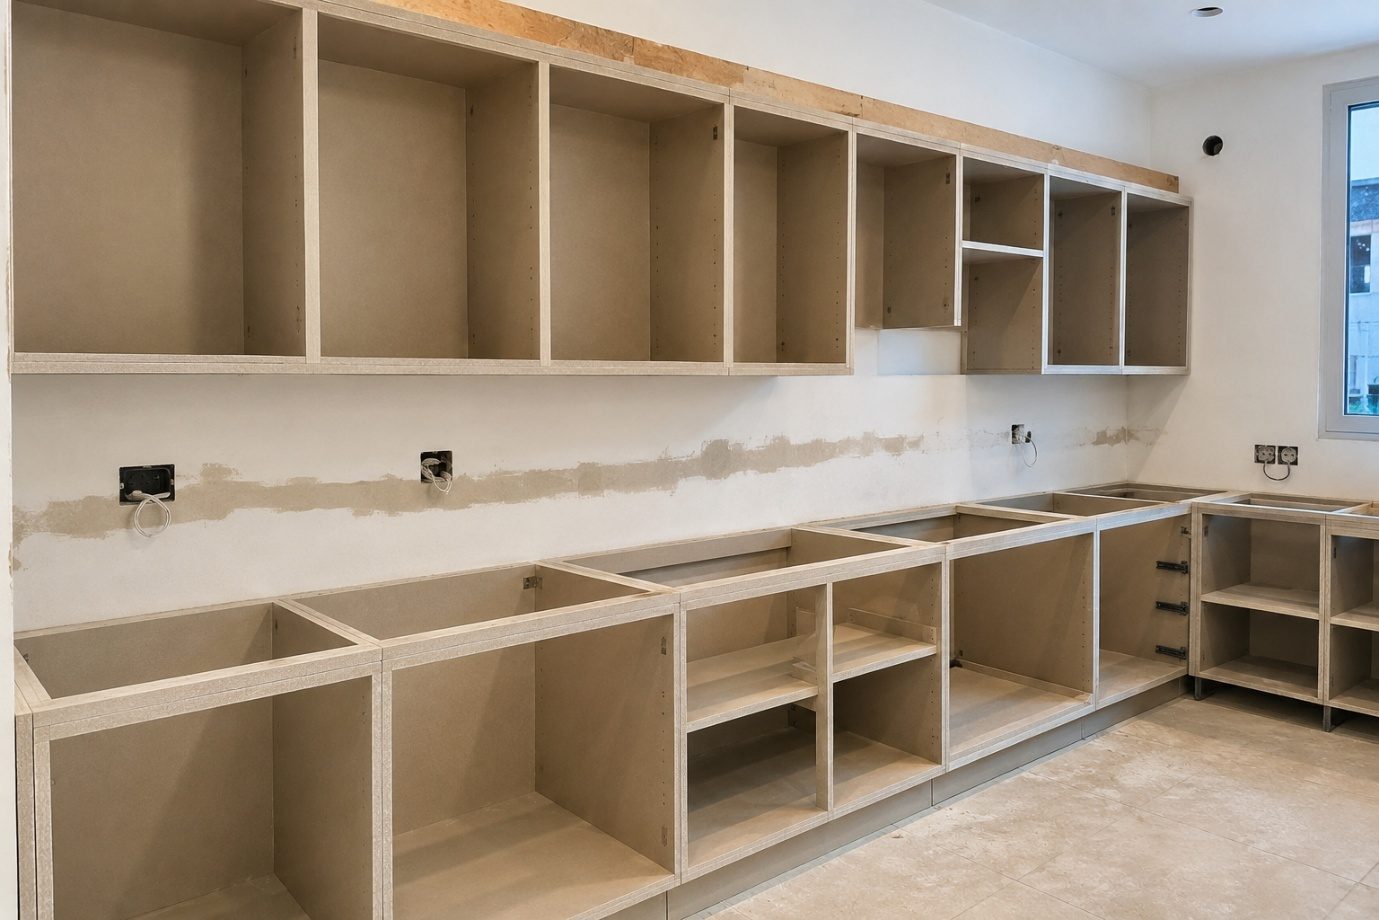
In a finished modular kitchen, your eye lands on the surfaces — the shutters, the countertop, the handles, the backsplash, the appliances. Behind all of it sits the part nobody photographs: the carcass. The carcass is the cabinet body. It holds the shape, carries the load, and gives every shutter, drawer, shelf and fitting something solid to hold on to.
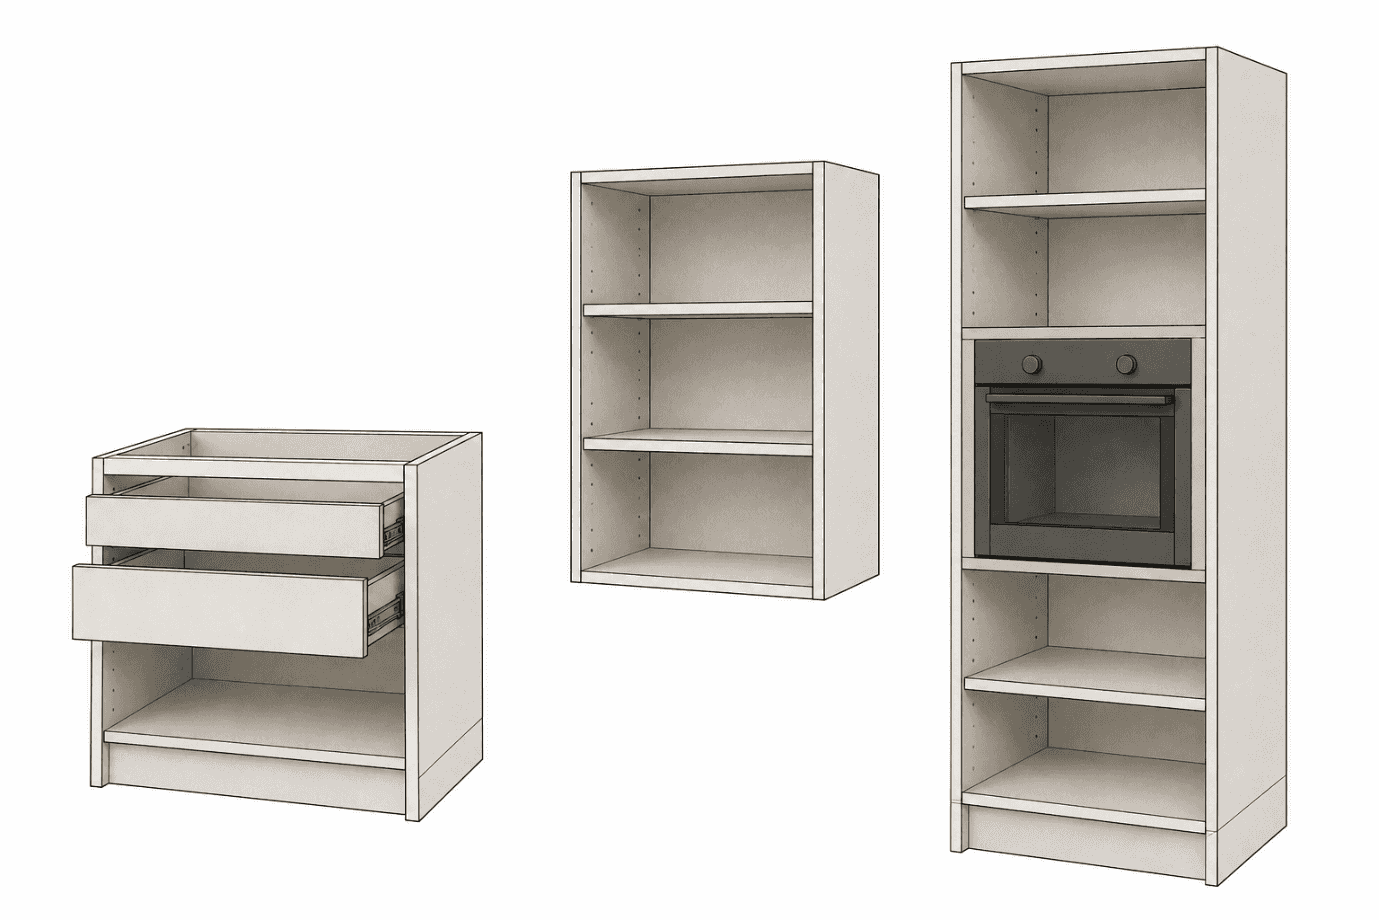
Think of the carcass as the skeleton of the kitchen. Base cabinets under the counter, wall cabinets above, tall pantry and appliance units — all of them are built on the same idea. A modular kitchen isn't carved as one piece on site. It's a set of separate boxes, each made on its own, then brought together into one continuous run.
Each box comes from a handful of flat panels — two sides, a bottom, top members, a shelf or two, and a back. Joined square, those panels become a rigid box. Stand several boxes side by side and you get the unbroken line of cabinetry you actually see in a kitchen.
The board comes first
Every cabinet starts with a choice of board. Depending on the spec and the maker, a carcass may be built from plywood or from engineered boards — particle board, MDF or HDF. No single board wins every kitchen. The right one depends on where the cabinet sits, how much moisture it will face, the hardware it has to hold, the finish going over it, and the budget.
That choice matters most under the sink. A kitchen looks dry, but the cabinet below the basin quietly takes the brunt of it — the slow drips, the overflow, the damp that never quite clears. It lives a harder life than the cabinets up on the wall. So you match the board and the detailing to each module's spot in the room, rather than spreading one material everywhere and hoping for the best.
The finish is not the carcass
Here is where most people mix things up. The colour you see — the blue, the white, the timber-look, the matte — is the shutter or the drawer front. The carcass is the box behind it. Structure and skin are two different jobs.
Keeping them separate is what lets a kitchen age well. You can change the fronts years later and keep the same cabinet system underneath. It also means two kitchens with near-identical faces can be built to very different standards — different boards, different hardware, different care in the joinery.
Which is the whole point: the finish tells you almost nothing about how the kitchen is actually built.
Judge a kitchen by its shutters and you are only reading the cover. The carcass is the book.
From a flat board to a kitchen
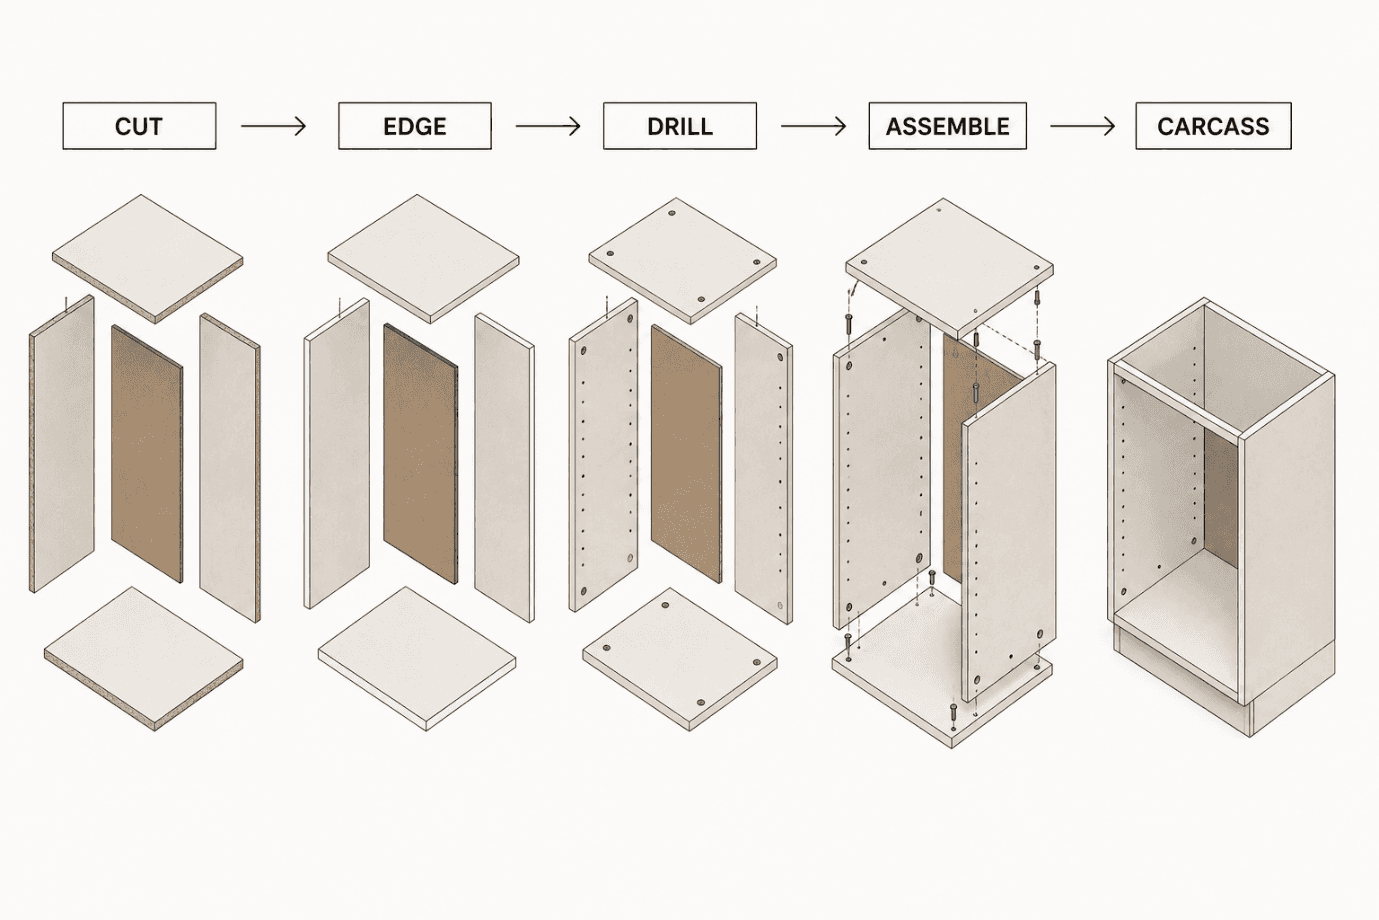
The path from sheet to kitchen is orderly. Big boards are cut into exact panels. The panels are edged and machined for hardware. They are joined into boxes, fitted with shelves and drawers as the design asks. Then the finished modules travel to site and line up into a kitchen.
Strip away the polish and the whole thing reads as one clean sequence:
BOARD → PANEL → CARCASS → MODULE → KITCHEN
Once you can see that line, the kitchen stops looking like a single wall of furniture. It's a coordinated set of boxes, working together.
From board to box
A carcass begins life as a flat sheet. Every part is planned against the module it belongs to, read off the production drawings, and prepared on its own. Precision earns its keep here — a few millimetres out early show up later as a cabinet that won't sit square.
This is the real difference from old-style on-site carpentry. Most of the cutting and machining happens in a controlled workshop, where the kitchen is made as one coordinated set of parts instead of being knocked together piece by piece in the room.
01 — Cutting
First, the board is cut down into panels of the exact sizes needed. Makers use panel saws, table saws or CNC machines, depending on how they work and how much they produce. Size is only half of it — the edges have to come out clean, straight and consistent, because tiny differences between panels turn into uneven shutters, ragged drawer gaps and a wandering countertop line down the road. One big sheet leaves this stage as the bones of several cabinets.
02 — Edge treatment
Cutting leaves the raw edges of engineered board exposed, so each edge gets a banding strip suited to the board and the spec. The band is pressed on and trimmed flush with the panel faces, corners and transitions cleaned up as needed. It sounds like a small step, but sloppy edges are the fastest way to make good cabinetry look poor — and in a kitchen, where surfaces meet spills, steam and constant wiping, that edge is doing real protective work.
03 — Drilling and machining
Next the panels are drilled and machined for everything that will bolt to them — connectors, shelf supports, hinges, drawer runners, whatever the module calls for. Some workshops run CNC machines off digital files; others use jigs, templates and standalone drills. The tools vary; the rule doesn't. Matching holes on separate panels have to line up when the box finally comes together. This is also where a panel commits to its future — a drawer-cabinet side isn't machined like a plain shelf-unit side. The cabinet's job is already written into its parts.
04 — Assembly
Now the flat pieces become a box. Sides join to the bottom and top; shelves and backing go in as the carcass system needs. Squareness is everything at this point. A box that's slightly out can look fine on the bench and then betray itself the moment shutters and drawers go on, with gaps that taper and fronts that refuse to line up. What you want is a box that's rigid, true and ready for its fittings.
05 — Hardware
With the box formed, the working parts go in — drawer runners, hinges, shelf supports, baskets, pull-out systems — chosen for what the module is meant to do. No two carcasses get the same treatment. A drawer stack is fitted out nothing like a pantry; a sink cabinet makes room for plumbing; a hob unit coordinates with the appliance and its drawers; a tall appliance tower answers its own set of rules. A modular kitchen is best pictured as a row of purpose-built boxes, not one cabinet copied down the wall.
By the end of the workshop, the change is nearly done. A flat sheet has been cut, edged, machined and assembled into a structural module, ready for the drive to site.
BOARD → CUT → EDGE → DRILL → ASSEMBLE → CARCASS
Inside the carcass
A finished carcass has no fixed job. The same box can become a drawer unit, a sink cabinet, a pantry, a wall cabinet or an appliance tower — what decides it is the way the inside is organised and the hardware, services or equipment it has to hold. This is where modular design stops being about making boxes and starts being about making each box earn its place.
Base units
Base units live under the worktop and carry most of the day's work. They hold drawers, shelves, pull-outs, waste bins, cookware, sometimes an appliance. Because you reach into them constantly, access is everything. Deep drawers suit pots, pans and big vessels — you pull the contents out instead of groping toward the back of a shelf. Shallow drawers sort cutlery and everyday tools. And base carcasses work together structurally: once installed, neighbours are aligned and joined into one unbroken run beneath the countertop.
Wall units
Wall units do a different job. Mounted above the counter, they use height instead of floor space, and usually hold the lighter things — crockery, glasses, spices, daily ingredients. Their position raises a catch, though: reach. Storage you can't comfortably get to isn't really storage, so the everyday items belong in the easy lower zones and the rare ones go up top. Wall units also have to make peace with windows, the chimney, lighting and whatever else runs along that wall, so their size and position can't be settled apart from the rest of the elevation.
Tall units
A tall carcass carries the storage all the way up, and it can play several parts — a pantry, a home for built-in appliances, or a mix of drawers, shelves and accessories in one full-height run. Unlike a plain cupboard, it needs its insides thought through: a deep box full of fixed shelves offers plenty of theoretical space while burying everything at the back out of reach. Internal drawers, pull-outs and well-placed shelves make that volume usable. When appliances go in, the carcass has to meet the equipment's own demands — the opening, the support, the ventilation and the access all follow the maker's installation guide, not a generic cabinet standard.
The sink unit is different
From the outside, the cabinet under the sink can look just like its base-unit neighbours. Inside, it has to negotiate plumbing — supply lines, waste pipes and the bowl itself all claim space that would otherwise store things. It's also the spot most likely to suffer if a leak starts, so the board, the edge protection, the plumbing access and the treatment of the cabinet base all deserve extra thought here. Chase maximum storage and choke off access to the pipes, and you'll pay for it later. A good sink carcass accepts that part of its job isn't storage at all — it's a safe, reachable enclosure for services.
Hardware turns the box into storage
The carcass gives you structure; hardware gives you function. Hinges swing the shutters, runners make the drawers, shelf supports let storage adjust. Pull-outs, baskets and organisers tune each module further. It's why two boxes of the same size can behave so differently — one hides shelves behind a shutter, the next runs drawers, a third carries a waste system. Same outside dimensions, a completely different life inside. A modular kitchen isn't one universal cabinet repeated; it's a family of carcass types, each shaped to a task.
From workshop to kitchen
A modular kitchen can look like it arrived in one seamless piece, but almost every decision was made before anyone reached the site. The carcasses are already cut, edged, drilled and assembled. Installation is the day all those modules become a single kitchen — and it's where hard-won workshop accuracy can quietly slip away. Floors are rarely dead level. Walls are rarely truly straight. Corners run off, and plumbing or electrical outlets sit a little off from the drawing. The installer's real job is to marry a factory-made kitchen to the room as it actually is.
01 — Position the modules
It starts by setting each carcass in its place — base units laid out to the kitchen plan, tall units and wall cabinets set to the installation drawing. At this stage the kitchen still looks like separate pieces, with small gaps and steps between them; the whole point of what follows is to pull those pieces into one line. Order matters. Sink units have to meet the plumbing outlets, hob and appliance units have to sit with the services they connect to, and tall units have to respect the cabinets and appliances around them. The modular system now has to bend to the real building.
02 — Level before you join
The most important work happens down at the floor. A floor that looks flat still has small dips, and if the base cabinets simply follow them, the countertop above ends up wavy. Adjustable legs, bases or levelling systems — matched to how the cabinet is built — fix that. Each module is checked and set true before the run is closed up, so the cabinets, and the countertop to come, sit on one straight horizontal line. You'll never notice the levelling in the finished kitchen, but nearly everything else leans on it — every drawer, shutter, appliance and worktop trusts the box beneath to be in the right place.
03 — Individual boxes become one run
Once the neighbours are sitting right, they're aligned and joined per the installation system. This is the moment the modular construction disappears — five or six boxes stop reading as boxes and become one continuous base or storage wall. Check the alignment at the fronts and along the tops, too: nudge one module forward or leave it a hair low, and the difference resurfaces later as uneven shutter gaps or a broken countertop line.
04 — The countertop comes to rest
With the base units set, the fabricator measures the countertop, prepares it and fits it to suit the surface and the fabrication method chosen. Now the carcass takes on another role — it becomes the support system for the working surface above. Sink and hob openings have to land over the right cabinets, and joints, edges and the way the top meets the wall all get resolved on site. Several trades converge here at once — cabinetry, countertop fabrication, plumbing, electrical, appliances — and the coordination between them starts to matter as much as any single cabinet.
05 — Shutters, drawers and appliances
Now the visible kitchen arrives. Drawer boxes and fronts go in, shutters are hung, hinges and runners are tuned. Appliances slot into the openings prepared for them, each to its own installation requirements. Small adjustments buy a big visual payoff here — shutter gaps that read even, drawer fronts that line up, doors that swing without brushing their neighbours, hardware that runs smooth. Only now does the carcass start to vanish behind the finished kitchen.
06 — The final check
Before you call it done, test the kitchen — don't just look at it. Open every shutter and pull every drawer all the way out. See whether neighbouring handles or doors knock into each other. Look along the sides as well as head-on, and check the exposed edges and the internal corners. Watch for any sign of a leak and confirm you can still reach the plumbing under the sink. Make sure the appliances sit right and run the way their installation asks. A good modular kitchen shouldn't only look tidy with everything shut; it should feel thought-through with everything open and in use.
The journey that began with a flat board is finished:
BOARD → PANEL → CARCASS → MODULE → INSTALLATION → KITCHEN
The last word
The shutters and the countertop decide what you see. But the quality you actually live with — the kitchen that stays square, opens sweetly and lasts for years — is set by the structure, the fabrication and the alignment hidden behind them. What you don't see is what holds it all up.