
img2img & ControlNet: keep your geometry
Text-to-image invents a building. These techniques make the AI render YOUR building instead — your massing, your plan, your lines, kept honest.
You spent two days on the massing. The AI threw it away in four seconds.
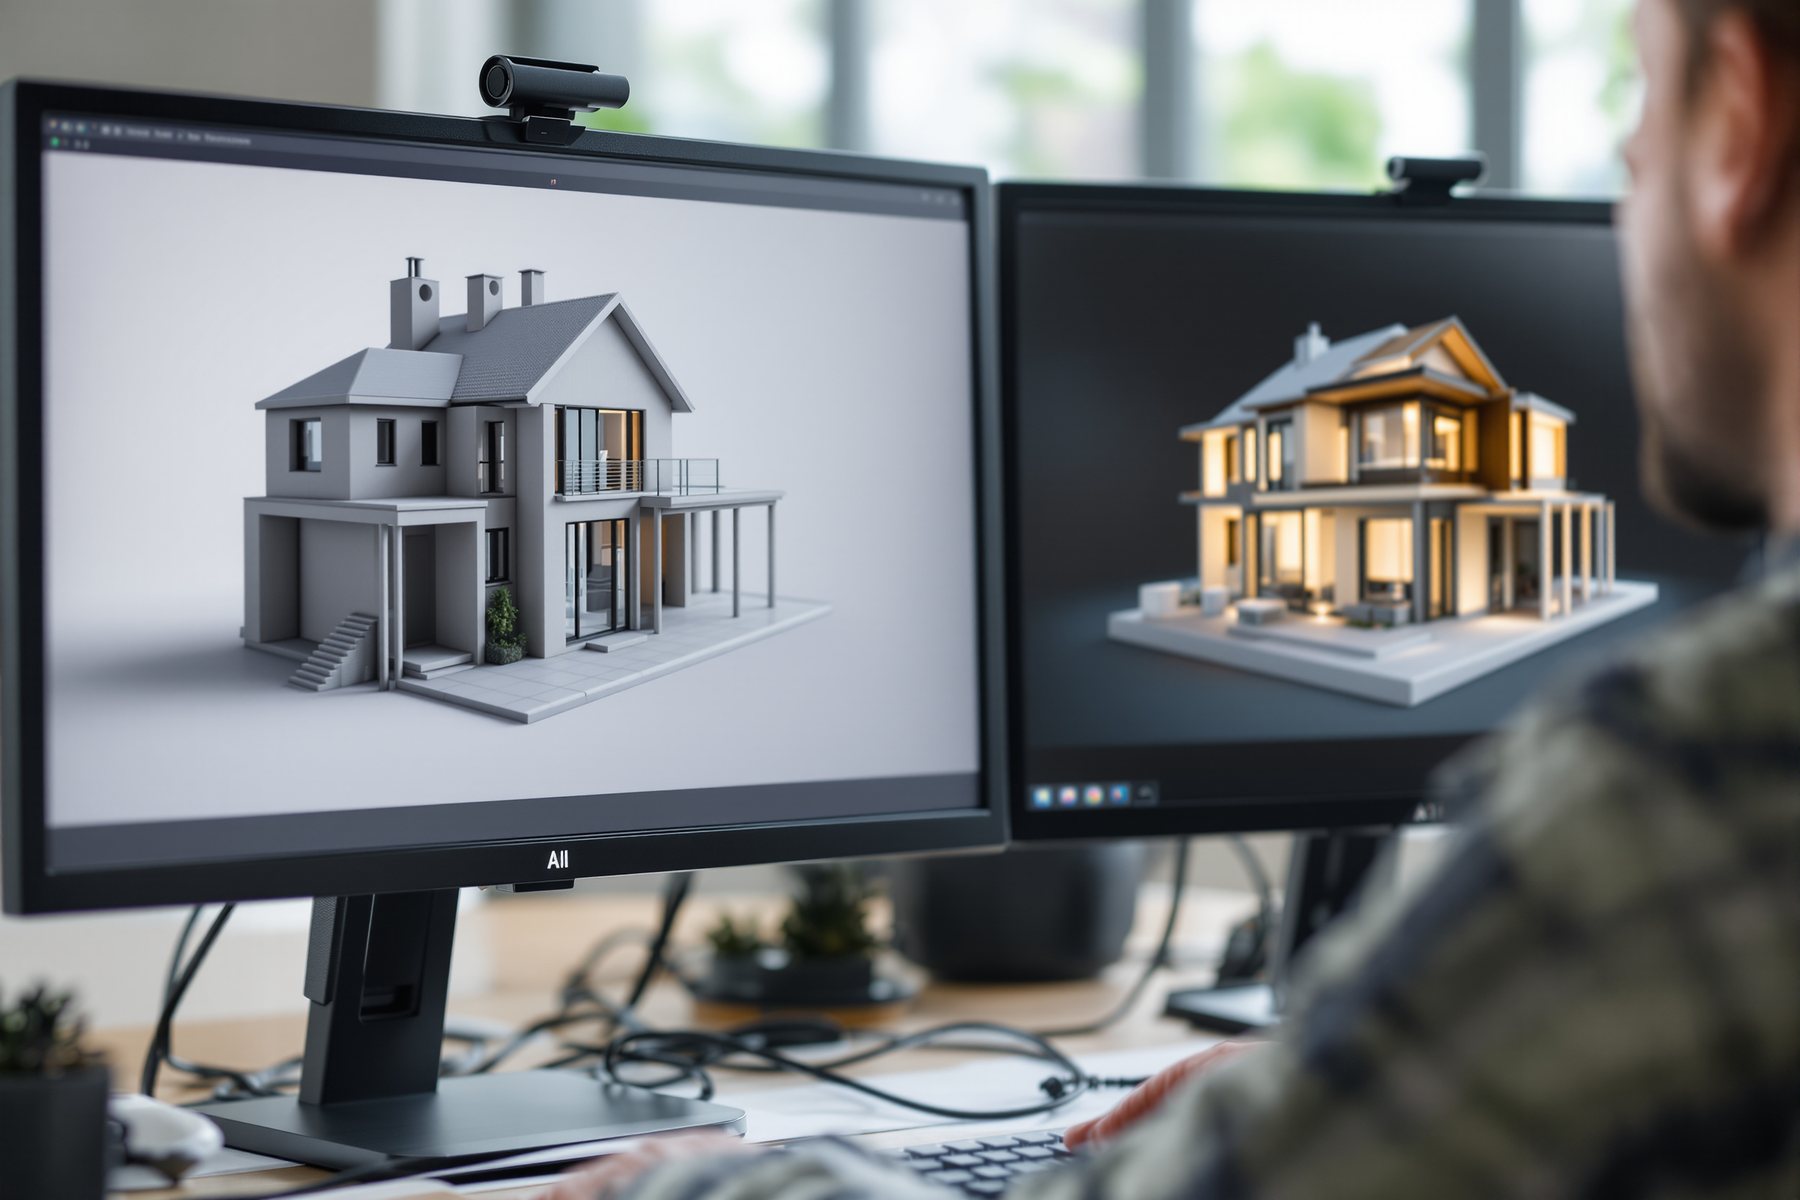
You feed a text prompt to Midjourney and get a gorgeous tower. It is not your tower. The proportions are wrong, the floor count is off, the entrance is on the wrong street. That is what pure text-to-image does: it invents the most plausible building for those words, not the one sitting in your SketchUp file. The fix is not a better prompt. The fix is to stop describing the building and start showing it. Once you hand the model your own image as a starting point and lock it down, the AI works for your geometry instead of against it.
From describing a building to constraining one
Start from your image, not from noise
Plain text-to-image starts from random visual noise and walks toward a plausible match for your words. img2img starts from your image instead - a clay SketchUp view, a massing study, a flat 3D screenshot - and walks a shorter distance toward the prompt.
The one dial that matters is strength (often called denoising strength), a number from 0 to 1. Low strength (0.2-0.35) barely touches your image - it adds materials and light but keeps every line. High strength (0.7-0.9) keeps only the loose composition and reinvents the rest. There is a sweet spot for architecture: roughly 0.35-0.5, where you get real render polish while the massing, openings and roofline survive.
The instinct to build: low strength when geometry is sacred, higher strength when you only want the mood and you'll redraw the form yourself. Wrong strength is the single most common reason an AI render 'doesn't look like my building'.
Strength is a leash. Short leash: it stays by your geometry. Long leash: it wanders off and invents.
Edges, depth and pose so it respects what you drew
img2img keeps a soft memory of your image. ControlNet is the firm grip. It runs on Stable Diffusion and extracts a structural map from your input - then forces every generated pixel to obey that map while the prompt only fills in style.
The three maps you'll actually use: Canny / edges locks straight lines - perfect for a line drawing, an elevation or a wireframe, so window mullions and floor lines stay exactly where you put them. Depth locks the 3D massing - near-and-far, the stacking of volumes - ideal off a clay render so the building's form is untouchable while materials change freely. Pose locks a human figure - niche in architecture, useful when you're staging people at a real scale into a scene.
Stack them and you get astonishing control: edges to keep the facade grid, depth to keep the massing, prompt to swap laterite for exposed concrete. The AI stops inventing and starts rendering the thing you built.
Tell it what to change and it keeps the rest
The newest layer is context-aware editing. FLUX Kontext (from Black Forest Labs) - the same engine Studio Matrx uses for wall-only recolour - takes your finished image and a plain instruction like make the facade screen terracotta jaali and changes only that, holding the rest of the building steady. No noise, no full reroll.
This is the difference between generation (make a new image) and editing (change this one). For an architect, editing is usually what you actually want: you already have a render you like; you need this one balcony deeper, that screen denser, the sky calmer. Google's Nano Banana plays the same role for instruction edits and keeping an object consistent across changes.
The spine holds: these tools diverge fast and plausibly, but a context edit can still drift a cornice or invent a junction. You converge - you check that the change is the only change, and that it could be built.
This is the technique that finally makes AI safe at design-development stage. Model your massing properly in SketchUp or Rhino, export a clay view, then ControlNet-depth it so the form is locked and only materials and light are AI. The render now matches the building you'll actually document - no west-facing glass the model invented, no phantom cantilever. Treat strength like a tolerance: the tighter the geometry must be respected, the lower you set it. The image still isn't a contract document, but it stops lying about your design.
img2img is your fastest restyle loop. Photograph the actual room - or screenshot your Foyr/SketchUp model - and run it at low strength to keep the layout, sightlines and proportions while the AI swaps the palette, the flooring, the mood. ControlNet-edges keeps the joinery lines crisp so a wardrobe doesn't melt into the wall. For a client who loves a render but wants 'that one wall in a deeper terracotta', FLUX Kontext changes only that wall - exactly the move Studio Matrx's Design Ideas recolour makes one-tap.
You don't need a render farm - you need control. Start free: many Stable Diffusion front-ends ship ControlNet built in, and you can run img2img on a clay screenshot before you own any 3D rendering software. Learn one map cold (depth, off a massing view) before you stack three. The mistake solos make is reaching for higher strength to 'make it prettier' and watching their design dissolve - then blaming the tool. Keep the leash short, build the habit, and one person can output controlled renders a whole viz team used to bill for.
Stable Diffusion + ControlNet
Open / local control rig
The reference setup for edge, depth and pose control. Runs locally, free, infinitely tweakable - but there's a learning curve and you manage your own models and VRAM. The 'under the hood' engine many architecture tools wrap.
FLUX Kontext (Black Forest Labs)
Context-aware editing
Best-in-class for 'change only this, keep the rest' instruction edits on a real image. The engine behind Studio Matrx's wall-only recolour. Still drift-prone on fine junctions - check the change is the only change.
Google Gemini image - Nano Banana
Instruction edits + consistency
Strong at instruction-based editing and keeping an object or material consistent across a series of edits. Convenient, no local setup; less precise than a true ControlNet rig for locking exact lines.
Studio Matrx Design Ideas
Wall-only recolour (live example)
A working FLUX-Kontext context edit in production: recolours a wall while holding furniture and layout. The clearest demo of 'editing, not generating' for an Indian interior context.
“If I write a detailed enough prompt, text-to-image will eventually draw my exact building.”
It won't, and it can't. A prompt is words; your building is geometry. No amount of describing the floor count, the setback and the mullion spacing forces the model to honour them - it only nudges probabilities. To keep YOUR geometry you must SHOW it, not say it: feed the image (img2img) and constrain it (ControlNet). Description suggests; an input image and a control map enforce.
Workshop - render your own massing without losing it
Take a building you actually modelled and prove the difference between describing it and constraining it. You'll run the same view three ways and watch geometry survive - or die - by the numbers.
Free: any Stable Diffusion front-end with ControlNet (or an img2img tool). Bring one clay screenshot of your own SketchUp/Rhino massing.
INPUT: one clay 3D screenshot of your massing (no materials)

PROMPT (reuse for all three runs):
"warm late-afternoon photoreal render of this building,
exposed concrete and terracotta jaali screen, Indian
urban context, clear sky, eye-level view"

RUN A  text-to-image  -> prompt only, ignore the input
RUN B  img2img        -> same input, strength 0.40
RUN C  ControlNet-depth-> same input, depth map locked
- 1Export one clay screenshot of your massing - no materials, just form - at eye level.
- 2Run A: feed only the prompt to a text-to-image model. Note how little it resembles your building - count the floors it invented.
- 3Run B: switch to img2img, feed your screenshot, set strength 0.40. Compare: the massing should now survive while materials appear.
- 4Run C: feed the same screenshot through ControlNet-depth. Overlay the result on your original - the volumes should sit exactly where you put them.
- 5Push strength on Run B to 0.75 and watch your geometry dissolve. That failure is the lesson: high strength trades control for invention.
- 6Pick the run that keeps your design AND looks built, and write one line on the strength/control setting that got you there - your default for this kind of view.
You’ll walk away with
A three-way comparison of your own building - invented vs img2img vs ControlNet - plus a personal default setting (strength + control map) for rendering your massing while keeping it.
Two quick probes, if you have ten minutes.
- 01Take a hand-drawn elevation, run it through ControlNet-Canny, and watch the mullion lines stay put while it adds material and shadow.
- 02On a finished render you like, ask FLUX Kontext or Nano Banana to change one element ('deeper balcony', 'denser screen') and check that nothing else moved.
To keep your geometry, stop describing the building and start showing it: img2img starts from your image and strength controls how far it can wander; ControlNet (edges, depth, pose) forces the output to obey your structure; FLUX Kontext edits one thing in context. Control is a dial you set, not a prompt you hope works.
Text-to-image invents; img2img + ControlNet constrain. Strength is the leash - low keeps your lines, high reinvents. Canny locks edges, depth locks massing, pose locks figures. FLUX Kontext and Nano Banana edit in context. You still verify the result could be built.
What is the best img2img strength for keeping architecture accurate?
For architecture, roughly 0.35-0.5 is the working range: enough denoising to add real materials, light and atmosphere, but low enough that your massing, openings and rooflines survive. Below 0.3 it barely changes anything; above 0.6 it starts reinventing the building. Set it lower the more sacred the geometry, and test on one view before batching.
What's the difference between img2img and ControlNet?
img2img starts from your image and keeps a soft memory of it, governed by the strength dial. ControlNet is firmer: it extracts a structural map (edges, depth or pose) from your input and forces every generated pixel to obey that map while the prompt only handles style. Use img2img for a quick mood-keeping restyle; use ControlNet when exact lines or massing must not move.
Do I need to code or run things locally to use ControlNet?
Not necessarily. The classic rig is Stable Diffusion with ControlNet run locally, which is free and powerful but has a setup curve. As of 2026 several hosted tools and front-ends expose edge and depth control without local installs, and context-edit tools like FLUX Kontext and Nano Banana give you much of the 'keep the rest' behaviour with no setup at all.
Now that the AI will respect a finished model, the next question is upstream: can it respect a rough hand sketch, and turn it into a render without redesigning it for you?