
Where does the water go?
The anatomy of site drainage — following a raindrop from the roof to the earth, and the design choices that turn rainfall into a resource.
Every building tells two stories. The first is visible — the façade, the materials, the spaces, the form. The second is less obvious, and it emerges only during heavy rain. This is the story of water.
Rainwater travels across roofs, down walls, through open spaces and into the ground. Planned well, the building stays dry, the landscape benefits, and groundwater is replenished. Planned badly, the same rain brings erosion, flooding, structural damage and waste.
For decades, site drainage has been treated as a technical task, bolted on late in the design process. But resilient architecture starts earlier — by understanding how water naturally moves across a site before deciding where the building sits. This feature traces a raindrop's path, from the moment it lands on a roof to its return to the earth. Before deciding what to build, we have to ask one question first: where does the water go?
Effective drainage goes unnoticed when it works — and is unforgettable when it fails.
The journey of a single raindrop
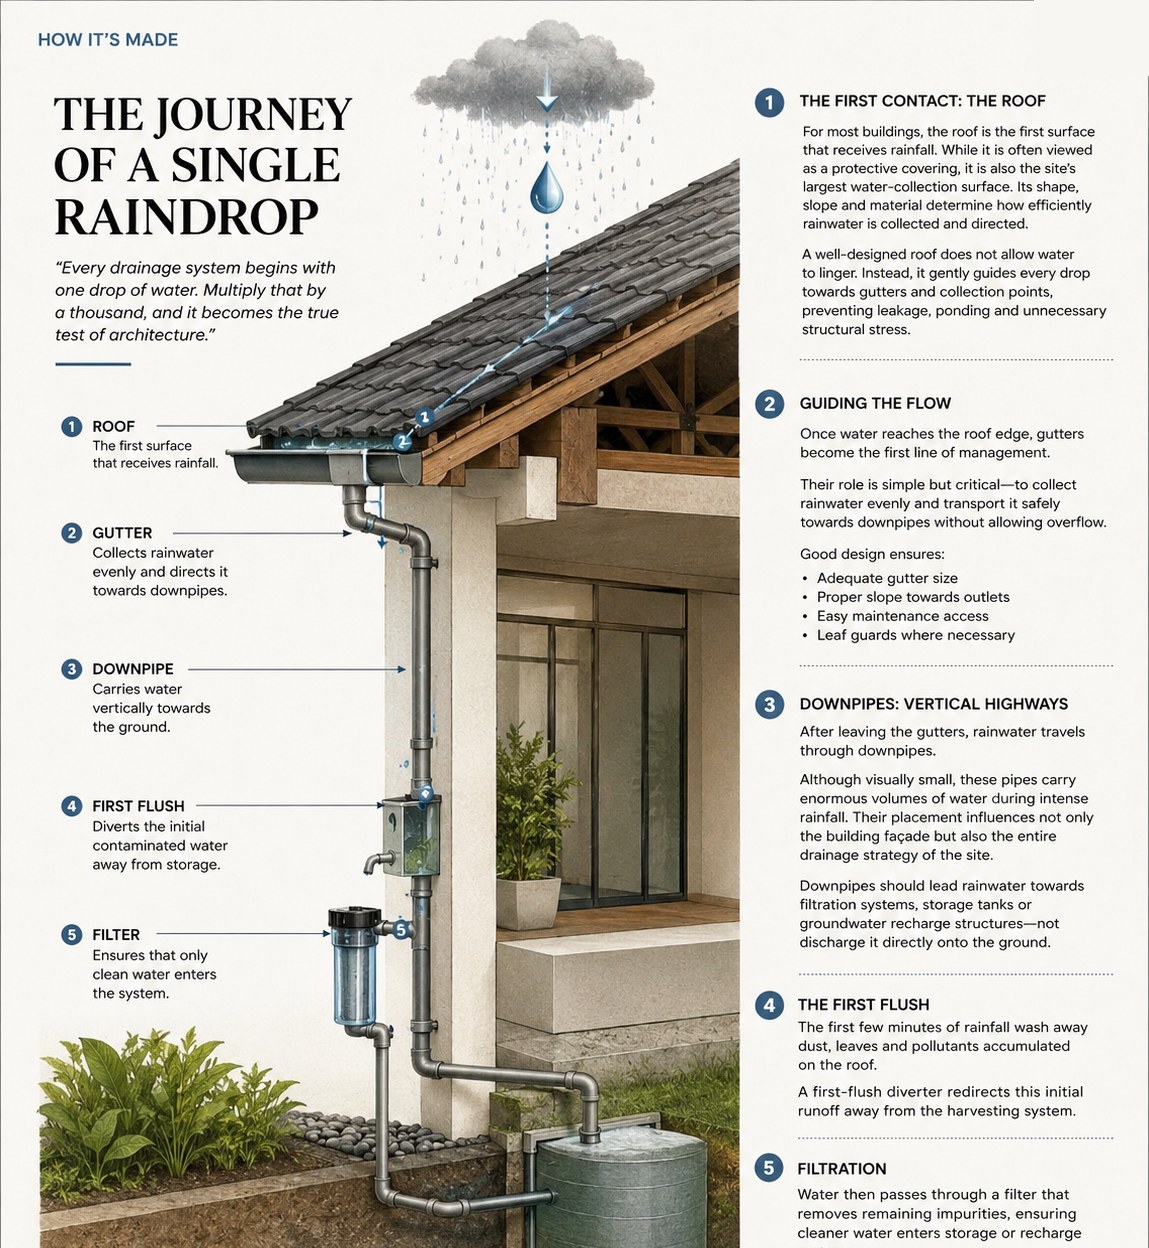
Every drainage system begins with one drop of water. Multiply that by a thousand, and it becomes the true test of architecture.
Step 1 — First contact: the roof
For most buildings the roof is the first surface rain touches, and the largest water-collection area on site. Its shape, slope and material decide how efficiently that water is gathered and led away. A well-designed roof never lets water linger; it directs it to gutters and collection points, reducing leaks, ponding and structural stress.
Step 2 — Guiding the flow
At the roof edge, gutters take over. Their job is simple but essential: collect the water evenly and carry it to the downpipes without overflowing. Undersized or clogged gutters spill over the edge, stain the façade and, over time, damage the foundation. Good gutters mean adequate size, a proper fall to the outlets, easy access for cleaning, and leaf guards where they are needed.
Step 3 — Downpipes: the vertical highways
From the gutters, water drops through the downpipes. Small as they look, they carry large volumes in a heavy storm, and where they land matters — for the façade and for the whole site strategy. Rather than discharging straight onto the ground, downpipes should feed filtration, storage or recharge structures.
The first flush
The first few minutes of rain wash the dust, leaves and droppings off the roof. A first-flush diverter sends that dirty initial runoff away from the tank, so only cleaner water goes on to the filters and storage.
The goal is not just to remove rainwater from a building, but to guide it, clean it, and return it responsibly to the landscape.
Reading the land before drawing the building
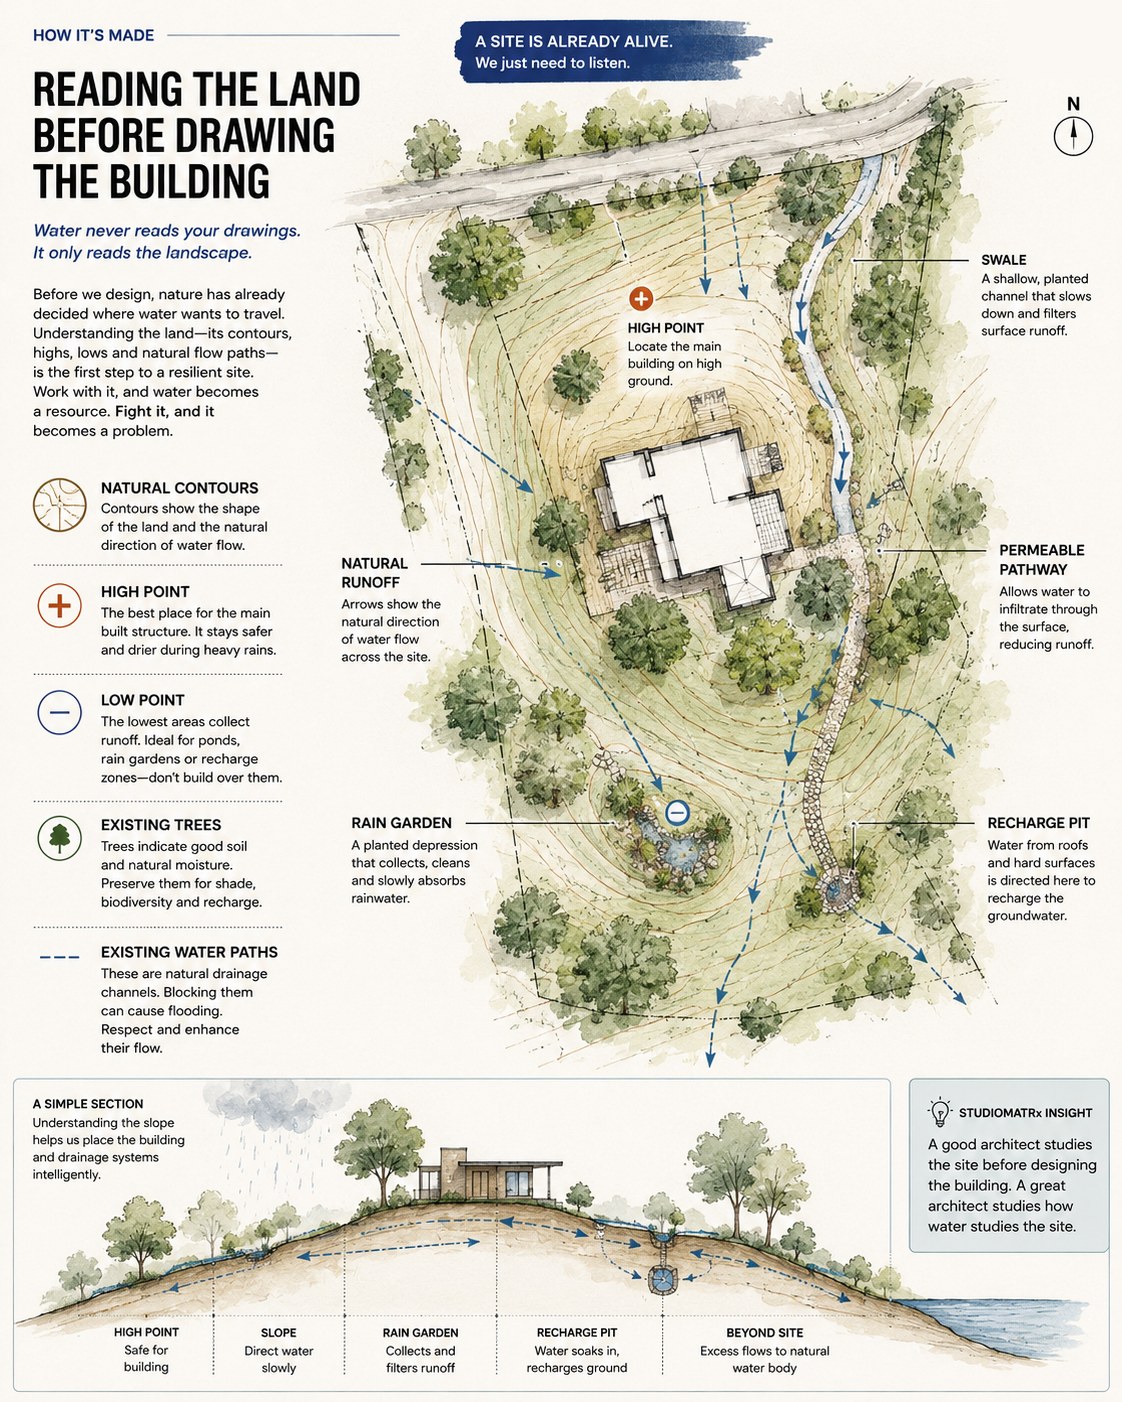
Water does not read architectural plans; it reads the landscape. Long before design begins, a site's topography, contours and elevation already decide where rain will go. Good site planning starts by understanding those patterns rather than fighting them.
A common mistake is to treat a site as empty land. In truth every site already does environmental work — rain soaks into its soil, runs down its slopes, feeds its plants and eventually reaches a water body. Architecture should support those systems, not sever them.
So resilient design begins with observation. Walking a site during or just after rain reveals more than any survey: small depressions become temporary ponds, steep ground speeds the runoff, and thriving vegetation marks where moisture naturally gathers. Those clues tell you where buildings, roads and open spaces should — and shouldn't — go.
What to read before you draw
Natural contours reveal the shape of the land and the direction water will move. High points are the safest ground for critical structures, away from water pooling at the foundations. Low points, where runoff collects, are better turned into rain gardens, detention ponds or recharge zones than built over. Large existing trees mark healthy soil and good drainage — and keeping them aids recharge. And existing water paths, even dry channels, come alive in a downpour; block them and flooding appears where you least expect it.
A good architect studies the site before designing the building. A great architect studies how water studies the site.
Slowing the water, not fighting it
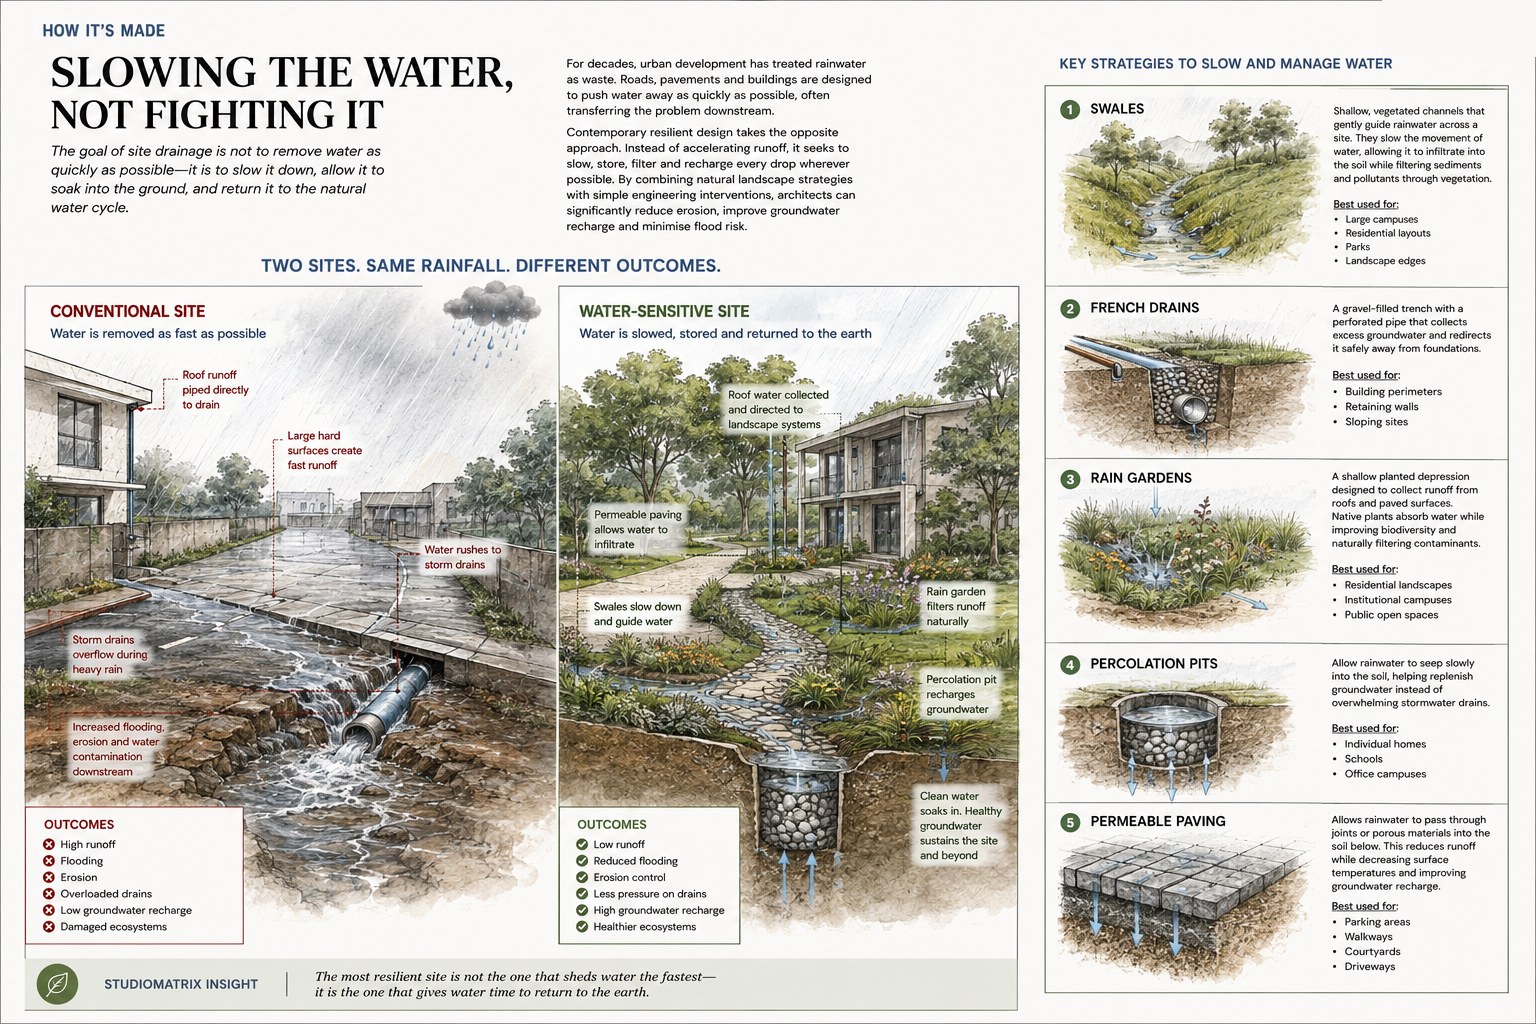
The aim of site drainage is not to be rid of water as fast as possible; it is to slow it, help it soak in, and keep the natural water cycle turning. Cities spent decades treating rain as waste — roads, pavements and buildings all shaped to rush it away, usually onto someone downstream. Resilient design does the opposite: slow, store, filter and recharge wherever it can. A little landscape strategy and some simple engineering together cut erosion, feed groundwater and lower flood risk.
Swales
Shallow, planted channels that guide rainwater across a site. Unlike a concrete drain, a swale slows the flow, lets water infiltrate, and filters sediment and pollutants through its vegetation. Best for large campuses, residential layouts, parks and landscape edges.
French drains
A gravel-filled trench with a perforated pipe that gathers excess groundwater and carries it safely away from foundations. Hidden underground, it is one of the most effective defences against waterlogging. Best for building perimeters, retaining walls and sloping sites.
Rain gardens
A shallow planted depression that briefly holds runoff from roofs and paving. Native plants drink the water, add biodiversity, and filter contaminants before they reach the groundwater. Best for institutional campuses and public open spaces.
Percolation pits
Pits that let rainwater seep slowly into the soil, recharging groundwater instead of overwhelming the storm drains. Simple, cheap and very effective. Best for individual homes, schools and office campuses.
Permeable paving
Unlike solid concrete, permeable paving lets rain pass through its joints or pores into the soil below — cutting runoff, cooling the surface and recharging groundwater. Best for parking areas, walkways, courtyards and driveways.
The most resilient site is not the one that sheds water fastest — it is the one that gives water time to return to the earth.
Every roof is a catchment
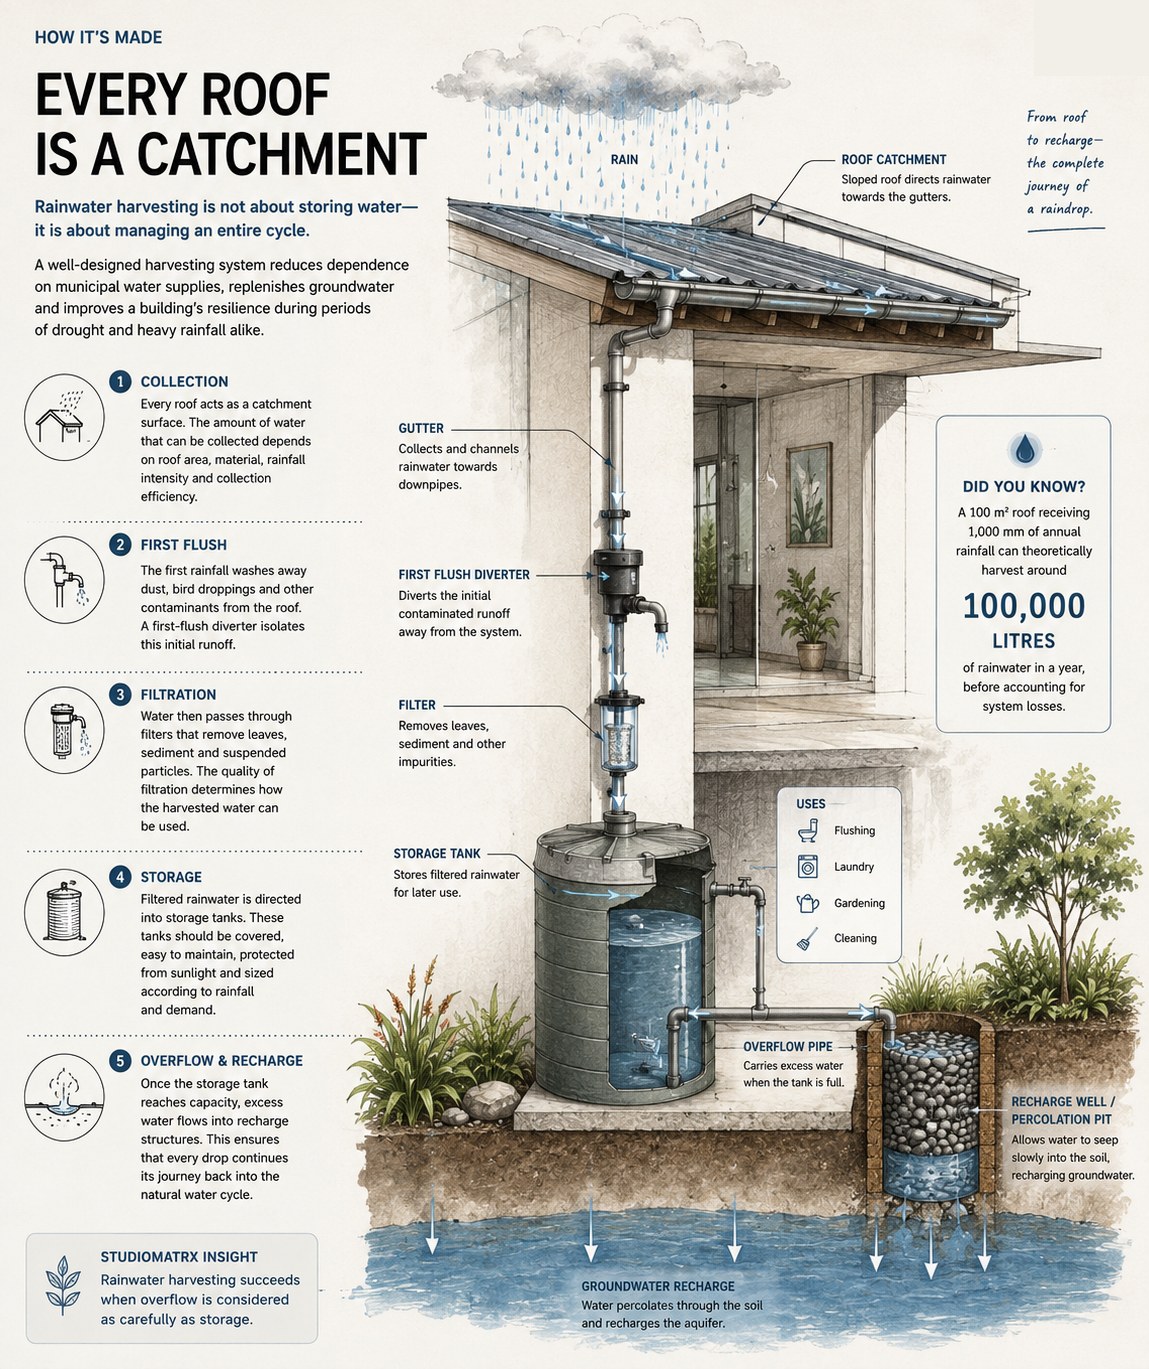
Rainwater harvesting is not a storage tank; it is the whole water cycle, designed. Each part — from the first drop on the roof to storage or recharge — affects the system's efficiency, the water's quality, and how long it lasts. Done well, it cuts reliance on municipal supply, refills the aquifer, and carries a building through both drought and deluge.
Step 1 — Collection
How much a roof yields depends on its area, its material, the intensity of the rain, and how efficiently the water is collected. A large roof can gather thousands of litres from a single storm.
Step 2 — First flush
The first rain carries the roof's dust and droppings; a first-flush diverter sets that aside so only cleaner water enters the system.
Step 3 — Filtration
Before storage, the water is filtered of leaves, sediment and suspended matter. How well it is filtered decides whether it is fit for irrigation, for domestic use, or for recharge.
Step 4 — Storage
Filtered water rests in tanks — covered, easy to maintain, shaded from sunlight, and sized to the rainfall and the demand — so it stays usable long after the rain.
Step 5 — Overflow & recharge
When the tank is full, the surplus should not be wasted. Lead it to recharge wells, percolation pits, recharge trenches or landscape infiltration zones, so every drop returns to the cycle.
Rainwater harvesting is most effective when the overflow is managed as carefully as the storage.
Did you know?
A 100 m² roof under 1,000 mm of annual rainfall can, in theory, collect about 100,000 litres a year before system losses — proof that, designed well, every roof is a water resource.
Five questions before you design a site
Resilient architecture begins long before the first foundation is laid. It begins with asking the right questions.
Every site is different — the rainfall, the soil, the way the land answers a storm. Before you draw a line, five questions are worth sitting with.
1. Where does the water naturally want to go?
Read the site before you change it. Find the slopes, the low ground and the existing drainage paths, and work with them rather than redirecting water for no reason.
2. How much of the site can still absorb rain?
Every paved surface is a surface that no longer soaks. Keep open soil, planting and permeable ground wherever you can.
3. Can rainwater be a resource, not runoff?
Instead of sending it all to the storm drain, look for the chances to store it, irrigate with it, and recharge the ground.
4. What happens in an extreme storm?
Design for the cloudburst, not just the average shower. Plan the overflow routes and emergency drainage from the very start.
5. Will it still work in twenty years?
With the climate shifting, a resilient site has to perform under future conditions, not just today's assumptions.
The takeaways
Design with the landscape — understand the land before siting the building. Slow the water — favour infiltration over rapid discharge. Store what you can — treat every roof as a water resource. Recharge the ground — return the surplus whenever possible. And plan for extremes — design for resilience, not for the average day.
The last word
Architecture is judged on what shows — the façade, the materials, the space. But many of its most important decisions are invisible. A good drainage system is never noticed by the people who use a building; it simply, quietly, protects them, their landscape and their neighbours all year round.
As the climate grows less predictable, designing with water stops being an add-on and becomes a basic responsibility. Understanding where the water goes isn't only a technical task — it is the first step toward buildings and cities that are ready for what's coming.
The best drainage system is the one nobody notices. The best architect is the one who planned for it long before the rain arrived.