
 Lesson 9.2
Lesson 9.2 · Capstone: A Room, End to End
From Concept to Specification
Turning the chosen idea for the Rao family's living-dining into a complete, buildable specification — surface by surface, circuit by circuit, layer by layer — the final assembly of everything this course taught.
A drawing is a wish. A specification is a promise someone else can keep.
Last lesson, the Raos chose their concept — 'a calm, warm island for a busy family' — a floated conversation group, a generous table, and one quiet feature wall that holds the room together. A lovely idea. But an idea cannot be ordered, wired, painted or upholstered. Today you do the real work of an interior designer: you take that single sentence and grow it, patiently, into a document so complete that a carpenter, an electrician, a painter and a tailor could each pick up their part and build exactly what you imagined — without you in the room. This is where every layer of this course finally clicks into place at once.
Sketch your own room from above, then layer four quick transparent overlays on top of it in order: furniture positions, then power points, then surfaces labelled, then the three light layers. Watching the empty plan thicken into a buildable thing — that stack is a specification.
From plan to layout — the concept becomes a position for everything
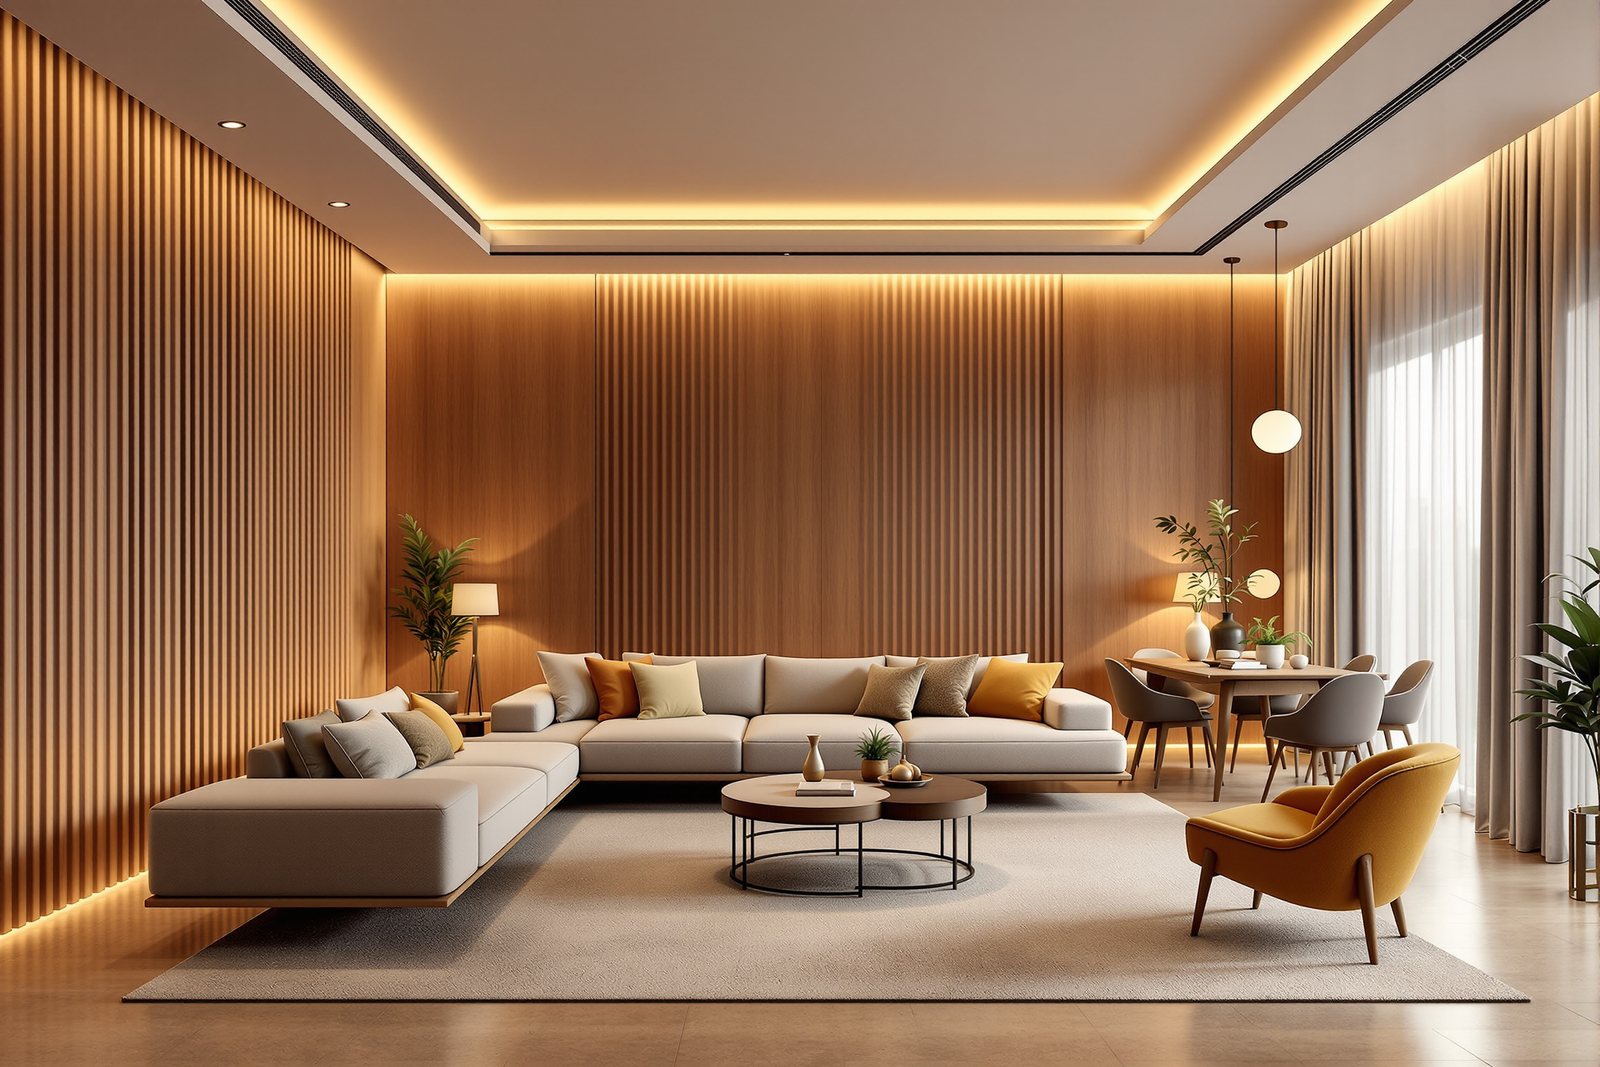
Recall the room: a 3.6 m x 6.9 m living-dining in a Pune apartment, an awkward 300 mm down-stand beam crossing about two-thirds of the way along, and a large west window that floods the room with hot afternoon glare. In Module 1 you learned to read this shell — space, structure and services — before touching it. The beam and the window are not problems to hide; they are the givens your concept must answer.
The concept said float the seating. So you pull the sofa off the wall to face two armchairs across a 1200 mm coffee table, with a 750 mm walkway behind the sofa that becomes the spine of circulation — the family crosses the room without ever cutting through the conversation. The dining table for six sits in the brighter half near the window, with the mandatory 900 mm of pull-out-and-walk clearance on every side you costed in Module 8. The beam falls neatly on the line between the living and dining zones, so instead of fighting it you let it become the threshold — the ceiling change happens exactly there. Notice what just happened: a structural accident became a spatial decision. That is the whole course working at once — M1's reading of the shell, M2's choice to plan rather than improvise, M3's vocabulary of zones and thresholds, all converging on one arrangement before a single thing is bought.
This arranged plan is the skeleton. Everything that follows — wiring, finishes, light, furniture — hangs off these positions. Get the layout wrong and the most beautiful finish schedule in the world specifies a beautiful mistake.
Services and shell — the layer that hides inside the walls
Furniture decides where power must be, so services come second, not last. Walk the arranged plan and ask of every position: what does this need to be plugged in, lit, cooled or escaped from?
Electrical points follow the people. The floated sofa needs a 5A floor or skirting point for a table lamp (no cable trailing across the walkway). The dining zone gets a dedicated switched point at the table's reflected centre for a pendant, plus a 16A point on the dining wall for a future buffet warmer. The study niche Meera uses gets two 6A sockets and a USB point at desk height, 200 mm above the worktop, not at the floor. Group these onto sensible circuits — lighting on one, the AC on its own 20A line — exactly the load-and-circuit thinking from Module 5. The split-AC indoor unit mounts high on the wall the beam runs into, so its draught crosses the living zone, not the diners' necks; its drain routes to the existing balcony outlet, the only plumbing this room touches.
Now the two givens. The beam is boxed into a deliberate bulkhead that carries the cove lighting and the AC pipework — it earns its keep. The west window, your Module 5 problem child, gets a 300 lux daytime answer that does not cook the family: an external-feeling solution isn't available in an apartment, so you specify a dense-weave roller blind plus the curtain layer, and you keep the sofa out of the direct glare path. Throughout, you keep a clear, unobstructed line from any seat to the front door — the quiet escape sense that good rooms have and codes formalise. None of this will ever be seen. All of it must be right before the walls close.
The finish schedule — every surface, judged against four questions
Now the surfaces. For each one you ask the four questions this course returned to again and again: Does it suit the use? Will it last? Can they afford it? Does it serve the concept? Then you write the answer down, because a finish remembered is a finish forgotten — a finish schedule is a written list, surface by surface, of exactly what goes where.
The floor stays continuous across both zones to make the room read as one calm island (the concept), so you specify a 600 x 600 mm matt vitrified tile in a warm greige — durable, child-proof, and cheaper than the timber the family first wished for. The walls are a soft off-white at a high enough light-reflectance to bounce the daylight you fought so hard for, which also keeps the proportions of the long room feeling generous (M3's colour-and-proportion lessons made visible). The ceiling is the same white but the bulkhead over the beam drops 300 mm and turns the structural line into the room's natural seam. And the feature wall — the concept's anchor — is the wall the floated sofa faces: a single fluted-MDF panel in a warm walnut laminate, vertical lines lifting the apparent height, a texture you can touch. One feature wall, chosen with intent, says far more than four busy ones. Each entry below names the material, the finish and the area — the document a painter and a carpenter divide between them without a phone call.
The lighting plan — three layers drawn on the ceiling itself
Light is the layer that makes or breaks the concept of calm and warm, so you draw it deliberately on a reflected-ceiling plan — the room's ceiling drawn as if mirrored on the floor, so every fitting sits exactly where it will hang. From Module 6 you build it in three layers, never one.
Ambient is indirect: a continuous warm cove inside the bulkhead and along one edge, washing the white ceiling so the whole room glows without a single glaring downlight in your eyes. Task is aimed: a pendant centred over the dining table at 750 mm above it for the family's meals and Meera's homework spill-over, plus a focused fitting over the study niche delivering a working 500 lux where the ambient gives a restful 150. Accent is the drama: two narrow-beam spots grazing the fluted feature wall so its vertical texture comes alive after dark — the concept's anchor, lit. Everything runs at 2700K, the warm tone the family read as home, and you specify a minimum CRI 90 so skin and food look true, not grey. Two scenes on the switching: bright for homework, low for evenings.
One more thing the ear notices but the eye forgets — Module 6's acoustics. A hard-tiled, glass-walled room rings. So the lighting plan's partner is a soft one: the rug, the curtains and an upholstered sofa do quiet acoustic work, and you note it on the drawing so nobody 'value-engineers' the softness away.
Furnishings, styling and the handover
The last layer is the one the family actually touches, and it is FF&E — furniture, fixtures and equipment — written down with the same rigour as the wiring. From Module 8: the sofa is specified in a performance weave rated 40000 rubs because a busy family with a child is brutal on upholstery, and a fabric that fails in a year was never affordable. The curtains are specified at 2.5x fullness so they hang in real folds, not flat sheets, filtering the west light into something golden. The rug is sized to sit under the front legs of all the floated seating — it draws the island together and stops the conversation group from drifting apart on the open floor.
Then the styling, the layer beginners reach for first and you have learned to do last: art hung with its centre at 1500 mm, true eye level, on the feature wall; a low vignette on the coffee table in odd-numbered groups; and plants chosen by the light they will actually get — a sun-lover by the bright west window, a tolerant one in the dim corner. You will see whether you have left anything out by running the specification-checklist — it walks every layer of the room, space through styling, and tells you honestly how complete your document is. When it reads complete, you have made the real thing a designer makes: not a pretty picture, but a handover — the document that lets a carpenter, an electrician, a painter and a tailor build your exact intent while you stand back and let them. That is the moment a concept becomes a room.
Hands-on
A specification is complete only when every layer is decided and written down — because the gaps you leave are the decisions a contractor makes for you. Tick them off until the document, not a vibe, is what you hand over.
Three altitudes on the same idea
Read the band that fits you — or all three.
If you only do one thing with this lesson in your own home, make the list. Walk your room and write, surface by surface, what is actually going there — floor, walls, ceiling, the one wall you want to make special — and beside each, the four questions: Does it suit how we live? Will it last? Can we afford it? Does it serve the feeling we want? A written schedule is the single best protection against a contractor's improvisation and your own midnight changes of mind. Hand your tradespeople a document, not a vibe, and you will get the room you meant.
In practice the specification is the deliverable and the protection. Vagueness on a drawing becomes a variation claim and a margin you never see again. Specify by attribute, not just brand — 40000 rubs, CRI 90, 2700K, 600 x 600 mm — so a substitution can be judged on merit and a supplier can quote like-for-like. Tie the finish schedule, the RCP and the FF&E list to a single revision number, and make the handover meeting a walk through the document, layer by layer, with the principal contractor. The room you don't have to revisit on site is the one you specified properly.
This is the lesson where everything you have studied stops being separate subjects. The brief is to take any room you can stand in — your hostel room, your home, a friend's flat — and write the full stack: arranged plan, services notes, finish schedule, reflected-ceiling and lighting plan, and FF&E list. You will discover that you cannot specify the light until you know the furniture, and cannot place the sockets until you know the light. That dependency is design. Do this once properly and you will read every professional drawing set differently for the rest of your career.
“The specification is the boring paperwork you do at the end, after the real creative design is finished.”
Run the method yourself
Take the Rao room or your own, and build the document for real. Do it in this order — the order matters, because each layer depends on the one before it.
- 1Draw the arranged plan: place the seating, the dining for six and the circulation walkway, and mark your zones and the one threshold between them. Check every clearance against the numbers from Module 8.
- 2Mark services on a copy: every socket, switch and light point, the AC position and its draught path, and a clear escape line to the door. Group the points into sensible circuits.
- 3Write the finish schedule as an actual table — floor, walls, ceiling, feature wall — naming material, finish and area, and justify each against the four questions in one line.
- 4Draw the reflected-ceiling plan with all three lighting layers placed — ambient, task, accent — and note colour temperature, CRI and which surfaces do the acoustic softening.
- 5Run the specification-checklist over your document. Wherever it flags a gap — a missing rug size, an unspecified curtain fullness, an art height you never decided — go back and fill it, then run it again until it reads complete.
The whole course, on a single page
There is no next module, and that is the point. You came into this course able to feel when a room was right or wrong without knowing why. You leave it able to say _why_, to _decide_ on purpose, and to _write down_ a decision so completely that other hands can build it. That is the entire toolkit — there isn't a secret tenth module the professionals have that you don't. What they have is years of looking, deciding and refining, and you now have the same instrument they use. So go and use it. Re-light the room you are sitting in. Float the sofa in your parents' hall and watch the conversation change. Make one wall special and leave the others calm. Specify, build, look hard at the result, and refine. Design was never a course to finish; it is a way of seeing that you will practise for the rest of your life. You are not a student of the shape of space anymore. You are a maker of it. Welcome — and go design real rooms.