
Model-Making for Architecture Students
The 2026 Working Reference for B.Arch Studios in India — Five Model Types, Scale-to-Material Map, Tool Kit, Indian Material Sources, Workshop Discipline (Including Laser-Cutter and 3D-Printer Access), Lighting and Photography for Jury Showings, Storage & Transport, Five-Year Skill Build, and Common Failure Modes
Physical model-making remains, in 2026, the most consequential single discipline of the Indian B.Arch studio. Despite a decade of increasingly capable digital rendering, generative-AI visualisation, and BIM-coordinated 3D modelling, physical models continue to dominate the studio jury — both as the most-photographed artefact at final reviews and as the thinking instrument through which design decisions get tested. The architect who has made fifty models across five years carries a different intuition about volume, proportion, and tectonic logic than the architect who has only modelled in software. The studio jury reads this difference within a single review.
This guide is the working reference for the model-making discipline. It is the physical-craft counterpart to the Architectural Drawing & Representation Fundamentals guide and the Software Stack — A Working Learning Path guide. The orientation throughout is towards Indian B.Arch and B.Des students in studio settings — the cost-of-materials assumptions are India-specific, the workshop access patterns reflect Indian institutions, and the supplier ecosystem references Indian model-making material sources.
The treatment is structured around four clusters. The map cluster (sections 1-3) covers why physical models still matter, the five model types every B.Arch student must master, and the scale-to-material mapping. The production cluster (sections 4-7) covers the tool kit, Indian material sources, hand-cutting versus laser-cutting decisions, and 3D-printer integration. The presentation cluster (sections 8-10) covers scale figures and entourage, lighting and photography, and storage and transport. The discipline cluster (sections 11-13) covers the five-year skill build, the cost map, and common failure modes.
"The architect who builds models thinks in volumes. The architect who only renders thinks in screens. Both are useful, but the first is harder to learn after college and is what college is for." — Faculty paraphrase, Indian B.Arch studio
1. Why Physical Models Still Matter in 2026
The student in 2026 has access to ChatGPT-grade generative AI rendering, photoreal V-Ray output in minutes, and BIM coordination software that produces dimensioned drawings near-automatically. Why, then, does the discipline of cutting foamboard with a steel rule and X-acto knife remain mandatory?
The answer is in five claims, each empirically supported in studio research:
- Models are thinking instruments, not just communication artefacts. The act of building a physical model forces volumetric decisions in a way that screen-based modelling does not. Decisions about wall thickness, floor depth, opening size, and material weight become tactile during construction — a forcing function for the design.
- Physical models reveal proportion errors that screen-based work hides. A render's scale is set by the camera; a model's scale is set by reality. Students often discover, on building a 1:100 model, that the "cosy living room" of the plan is in fact 12 metres long — uncomfortably large in physical reality.
- The studio jury responds differently to a physical artefact. A 1:50 model on the jury table commands a different conversational quality than a sequence of A1 boards on a wall. Jurors walk around it, photograph it from multiple angles, and discuss it at the level of experience rather than image.
- Material choice and tectonic logic emerge in physical making. A student who has never laid mountboard against basswood does not understand the visual difference between a heavy-and-light wall pairing in real construction. The instinct that "this should be brick, that should be steel" comes partly from having handled the materials at scale.
- Models compound into a portfolio asset across five years. A graduate with a photographic record of forty-plus models built across B.Arch carries portfolio evidence that a graduate with only software work cannot match.
The candidate who treats physical model-making as optional in 2026 is the candidate whose B.Arch graduation portfolio is, in this important respect, thinner than their cohort.
1.1 What Models Cannot Replace
Models do not replace plans, sections, or detail drawings. They are complementary. The discipline is to know which question each instrument answers:
| Question | Answered best by |
|---|---|
| What is the volumetric idea? | Model |
| What is the spatial organisation? | Plan |
| What is the vertical relationship? | Section |
| What is the façade reading? | Elevation |
| What is the experiential atmosphere? | Render or model + lighting |
| How does it build? | Detail drawing + 1:10 mock-up |
| How does it sit in context? | 1:200 site model |
The most sophisticated studio outputs use all of these instruments together. Models are not the only instrument; they are an indispensable one.
2. The Five Model Types Every B.Arch Student Must Master
Models are not a single category. The discipline of B.Arch model-making divides into five types, each answering a different design question.

2.1 Massing / Concept Models — Built Fast, Iterated
Built in Weeks 1-3 of a project. Material: foamboard 5mm or greyboard, single-tone. Scale: typically 1:200 or 1:500. Detail: pure form, no openings, no surface treatment. Time: 6-12 hours each.
The discipline is to build many — at least 3-5 massing variants per project. Each is photographed from 4 angles before being scrapped or stored. The goal is exploration of volumetric alternatives; falling in love with the first model is the most common Year-1 / Year-2 mistake.
2.2 Working / Development Models — The Re-Cut Iteration
Built in Weeks 4-9. Material: foamboard or mountboard, removable / re-buildable. Scale: typically 1:100. Detail: plan-correct walls and openings; refinable as design changes. Time: 15-40 hours.
The working model is not finished until the design is locked at Week 9. Students who finish the surfaces and add craft elements before the design is settled waste hours when the design changes. The working model's purpose is design verification, not aesthetic display.
2.3 Presentation / Final Models — The Jury Object
Built in Weeks 10-13 (final two weeks of a typical 13-week studio cycle). Material: mountboard + basswood + acrylic + select veneers and composites. Scale: typically 1:50 or 1:100. Detail: material distinction, careful craft. Time: 40-150 hours.
The presentation model is the photographed object of the project. Many students will see this model again, in their portfolio, for the next 20 years. It deserves the time it takes.
2.4 Sectional / Cutaway Models — Reveal the Interior
Built in Weeks 8-13. Material: mountboard + basswood. Cut to reveal interior; sometimes with removable lids. Scale: 1:50 to 1:100. Time: 30-100 hours.
The sectional model reveals what plans cannot — the spatial flow of interiors, the relationship between programmatic blocks, the section qualities. It is most powerful when paired with a presentation model — the jury can move from massing reading to interior experience without leaving the table.
2.5 Detail / Joinery Models — Tectonic Depth
Built in Years 4-5. Material: real-spec materials at near-real scale. Scale: 1:20, 1:10, sometimes 1:5 or 1:1. Time: 20-80 hours.
The detail model addresses the how does it build question. Constructing a 1:10 wall section with real wood, brick fragments, and metal flashings reveals the tectonic logic of an envelope choice. This model type belongs primarily to thesis and major project work; Year-1 and Year-2 students should not yet attempt.
3. The Scale-to-Material Map
The single most consequential operational decision in model-making is the scale at which to work. Scale determines material, which determines tools, time, and outcome. Students who choose the wrong scale waste days; students who choose the right scale produce more communicative work in less time.

The general rule:
- Larger scale (1:1000-1:200) for site context, urban scale, volumetric massing — single-tone surfaces, pure form
- Medium scale (1:100) for whole-building massing with basic openings — foamboard + mountboard
- Detailed medium scale (1:50) for full-building presentation — mountboard + basswood + acrylic
- Detail scale (1:20-1:10) for joinery and detail studies — real-material samples
- Mock-up scale (1:5-1:1) for component mock-ups — real building materials
The discipline rule: never make a model at the wrong scale for the question. A 1:50 model when the brief is urban context wastes time; a 1:200 model when the question is façade detail does not communicate.
When in doubt, build smaller and earlier. A 1:200 study model in Week 2 reveals problems faster than a 1:50 final model produced in Week 11.
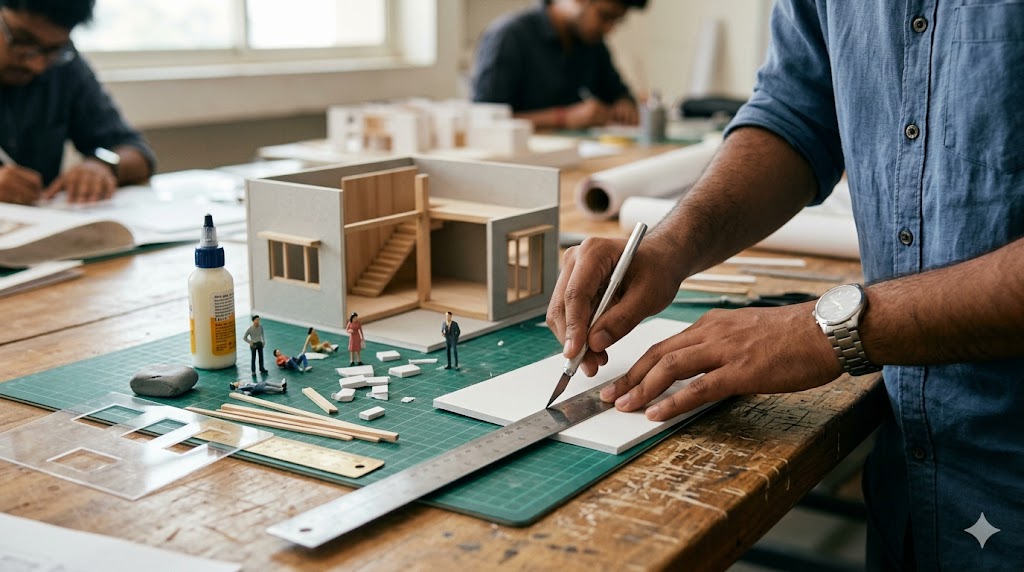
4. The Tool Kit
The model-making tool kit is one-time investment that pays back across the entire B.Arch programme. The candidate setting up a kit at the start of Year 1 should expect to spend ₹4,000-6,000 on a complete starter kit and another ₹2,000-3,000 in upgrades by Year 3.
4.1 The Cutting Tools
| Tool | Specification | Indian price (2026) | Notes |
|---|---|---|---|
| X-Acto knife (or equivalent) | #11 standard blade; aluminium body | ₹250-500 | Buy two — one for clean cuts, one for rough |
| Spare blades | 100-pack of #11 blades | ₹400-700 | Replace blades frequently; dull blades tear, sharp blades cut clean |
| Steel rule | 30 cm + 60 cm steel-edged | ₹300-500 | Never use plastic rules — they are not safe to cut against |
| Cutting mat | A2 or A1, self-healing | ₹600-1,500 | An investment; protects table, blade, and your time |
| Set-square | 30/60 + 45/45 | ₹150-300 | For perpendicular and 45° cuts |
| Compass cutter | Optional | ₹400-800 | For circular cuts |
| Mitre box | Optional but useful | ₹400-600 | For consistent 45° cuts in basswood/wood |
| Sandpaper | Mixed grit pack 80-220 | ₹100-200 | For finishing edges |
| Sharpener (knife) | Small whetstone | ₹200-400 | Sharpening blade extends life 5x |
4.2 The Adhesives
| Adhesive | Use | Indian price (2026) | Notes |
|---|---|---|---|
| PVA (Fevicol equivalent) | General foamboard, mountboard, basswood | ₹100-300 (large bottle) | The workhorse; dries clear; reversible if applied lightly |
| Cyanoacrylate (Super Glue) | Quick bonds, basswood-to-basswood, plastic | ₹50-150 (small) | Brittle when set; permanent |
| Spray adhesive (3M Super 77 equivalent) | Sheet-to-sheet bonds, mountboard surfaces | ₹400-700 | Use in ventilated space only |
| Glue gun + sticks | Quick non-precision bonds | ₹400-700 (gun) + ₹150 (sticks) | Avoid for final models — visible glue lines |
| Double-sided tape | Quick prototyping | ₹150-300 | Reversible for working models |
| Masking tape | Masking, holding pieces during PVA cure | ₹50-100 | Always use low-tack on mountboard |
4.3 The Measuring & Marking Tools
| Tool | Indian price |
|---|---|
| Pencil set (HB, 2B) | ₹50-100 |
| Eraser | ₹30-50 |
| Calipers (digital, optional) | ₹400-1,000 |
| Measuring tape (5m) | ₹100-200 |
| Triangular scale rule | ₹150-300 |
4.4 The Workshop Safety Kit
| Item | Indian price |
|---|---|
| Cut-resistant gloves | ₹200-400 |
| Safety glasses | ₹150-300 |
| First-aid kit (basic) | ₹200-300 |
| Dust mask (for sanding/cutting MDF) | ₹100-300 |
X-Acto knife cuts to fingers are the most common B.Arch injury. The discipline: cut away from your body, never towards. Replace the blade when it pulls instead of cutting cleanly. Wear gloves on the non-cutting hand for extended sessions.
5. Indian Material Sources
Material sourcing is one of the operational disciplines that varies by city. The candidate at SPA Delhi has access to a different supplier ecosystem than the candidate at NIT Calicut. The framework below covers the dominant Indian material sources.
5.1 The Material Families
| Material | What it is | Where used | Indian price (2026) |
|---|---|---|---|
| Foamboard 5mm (Kappa, Cellboard) | Foam core sandwiched between paper | Massing, working models | ₹250-450 per A2 sheet |
| Foamboard 3mm | Same construction, thinner | Detailed working models | ₹200-350 per A2 |
| Mountboard (1.4mm) | Dense card, durable | Presentation models | ₹120-250 per A2 |
| Greyboard (2-3mm) | Compressed grey board | Site context, base boards | ₹80-200 per A2 |
| Museum board (acid-free) | High-quality archival card | Premium presentation | ₹400-800 per A2 |
| Basswood (1mm, 2mm, 3mm sticks) | Soft hardwood for structure | Beams, columns, frames | ₹400-1,500 per pack |
| Balsa wood (2-5mm) | Lightest workable wood | Quick prototypes, light structure | ₹300-700 per pack |
| Acrylic (2-3mm clear) | Transparent plastic | Glass, water, glazing | ₹400-800 per A2 |
| MDF (3mm, 6mm) | Engineered wood | Site terrain, base, robust models | ₹200-400 per A2 |
| Wood veneer (paper-back) | Thin wood facing | Surface treatment | ₹400-800 per A2 |
| Plaster of Paris | Casting medium | Terrain, complex curved forms | ₹40-80 per kg |
| Modeling clay (Fimo, Sculpey) | Plastic-modelling clay | Sculptural detail, mock-ups | ₹500-1,200 per pack |
| Greybard chipboard | Recycled board | Quick test models | ₹50-150 per A2 |
5.2 City-Specific Suppliers
| City | Notable suppliers |
|---|---|
| Delhi | Modelmaker stores in Khan Market, Connaught Place; Hindustan Stationery; Khanna Stores |
| Mumbai | Borivali model-makers (Kumar Galaxy etc.); Lower Parel art-supply shops |
| Bengaluru | Brigade Road art-supply ecosystem; Camlin Showroom; Stationery Plus |
| Chennai | T. Nagar art-supply shops; Stationery World |
| Pune | FC Road art shops; Modelmaker stores in Camp |
| Ahmedabad | C.G. Road art-supply ecosystem; CEPT campus shop (CEPT students) |
| Kolkata | Free School Street art supplies; Sumeru |
The candidate's discipline at the start of Year 1 is to identify their local supplier ecosystem — a 30-minute Saturday walk through the local art-supply district, asking what's available, at what price, and what's substitutable. Many materials are cheaper or out of stock at Indian suppliers compared to international references; the substitution map is local knowledge.
5.3 Online Sources
| Platform | Strength | Limitation |
|---|---|---|
| Modelmaker (modelmaker.in) | Wide range; India-focused | Higher prices; longer delivery |
| Amazon India | Convenient; broad catalogue | Variable quality |
| Flipkart | Same as Amazon | Same |
| Itsy Bitsy | Craft-supply ecosystem | Limited architectural-scale stock |
| Hobby Ideas (Asian Paints brand) | Foamboard, basics | Limited specialised stock |
For specialty materials — basswood at specific dimensions, acrylic in standard sheets, or model-railway-grade scenic materials — direct local sourcing is usually faster and cheaper than online ordering.
6. Hand Cutting vs Laser Cutting
The candidate at an institution with workshop laser-cutter access faces a choice that the candidate without does not: when to hand-cut and when to laser-cut. The decision is meaningful — laser-cutting saves hours but eliminates the tactile design feedback of hand-cutting.
6.1 When to Laser Cut
| Scenario | Reason |
|---|---|
| Large repetitive curtain-wall mullion patterns at 1:100 | Hand-cutting 200 identical pieces is mechanical, not design |
| Complex curved geometry (circular openings, parametric forms) | Hand-cutting precision is poor at curves |
| Final presentation model components after design is locked | Time-saving |
| Components requiring tight fit tolerances | Laser kerf is consistent, hand-cut is not |
| Acrylic / specific veneer panels | Hand-cutting often damages these materials |
6.2 When to Hand Cut
| Scenario | Reason |
|---|---|
| Massing models in Weeks 1-3 | Hand-cutting forces design decisions; laser-cutting from a software file pre-assumes the design is settled |
| Working models | Re-cutting is design iteration; laser-cutting requires re-sending the file each time |
| Detail and tectonic-feel work | Hand-cutting reveals material qualities laser-cutting hides |
| Year-1 / Year-2 skill building | Hand-cutting builds the eye and hand; over-reliance on laser early loses this |
| Quick prototypes or studies | Lower setup cost than laser |
6.3 Workshop Discipline
If your institution has a model workshop with laser-cutter and 3D-printer access:
- Book early. Workshop schedules fill rapidly in Weeks 11-13 (jury weeks). Book your laser-cut runs 7-10 days before the jury, not 36 hours.
- Test before committing. A 5-minute test cut on scrap reveals issues that a 90-minute large run reveals catastrophically.
- Prepare clean files. Workshop staff cannot debug your AutoCAD layer-confusion; submit ready-to-cut DXF or AI files.
- Respect material limits. Each laser has thickness limits (typically 5-6mm for stock CO2 lasers; 12-15mm for higher-power industrial lasers). Confirm with workshop before cutting.
- Do not laser-cut what hand-cutting would teach you. A Year-2 student who never hand-cuts has wasted their Year-2.
7. 3D Printing for Architecture Models
3D printing has become standard at most major Indian architecture schools by 2026. The student should understand its uses and limitations.
7.1 What 3D Printing Is Good For
- Complex geometry that hand-fabrication cannot achieve — curved roofs, parametric forms, intricate organic shapes
- Precise topographic terrain — direct from CAD elevation data
- Repetitive small components — thirty identical chairs, two hundred identical pavers
- Components requiring tight tolerances — interlocking parts that snap together
7.2 What 3D Printing Is Not Good For
- Large flat surfaces — wasted print time vs sheet material
- Time-critical components — typical FDM print of a moderate component is 2-8 hours
- Material-rich surfaces — printed PLA does not look like brick or wood
- Models where craft is part of the message — a fully printed model often reads as digital, not designed
7.3 Workflow
| Stage | Tool / process |
|---|---|
| 3D model | Rhino / SketchUp / Revit / Fusion 360 |
| Mesh repair | Meshmixer or netfabb (often free for students) |
| Slicer | Cura, PrusaSlicer (most schools standardise on one) |
| Material | PLA (most common), PETG, ABS — confirm with workshop |
| Print time | 1 hour to 24+ hours per component |
| Post-processing | Sanding, priming, painting where needed |
The discipline: do not print what should be cut. The strongest models combine hand-cut planar surfaces with selectively-printed complex components.
8. Scale Figures, Entourage, and Atmosphere
A model without scale figures is a model without scale. The discipline of populating the model with people, vegetation, vehicles, and small environmental detail is what separates the documentary model from the experiential model.
8.1 Scale Figures
| Scale | Figure approach | Source |
|---|---|---|
| 1:1000-1:500 | Generic dots representing crowds | Hand-cut card discs, ~5mm |
| 1:200 | Stylised silhouettes | Laser-cut card or printed figures |
| 1:100 | Simple silhouettes, walking poses | Architectural-scale figure packs (Preiser, Faller — German model railway brands) |
| 1:50 | Detailed silhouettes, multiple poses | Same suppliers; Indian-context custom-printing also possible |
| 1:20-1:10 | Realistic human-scale references | 3D-printed or hand-sculpted |
A 1:100 model with 8-12 well-placed scale figures reads as inhabited; the same model without figures reads as abstract massing.
8.2 Vegetation
| Scale | Approach |
|---|---|
| 1:500-1:200 | Lichen patches; sponge clumps; wire-and-foam approximations |
| 1:100 | Architectural-scale tree models (Preiser, Noch); custom-made wire trees |
| 1:50 | Detailed individual trees; foliage texture |
Indian-context vegetation matters: a model showing a Bengaluru courtyard with a clearly-Indian banyan tree reads more truthfully than the same model with generic European trees.
8.3 Vehicles, Furniture, and Small Detail
For 1:100 to 1:50 models, scale-correct cars (Preiser HO scale, ~1:87, often used as 1:100 approximation), motorcycles, and bicycles add scale and contextual reading. At 1:50, simple furniture indicates room programme.
The discipline rule: less is more. A model populated with ten well-chosen elements reads better than a model populated with fifty cluttered ones.
9. Lighting and Photography for Jury Showings
The model the jury sees is photographed, posted to social media, and lives in your portfolio for years. Documenting it well multiplies its value.
9.1 Lighting Setup
| Element | Setup |
|---|---|
| Primary light source | Single directional warm-white (3000K) LED at 45° to model |
| Fill light | Diffused secondary at 90° opposite, lower intensity, cooler tone (4000K) |
| Backlight (where appropriate) | Behind model for atmospheric haze effect |
| Background | White seamless paper or grey neutral; avoid cluttered studio backgrounds |
Models photographed at the studio on a phone with overhead fluorescents look flat. Models photographed with controlled directional lighting and a clean background look like portfolio assets.
9.2 Photography Discipline
- Multiple angles. Shoot from at least 6-8 angles: aerial, eye-level corners, low-angle dramatic, frontal axial.
- High-resolution, RAW. Phone HEIC or DSLR RAW; do not throw away resolution at capture.
- Model alone, then with context. Photograph the model on neutral background first; then with people for scale.
- Detail shots. Close-ups of joinery, façade details, sectional moments — these are often the most-shared images.
- Rotating turntable (optional) for dynamic video documentation.
A two-hour photo session at the end of a 100-hour model build is essential; cutting the photo session short to "save time" wastes the model's communicative value.
9.3 Post-Processing
Adobe Lightroom or equivalent: adjust exposure, lift shadows, control highlights. Avoid over-saturation or heavy colour-grading; the model should read as itself.
10. Storage and Transport
Models accumulate. By Year 5, a B.Arch student typically has 20-50 models occupying significant studio and home storage. The discipline of storage and transport matters.
10.1 Storage Principles
- Photograph everything before scrapping. A photographed model occupies digital space; an un-photographed model that gets damaged is lost forever.
- Box major presentation models. A custom cardboard box per major model extends life from months to years.
- Climate considerations. Indian humidity damages mountboard and basswood. Where possible, store in a dry room; consider silica-gel sachets in storage boxes.
- Hierarchy of preservation. Final presentation models from each year are worth keeping; massing iterations can be photographed and scrapped.
10.2 Transport
Moving a 1:50 presentation model from home to studio jury without damage requires planning. The principle: protect during transport, even if it adds weight. A foam-filled box twice the model's volume protects against the inevitable bumps.
For thesis or major-project models: assume 2-3 transport events (studio jury, school exhibition, photo session, possible competition or display) and plan box durability accordingly.
11. The Five-Year Skill Build
The B.Arch model-making discipline builds over five years. Each year adds a new layer of fluency.
11.1 Year 1 — Hand Skill, Single-Tone Models
- Build at least 12 single-tone foamboard or greyboard models
- Master the X-Acto + steel rule + cutting mat technique
- Achieve clean perpendicular cuts on 5mm foamboard
- Photograph every model before scrapping
11.2 Year 2 — Multi-Material, Working Models
- Move to mountboard + basswood combinations
- Build at least 10 working models that are re-cut as design evolves
- Begin photographing models with controlled lighting
11.3 Year 3 — Presentation Quality, Detail Awareness
- Master the presentation model (mountboard + basswood + acrylic + selective veneer)
- Begin scale-figure and entourage discipline
- First 1:50 model
- First sectional model
11.4 Year 4 — Detail and Tectonic Models
- 1:20 / 1:10 detail mock-up of a critical envelope or joinery
- Engagement with workshop (laser-cutter + 3D-printer where available)
- Material-honest models that distinguish brick, wood, metal at the level of jury reading
11.5 Year 5 — Thesis-Quality Output
- The thesis presentation model — typically 2-3 weeks of dedicated build
- Full lighting + photography + portfolio integration
- 2-3 detail mock-ups demonstrating thesis tectonic logic
- Output: portfolio-ready images that will represent the thesis for the next 20 years
12. The Cost Map
Model-making is a meaningful annual cost across B.Arch — typically ₹25,000-50,000 across the five years, with Year 4 and Year 5 dominant.
| Year | Models built | Material spend | Tool/upgrade |
|---|---|---|---|
| Year 1 | 12-15 small single-tone | ₹3,000-5,000 | ₹4,000 starter kit |
| Year 2 | 10 multi-material working | ₹5,000-8,000 | ₹1,000 upgrades |
| Year 3 | 6-8 working + 2-3 presentation | ₹8,000-12,000 | ₹1,500 upgrades |
| Year 4 | 5-6 working + presentation + 1-2 detail | ₹10,000-18,000 | ₹2,000 (specialty tools) |
| Year 5 | Thesis presentation + 2-3 details | ₹12,000-25,000 | ₹2,000 (high-end materials) |
| Total 5-year spend | 35-50 models | ₹38,000-68,000 | ₹10,500 |
The cost is real but spread over five years. The candidate planning their B.Arch budget should allocate roughly 4-6% of the total programme cost (tuition + hostel + everything) to model-making — the highest single discretionary studio cost line.
13. Common Failure Modes
- Building only the presentation model in Week 12-13. Skipping massing and working models means the design has not been physically tested. The presentation model becomes a beautiful object that does not reveal whether the design works.
- Wrong scale for the question. A 1:50 model when the brief is urban context wastes 80 hours that should have been spent at 1:200.
- Cluttered material palette. Models that combine 7+ materials tend to read as "design indecision". The strongest models use 2-4 materials with clear visual hierarchy.
- No scale figures. A model without people reads as abstract, not architectural.
- Last-minute laser-cutter run. Booking the workshop laser 18 hours before jury produces stress, errors, and missed deadlines.
- No photography. A perfect model that is never photographed is a portfolio asset lost.
- No storage discipline. Models damaged in transport or storage cannot be re-photographed. Plan box and photo before transport.
- Glue-line visibility. Heavy PVA at joints, hot-glue lumps, masking-tape residue — all visible in the jury and in photographs. Discipline: thin glue lines, no excess, clean joinery.
- Skipping the detail mock-up in Year 4-5. The detail model is the tectonic-thinking instrument that distinguishes thesis-grade work. Students who skip it produce thesis projects whose construction logic is generic.
- Over-investing time. Spending 250 hours on a working model in Week 6 means there are no hours for the presentation model in Week 12. Budget time across the whole project, not against the most-recent design impulse.
14. Twelve-Test Self-Diagnostic
1. Knife discipline. Have I replaced my X-Acto blade in the last week of model-making?
2. Steel rule discipline. Do I always cut against a steel-edged rule?
3. Massing discipline. Have I built at least 3 massing variants in the first 3 weeks of my current studio project?
4. Working model discipline. Have I re-cut my working model at least 3 times as the design has evolved?
5. Photography discipline. Have I photographed every model before scrapping?
6. Material palette. Is my current model using 2-4 distinct materials with clear hierarchy?
7. Scale figures. Does my current 1:100+ model have appropriate scale figures?
8. Workshop awareness. Do I know my institution's laser-cutter / 3D-printer access process and lead times?
9. Cost tracking. Do I have a rough sense of my model-making annual spend?
10. Storage discipline. Are my Year-1 models photographed and either stored properly or scrapped?
11. Material sourcing. Do I know my local art-supply ecosystem and approximate prices?
12. Documentation. Do I have a digital folder per project with model photographs across stages?
Year-3+ students scoring 9+ are well-positioned. Students scoring below 7 should review the model-making discipline against current studio requirements.
15. References and Further Reading
Architecture Model-Making References
- Knoll, W., Hechinger, M. (2007). Architectural Models: Construction Techniques. Birkhäuser. — Foundational reference text.
- Christenson, M. (2011). Lines and Planes: An Introduction to Architectural Design Drawing and Model Making. Princeton Architectural Press.
- Dunn, N. (2014). Architectural Modelmaking. Laurence King. — Contemporary technique reference.
- Mills, C. B. (2011). Designing with Models: A Studio Guide to Architectural Process Models. Wiley. — Process-orientation focused.
Workshop and Fabrication References
- Iwamoto, L. (2009). Digital Fabrications: Architectural and Material Techniques. Princeton Architectural Press.
- Various — RIBA, AA, Bartlett model archives — published student work showing model-discipline at the highest level.
Indian Practitioner-Side References
- Studio Mumbai (Bijoy Jain). Studio Mumbai's process is heavily model-led; publications and Instagram archives illustrate the model-as-thinking approach.
- CEPT University Annual Showcases. Student model archives at CEPT illustrate the Indian B.Arch model-making standard.
- NID Open House Archives. B.Des Interior model showcases.
- Sir J J College, SPA Delhi annual exhibitions — accessible institutional model archives.
Materials References
- Indian Standards (BIS): IS 1141 (timber), IS 12406 (MDF), IS 2046 (HPL — applicable to architectural finishes).
- Modelmaker.in, Hobby Ideas catalogues — Indian-specific material-supplier references.
Companion Studio Matrx Guides
- Architectural Drawing & Representation Fundamentals — Module 1; the drawing discipline that pairs with model-making.
- Studio Jury Survival — the model is presented in jury; that guide covers the presentation discipline.
- Building Your Architecture Portfolio — model photographs become portfolio assets.
- The Software Stack — A Working Learning Path — Rhino / SketchUp / Revit feed the laser-cutter and 3D-printer files.
- Architecture Competitions — competition entries often require physical or rendered model output.
Author's Note: The model-making discipline is the single most consequential physical-craft layer of the B.Arch programme. Models force volumetric thinking that screens cannot replicate; they reveal proportion errors that renderings hide; they command the studio jury's attention in a way A1 boards cannot. The candidate who treats the X-Acto and steel rule as foundational — who builds twelve models in Year 1, ten in Year 2, and progresses through scale and detail across five years — graduates with an instrument that an entirely-screen-based education does not produce. Buy the kit in Week 1 of Year 1. Photograph every model. Build first, render later. The hands learn what the screen cannot teach.
Disclaimer: Material prices, supplier availability, and workshop policies vary by city and institution; verify current information at your local supplier and institution. Tool safety practices must be followed at all times — X-Acto knife injuries are common and preventable. This guide is for informational and educational purposes only; Studio Matrx, its authors, and contributors accept no liability for outcomes based on it.
Export this guide
Related Guides — Deep-dive reading
Case-Study Analysis — How to Read an Architectural Project
Module 7 of the Student Foundations Track — Selecting Case Studies that Match Your Design Problem, Five-Layer Analysis Framework (Site, Programme, Form, Material, Detail), Data Collection Methods, How to Apply Findings to Your Own Studio Project, the Citation Discipline, and a Twelve-Test Pre-Submission Diagnostic for Indian B.Arch Students
Student FoundationsThe Trade-Offs Every Homeowner Has to Make
No one gets everything — every home is a stack of compromises. This is about the sacrifices: the cost-quality-time triangle, the recurring homeowner trades, and how to make your cuts on purpose instead of having them forced by a blown budget.
Planning Your ProjectArchitectural & Interior Photography & Documentation: A Professional's Field Guide
Camera, light, angle and technique for built work that publishes and wins — plus documentation, drone rules, post-processing and the India rights you must get in writing.
Design EducationRelated Tools — Try Free
Circadian Light Meter
Patient-centric circadian lighting visualizer for Indian healthcare design — time-of-day × intensity → CCT, melanopic lux (EML / mEDI), melatonin suppression, and an alertness curve. Calibrated against WELL v2 L03 Circadian Lighting Design, CIE S 026:2018, Brainard 2001, and Lucas et al. 2014.
Circadian ToolMaterial Decision Framework (M-Score)
Score 30+ Indian construction materials across cost, durability, climate fit, maintenance, and sustainability.
MaterialsHome Building & Interior Cost Calculator — 20 Cities
Construction + interior costs for 20 Indian cities across kitchen, wardrobes, flooring, painting, ceiling.
Cost Calculator